The store will not work correctly in the case when cookies are disabled.
This website requires cookies to provide all of its features. For more information on what data is contained in the cookies, please see our Privacy Policy page. To accept cookies from this site, please click the Allow button below.
We use cookies to make your experience better.Learn more.
Following up on our pieces about building a woofer, we thought we'd tell you a little bit about designing and building an Axiom Tweeter. Axiom Founder and President shows you how our current tweeters are built and some design features exclusive to Axiom Audio.
Ian Colquhoun: Today I thought we'd talk about tweeter manufacturing and driver manufacturing. It was really brought about by a post on our forums by regular Socketman, who asked if we build our own drivers, particularly the tweeter, and where we made the tweeter. So I thought I'd clarify that a bit.
It prompted a talk between Andrew [Welker, Axiom Engineer], about doing a whole video on not just the tweeter and where and how it's made, but actually into the whole tweeter design. We ended up deciding we'd save that for a completely separate video, later in the fall. For now I'll just keep to the manufacturing itself.
There was a really big change in the manufacturing of drivers for Axiom in 2008. Prior to that we had the component parts made to order (so they were our designs, but not made at our factory). Some of them were made at our factory in Canada, and the rest were purchased on an OEM basis in China. Frankly, we were never really 100% happy with that. In fact, starting well before that in 2004, I started the process of forming a WOFE, a Wholly Owned Foreign Enterprise in China. It's a company that is 100% owned by our Canadian company. The idea was that we would set up and manufacture our own drivers in our own factory and to our own standards. It's called Axiom Audio Shanghai.
It took until 2006 to start manufacturing there and until 2008 to start producing our tweeters in our own factory ourselves. What follows is some still shots that I took earlier this year explaining the manufacturing.
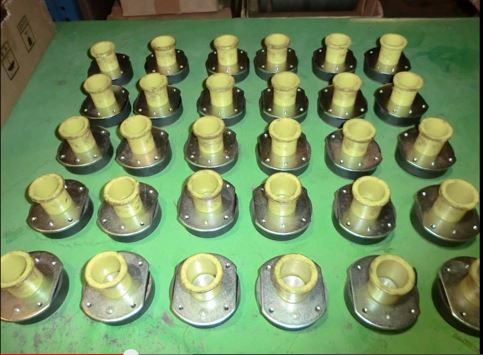
The first shot shows a view to Motor Assembly.
Tweeter Motor Assembly
This is the T-yoke magnet and top-plate getting glued together. The yellow piece is a jig that holds it while the glue dries.
Voice Coil
The next shot is of a tweeter voice coil. The thing that's so interesting about this is that you'll notice that the actual voice coil lead is terminated right at the voice coil and a tinsel lead is soldered on at that point. This is very important for the longevity of a tweeter. It's quite common to just take the voice coil wire and extend it out across the terminal plate and solder it to the wire lug, but this is really fraught with problems and is probably going to fail over time. So we go to the expense of soldering on a tinsel lead so those lead wires don't break over time.
In the next shot, this is a jig that shows you how the voice coil is centered onto the t-yoke and top-plate assembly. I think what's unique about this since we took over our own manufacturing, is we were able to make our own jigs (we tooled them at a local machine shop here in Canada with a very very expensive CNC lathe) and we were able to make these jigs to extremely tight tolerances so that we could get the voice coil at exactly the same spot in every tweeter. Even beyond that, we make the tweeters in sets, so once that voice coil has been jigged in that top-plate and t-yoke, it stays with that top-plate and t-yoke until it's completed and tested and sent to Canada.
It's little details like this we were never able to achieve when we were buying products on an OEM basis. A typical OEM driver manufacturer really wants to produce thousands and thousands of parts down an assembly line, and they're not really willing to start working on what they may think is a 'ridiculous' quality level. But it was important to us and we wanted to take that extra step, because really in tweeter manufacturing it's not about the cost of the parts: there's the t-yokes, magnets, top-plates, diaphragms and face plates. They're reasonably small and they cost what they cost. We were already using a titanium dome, which is a fairly expensive dome. But really what it comes down to is the care and attention into making every single tweeter exactly as you want it, holding each one to a very tight tolerance. It's easier to do in woofers: in tweeters, it's a little more difficult. You really have to go these special lengths in order to accomplish that.
Tweeter sets being lined up.
In the next picture here, you can see the sets being lined up. Hu and Lai are actually lining up the magnets and all of their associated voice coils are sitting there. They're about to put the ferrofluid in. The ferrofluid is put in with a very expensive pump that we bought in the United States from Fluid Metering Inc, which allows us to put the ferrofluid in to fractions of a micro liter. Again, this is goign after the idea of excellent consistency.
Final Tweeters
This next shot is the final tweeters together with the faceplates on, ready for testing. They get tested in an insulated square box with a microphone on the bottom and foam piece on top, which is on a spring-loaded arm that lowers the tweeter into the box.
Listen Inc, the multi-testing tool.
The real magic, though, is this Listen Inc measuring device which is hooked to a computer. It will do a series of tests all in one burst-sweep to the tweeter, so it will do impedance, amplitude, buzz-and-rub, phase . . . and it will then present the results to the operator, with a Pass or a Fail. The Pass of Fail parameters were all written by Andrew here, to the tolerances we wanted to try and keep.
So that's really how an Axiom tweeter is made. We'll get into more how it is actually designed a little bit later in the fall in a video then.