Alright, I've been getting asked about updated pictures and such of my basement/home theater build process. So I decided to do a somewhat "chatty" video of the basement.
First up is the "before" video. This is shorter and from before we actually owned the house.
I hate building soffits... I had no idea it would take so much time and I am still not done. IF (big if) I finish the soffit framing on Wednesday, I'll post some new pictures.
My list of things to do in the entire basement before inspection and drywall are pretty much home theater related. I finally have almost everything else done. It seemed like every time I crossed one thing off the list, I found 3 more things that needed to be done. Once the soffits are in place, I need to.build backer boxes for the recessed lights, run outlets and wall sconces connections, and then some video cables and QS8 speaker wires. Really, the soffits and backer boxes are the biggies. Everything else will go quick.
Assuming that I keep my pre-order of the JVC projector that I want (and not jump to something else), I have until early December to have the room functional minus the screen since I will want to experiment. After Drywall, I get to install all of the outlets, switches, doors, and some other fixtures like ceiling fan in the bedroom, built in wall heater in the bathroom, etc. I also get to tile the bathroom so that the plumber can set the toilet and vanity. I will probably tile just inside the sliding door maybe 2 rows of 12"x12" tile.
Then I will go back to the theater to work up my stage and riser. Once those are done, we will send in the carpet people to get something nice and soft put in. I will then have to put in shelves and closet organizers in the bedroom closet, bathroom closet, and our "game" closet for our German board games.
Then back to the home theater for equipment rack build and movie storage area and build the false front wall with screen.
Oh, and I need to paint the whole basement, put in the home theater lights, put up crown molding for the rope lights, attach my fiber optic star ceiling, and probably a dozen other things. The last whole basement thing will be the base board trim unless I decide to do that before carpet. The very last thing will be the construction of the wet bar. It is more for holding the popcorn machine and cold drinks, so it will be a back burner project for a while.
Lots to do, but the big hurdles, in my opinion, are the pre-drywall ones.
For me the hurdles are the finishing touches - that's where I get lazy. 2 years later i still have 2 closet doors to paint, baseboards and properly run my subwoofer cable (which must be done before baseboards). The problem is the room looks mostly finished and I like to enjoy my theater more than I want to move all the furniture to do the above tasks! My hats off to you who finish all details before sitting down to enjoy.
We are having a big party when the basement is "done" and it is supposed to happen in 2011 still, so I will have to keep plugging away for a while.
It is amazing how much time was lost over some key holiday weekends. We went out of town for the 4th of July (U.S. holiday where you blow stuff up). I took a vacation day too, so it was a 4 day weekend. Not 1 minute was in the basement. Labor Day weekend, same thing. Out of town for a 4 day weekend. If I could have put in a chunk of time on those weekends, I estimate that I would have been about 4-6 WEEKS ahead of where I am now, just because many nights I only have 2 hours to spend down there working.
So I've been a little slowed down again dealing with yet another driving incident with my daughter. Take 1 part Dukes of Hazard, 1 part Knight Rider, 1 part minivan, and 1 part 17 year old daughter. Shake well, and you get a nice big headache and a bunch of work. This was on Monday, but we are still dealing with things... Let me tell you this, minivans are NOT meant to go up a ramp on the passenger side and ride solely on the two driver side wheels. True story. Surprised that the thing didn't flip on its side.
Anyway, I did manage to assemble the final soffit tonight, but by the time I got all 46 pieces (again, no joke) of lumber put together, and the wall and ceiling marker for installation, my helpers were all in bed. No, I can't do it myself. The soffit is one big piece now that is 26 feet long. Good thing I ripped those 2x4s in half with my table saw. Weight wise isn't bad, just way too long to successfully manage. At least I am ready to roll for Thursday!
It took forever to get the one side's soffit put together, and less than 5 minutes to get it put up tonight.
I then mapped out where the wall sconces are going to go relative to the can lights that will be in the soffits. I also marked where my side QS8's are going, and moved the two flexible air ducts into the soffits. I was about to run the speaker wire for the final two QS8s, but then I got asked to help out with my oldest daughter's college applications and I never made it back downstairs... At least some progress was made, I guess.
Today (actually yesterday, I just haven't gone to bed yet), I managed to spend a solid 7 hours or so working in the basement. Most of the time was in the home theater running wire. I know, how can it take that long. I needed to do some figuring and calculating of where the side surrounds were going to go, and that mean planning out the wall sconces and can lights in the soffits. Not that I put those up, but mapping them out took a little time. I also worked on the equipment rack to try to get the whole section in the wall isolated from the rest of the wall so that it was more sound proof in the end since I had these huge holes in the back of the 4-gang adjustable boxes that the wires and cabling were going to terminate at. That way I have a little extra wire tucked into that cavity in case I need it.
Tomorrow (or today, if you are keeping track), I plan to start building my backer boxes for the can lights. I really want to have those done by the end of the day.
Then I will start putting in the adjustable boxes and wiring for the wall sconces (now that I know where they are going) and the electrical outlets. I will save putting the putty pads on the back for another day probably.
Once that is done, I am down to a very short list of items. I am sure that they will take some time yet, but it is getting closer since the rest of the basement is ready for drywall and the home theater is all that needs to be finished.
nick, you should take a point and shoot camera with you, to document your work at the end of the day... Or another short video.
I remember when i wired our family room for front and rear speakers... I think i was in the attic for an easy 3 or 4 hours... and i was only running 4 wires!!.... Stupid top plate....
Yea the only point and shoot cameras in our house are my kids'. I don't think that they would miss them. That is a lot easier than taking my DSLR down there. Any future video will pretty much be just in the home theater so they will be shorter. Of course, here I sit at the local mall...stranded...while my wife and kids shop for some stuff. I am just thinking how much time is wasted while I sit here...waiting...
I am just thinking how much time is wasted while I sit here...waiting...
Go to the apple store or cell store, and buy yourself a Iphone 4S.. The camera is pretty amazing... 8mp. and 1080p video.... my 4s has replaced my point and 5mp point and shoot camera i use to use for FB and other internet photo sharing.... I completely agree the DSLR can be a pain.. I have a Cannon 5D mk1, i only use it for "real photography" anymore....
Neither is every Apple product... On my "old by today's expectations" Droid Incredible, it was rated one of the top cell phone cameras by many review sites, and I've been able to use it for almost 18 months now.
I've taken some really great looking photos on my phone. The biggest issue is that with an always exposed lens cover, it is prone to scratching. Of course, none of these do real well in super low light, even with my phone's dual LED flash...
I'll take a quality camera over a cell phone camera any day. I haven't seen many quality pictures from one. But the other day, I seen a good one from an android phone, (but only saw it on the phone).
I took a really good photo of an Android phone on my iPhone once. Then I used a photo editor app on my iPhone to make it look like the Android phone was engulfed in flame.
I took a really good photo of an Android phone on my iPhone once. Then I used a photo editor app on my iPhone to make it look like the Android phone was engulfed in flame.
It was glorious.
Then I cried because Steve Jobs is dead.
LOL That is great!
My wife uses her camera phone all of the time, but usually they are duplicates of photos we take on the DSLR so that she can easily have a copy to show the ladies at work, etc... Outside of uploading a few snapshots for Facebook, I don't use my camera phone much either. Just like when people use cell phones to make videos and upload them to YouTube. Gotta love all of the 8 fps videos out there. Can't stand to watch those...
Nick, I'm following your journey, and am humbled and awed by your skill and discipline. You seem to do far less standing around than I do when faced with such projects.
I've always envied you guys with such beautiful dedicated theater rooms.
One last retort on the camera phone thing... one of the main reasons i upgraded to the 4s was actually the optics, as well as the sensor.. The camera has a lens with a F2.4! i have taken several photos with it, as well as a couple short videos..
I would feel comfortable printing up to 8X10 with this camera... and MP isn't everything... Thats why i got the 5D. for the full frame sensor, rather than a different body with a smaller sensor.. I would venture to say that the camera in the 4S is the first "quality" camera in a phone... The sensor is a Sony sensor, so other brands will surely have the same sensor in the near future, but will those manufactures spend the same money on the lens? maybe/maybe not..
Alright, it has been a DUSTY morning. While only 40F outside, I was out there in my shorts and t-shirt cutting MDF for my backer boxes for my can lights and another box that will be a recessed outlet with space for a small "wall-wart" (Wart not Mart) and the fiber optic light box for my star panel. This time the panel will mount snug to the ceiling, unlike last time where it hung below it.
Anyway, here are a couple of pictures... Sorry for the picture quality, I had to reduce the 8 MP down to something more internet/forum friendly.
I used about three and a half 48"x48" sheets of .5" MDF. Here they are all marked up for cutting...
And here is the small stack of pieces that I got from using almost 100% of three of the sheets (very little waste)...
I not have 6 of the 12 light backer boxes and the one outlet box put together and sealant applied to the inside edges.
I have 6 more to go, but I am taking a break for lunch. I haven't decided if I need (or want) to put a layer of 1/4" cement board on the inside as well. I am sure that the extra mass will be helpful for sound proofing, but I should have more than enough clearance for heat from the little 3" can lights and enough air in there to prevent overheating...
i've seen hundreds of thousands of photos made by pro photographers in my life (former photo lab tech), but i must say you are better than any of them because you succeeded to get your shadow in it.
For the boxes, which will be hidden anyway, I used a circular saw and free-handed it. Cuts weren't perfect, but very much good enough, and I didn't have to mess with setting all of the widths on my table saw.
If I was doing externally visible work, I would have used something more accurate, or at least attached a rigid straight edge to my material I am cutting.
Well, I got nice and itchy tonight. I hate working around the fiberglass insulation. I cut down a lot of the right side vapor barrier to get to some old outlets in there so that I can get them replaced by the ones I want to put in that are on the home theater circuit... While I had the vapor barrier down, I took out the insulation on half of that wall so that I could put in the boxes for the wall sconces... 3 on each side, centered between the rear 4 can lights that will go in the wood boxes that I made earlier and then up into the soffit.
I used the following for the wall sconces...
Anyway, I put those up and then put the insulation back and I am itchy! I also noticed that one of the outlets in the home theater area was on its own circuit (make that #11 in the "livable" space in the basement), and it had enough wire to be placed over near where the wet bar is going to have a circuit dedicated for the fridge and microwave. I figured, why not...
I did make a horrible error thought. Big enough that when I discovered that I had done something wrong, that I had that "pit in my stomach" feeling. In the background I had the TV show 'Holmes on Homes' playing, and they talked about junction boxes. Oh crap! I had followed code in SO many areas that I knew about, and asked about the things that I wasn't sure about. I talked to 2 different people about junction boxes, and they said that they were fine to use. Fine to use? Sure... As long as you can still access them! Dang it!
I have 7 junction boxes for 7 of the 8 circuits that were set in the breaker panel in the basement. The previous home owner used the basement as a workshop, and had a bunch of individual sets of outlets spread out on the ceiling joists to plug stuff in to. I just got rid of the outlets, put in junction boxes, and ran more wire from there to the different zones in the basement. Seemed like an easy way to do it. Well, now I have to tear out the junction boxes, tear out the old wire from the breaker box to the junctions, and tear out the new wire that I ran from the junction boxes to the first outlet/switch/whatever in each zone. I then need to "home run" all of those circuits.
Probably a $100 mistake in wiring and a huge mistake in time.
Plus I will need to rethink how I can run my circuits. I have most of the boxes with just the one old wire coming in, and one new wire going out, but there are 2 of them with multiple wires coming out going to different parts of a zone. I guess that I will have to run them to an outlet with a deep box and make that my new "junction"...
I am so ticked off at myself. It makes complete sense now, but at the time when people said "just make sure that the connections are all tested before drywalled" I thought that I was good to go since I did test them.
Well, off to take a shower to get rid of the itching, and then I am off on a business trip in the morning. More work this coming weekend. I will feel a lot better once I fix the wiring, so maybe I will do that first. Won't appear to be much progress, but it will be work that needs to be done nonetheless...
In the background I had the TV show 'Holmes on Homes' playing, and they talked about junction boxes. Oh crap! I had followed code in SO many areas that I knew about, and asked about the things that I wasn't sure about.
Was he berating some unknown contractor for hiding junction boxes in the walls/behind drywall? It's interesting how many episodes he finds junction boxes behind drywall where they are inaccessible and in a location that they not suppose to be..
I would not be pissed at myself if i were you... I would be glad that i found the mistake before the drywall is up, mudded and painted....
That reminds me. Behind the wall where my tv is mounted sits an old electrical outlet that is now a hidden junction box. I'm not sure how to fix that one. It will probably be next to impossible to run new wire to that spot without ripping out living room wall.
[quote=J. B.]i've seen hundreds of thousands of photos made by pro photographers in my life (former photo lab tech), but i must say you are better than any of them because you succeeded to get your shadow in it. Bravo!!!
Am I the only one concerned about his Doctor Zoidberg claw as evident by his shadow????
I took a really good photo of an Android phone on my iPhone once. Then I used a photo editor app on my iPhone to make it look like the Android phone was engulfed in flame.
It was glorious.
Then I cried because Steve Jobs is dead.
Hmmmm....I took a really good photo of an iPhone on my Android phone once. I didn't need a photo editor app because the iPhone was engulfed in flames.
It was glorious.
Then I thought, what irony, because Steve Jobs is dead.
MUWAHAHAHA
Shawn, dude, this is OBVIOUSLY A JOKE! Nothing more!
Nick you may inspire me to start a new thread with my basement project... very similar to yours that I'm about 1 year into now. Feels like it will never end. I've been too lazy to put the pix I've taken into some sort of album, oh wait maybe I did put it in my sig.
Nick, I would check your electrical codes for what you are allowed to run for wiring into what size box. I changed out 5 2 1/2" deep rectangualr boxes for 3" deep versions to be able to run 3 14/2 wires into them for use as power junction boxes as well as still being used as a switch box or receptacle. The standard hexagonal light box is large enough to allow 3 14/2 wires, at least according the codes here.
I like to run power through my plug in receptacles first then to my light switch and finally up to the light, but doing this means I required the 3" deep boxes to extend this run to other places as I pull power from either the switch or a receptacle which means 3 14/2 wires in one small box. If I used the standard hexagonal light box as the junction I wouldn't have required the 3" deep switch boxes but doing this would have meant I needed to run power back to the switch on the white wire, something I generally don't like to do.
Nick you may inspire me to start a new thread with my basement project... very similar to yours that I'm about 1 year into now. Feels like it will never end. I've been too lazy to put the pix I've taken into some sort of album, oh wait maybe I did put it in my sig.
I wish that I had the headroom to put down a subfloor like you did. That will be very nice when you are done.
Jason, I've been trying to find the electrical codes, but couldn't so I just kept calling the city with questions. I knew some basic stuff about securing the wires, box locations for outlets and switches were easy to replicate from the rest of the house. The city has a "checklist" as well for DIYers wanting to finish their basement, but that too was far front complete. I think that I've pieced together all of the main stuff, but the junction boxes were a mistake...
I wish that I had the headroom to put down a subfloor like you did. That will be very nice when you are done.
I lost a little less than an inch doing it.
I'm jealous of your sound proofing plans. I did a few minor things here and there but since the room doubles as a complete entertainment room/HT I didn't think I could go all out plus the additional cost. But I'm only on HT v2 while you're on v4.0
At least you caught that mistake before closing everything in.
There was an electrical code handbook(specific for my location) I picked up from Home Depot that covered much more than I needed to know, perhaps you could be as lucky?
Thanks for the tip. I will have to check. I already tried the local library with no luck. If they have one, I probably just need to skim through it since I am close to being finished, and I know that I should be good on everything else.
Nick, I was curious and took a quick look at the Marion library network catalog. There were several on the electrical code and wiring under the key word topic "electrical code".
Nice. When I was there a couple of months ago, the "librarian" couldn't direct me to any successfully. There were some books on the subject, but more of a "how to wire a light switch" type of material. Everything else was either gone with no known ETA on return, or was "missing" like someone checked it out, but never returned it. I will give them a shot again.
Just looked now, #1 is a Black & Decker book like I mentioned above, #2 looks like it would have been right "Wiring simplified : based on the 2011 National Electrical Code" but it is not currently available.
The 2008 code is available though... There is also "McGraw-Hill's national electrical code handbook" but it is for 2008 codes as well.
So I Googled the first book title (the 2011 one) and found it on Amazon. I can actually browse online through part of the 2008 version of that book. Maybe that will get me started and maybe if I can't find the 2011 book at like Home Depot, I will just order it. The cost is just over $8.
EDIT: Hey, that Black and Decker one claims that it covers the current codes too. Maybe I should just pick it up since it IS at the library.
So I got back from my business trip and hit the library. I didn't have a card, but within a few minutes, I did and was out the door with the book... All 350+ pages of electrical glory. I went through the whole book and wrote some notes down. It looks like the only thing that I missed was the previously mentioned junction box issue. I have everything else. The wires themselves are run correctly, stapled down correctly (ok, maybe a little overkill on some of the staples), I had enough length of wire coming out of the front of the box (I targeted 8 inches, and code requires 6). So after spending some time with the book, I headed downstairs tonight and started ripping out all of the old wiring that was going from the breaker box to the junction boxes. What a pain, but it is done and ready for new wiring to be run tomorrow. I might as well hit the home improvement store and pick up another 250 foot spool of 12-2 wire (20 amp circuits) for $76 plus tax.
I wonder if there is any way to recycle the old wire's copper? I mean, some people steal this stuff from houses that are under construction, an honest guy should be able to get a few bucks too I would think.
I will wait until I have to pull out the wiring for the existing lighting as well so that I have it all out at once, but I can't do that until I am ready for inspection.
Well I had a surprise visit from my father-in-law today. We hammered out a TON of the wiring that needed to be re-done in order to get rid of all of the junction boxes. There are 3 left that I need to work on, and 2 of them are related to the same thing. We would have kept working, but I needed to go get a long piece of 14-3 wire (25 feet or so) and it is about an hour round trip right now due to some stinking road construction. So, since he lives about an hour away, I just told him that he could go and that I was very thankful. We even moved the breaker box a few more inches to give me enough room to build a regular wall next to it (long story). Very productive, but now I need to finish mapping out how I am going to run the 3-way wiring and head off to the store for it. By the end of the day tomorrow, I hope to have them all worked out and the electrical run for the lights and outlets in the home theater too.
I enjoy actually working on the basement, not sitting in the car while my wife and youngest shop for jeans... I did make a run to the home improvement store to get a couple if small items, but I am ready to get back at it. I also found out that the people across the street from us in our "new to us" neighborhood are having an open house and they have a "theater" in their basement. Maybe a quick stop over to snoop around a bit and THEN getting to work...
LOL. The neighbor's "home theater" consisted of a row of 4 motorized theater seats, and a 46 inch TV. Oh, and some cheap in-ceiling speakers.
Well, as usual I didn't get as much done today in the basement, but that was because I decided to take care of some yard work while it was nice outside and since it is now going to be dark out by the time I get home from work. So I mowed the yard one last time, and raked a TON of leaves. Glad it is done.
I do have all of the remaining junction boxes worked out, and I opted to re-route some additional wiring just to clean things up. I did manage to get the wall sconces wired up, and that is when it hit me. I think that I will run a second circuit for the outlets in the home theater. Overkill for sure, but I heard that some inspectors don't like too many items (lights, switches, outlets) on a single circuit even though code doesn't specify how many items, as long as things don't exceed 80% of the circuit capacity. So, with 12 small can lights, 6 wall sconces, a star ceiling, and rope lighting that puts it at 20 lights on the circuit. So I'll have to pick up another $36 AFCI circuit breaker...
I went back downstairs and measured a few things for the backer boxes for the can lights, drilled my "in" and "out" holes for the electrical wire, and then ran some CAT6 cable from the equipment rack area to the projector area since more and more projectors have an Ethernet connection on them. I had to put my own ends on, and I had to hunt for my crimp tool, so it took a little longer, but those are done. Monday and Tuesday night I have band and orchestra concerts for the kids, so things will sit somewhat idle for a couple of days....
... is when it hit me. I think that I will run a second circuit for the outlets in the home theater. ...
Hey Nick - while you're at it, have you thought of running a separate circuit for your sub(s)? Just a thought for both future proofing and to make sure you don't have any issues with feeding your HT equipment and subs all on the same circuit.
Out of curiosity, was the neighbours motorzied seats the DBox system?
No DBox that I noticed. These people were old. Probably in their lower 80's. I doubt that they would have spent the bucks on DBox and had just a 46" TV...
As for the circuits, in my previous house, all of the lights in the basement were on one 15 amp circuit, and all of the outlets (minus the bathroom) were on a second 15 amp circuit. That is how it was wired by the builder when he built it for the original buyers before they backed out. No power issues. I could have the home theater up and running, plus all of my arcade equipment and not a single issue.
In this new basement, I am going to have (now) nine 20 amp circuits. Two of those dedicated to the home theater, and nothing else touching that power. I have heard that some people are putting in dedicated circuits just for subs, but others on those same AVS forums are saying that unless you have some massive amount of equipment (like those homes shown in magazines with racks and racks of powered equipment, or some enormous 4 sub setup) that it will be extremely rare that a dedicated circuit will be needed.
Probably one of those, it wouldn't hurt but real life shows that it would be only rarely needed.
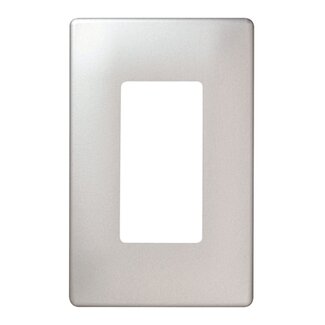
Hey, does anyone know if there is such a thing as a 4-gang adjustable switch box? I know that they make 3-gang, 2-gang, and 1-gang, but I need to get 4 light switches into one gang that is adjustable to account for the double drywall.
I could try an "old work" box, but I guess that I would need to make sure that it could handle the thickness, plus it makes the logistics of working with the drywall hangers a little trickier since I want to put putty pads on to the box once it is installed. That would mean that they would have to leave the back side of that wall open while I put it in. Doesn't sound too bad except that I am also going to be scrambling to get the first layer sealed and the second layer GreenGlued. With my luck, they will drywall up the back side while I am working to GG the inside.
For the separate sub circuit question - I was thinking not so much of crazy power demands, but just circuit separation for hum/interference issues that seem to manifest more frequently with subwoofers than other equipment. Like you, all of my HT is on the same circuit, sub included, and no issues.
Yup. That is the "old work" box. I current have adjustable boxes for the rest of the theater where the box has a metal clamp that attaches to the stud and then you use a screw to adjust the depth. I only have single , double, and triple gang versions of those.
Let me see how that would lay out. I don't think that they could go on the same stud due to where the stud is located, plus the fact that the metal plate from one box would be in the way of the other since they "wrap" around the stud, but maybe put the main lighting (cans and sconces) on the first switch in the room, and then a stud or two back, put up the "effects" switches for the stars and rope lighting...
For my project I put in a 20 amp circuit just for the subs and 20 amp for the rest of the equipment. The electrical outlets in the room are on a 20 amp circuit shared with the outlets of a couple other rooms. Then the lights are on their own 15 amp circuit. IIRC I think I put in 7 new circuits for the entire basement remodel.
As for the subs getting their own circuit, I figured one circuit is ~2200 Watts (20a*110v). I may eventually use at least half of that in amplified power.
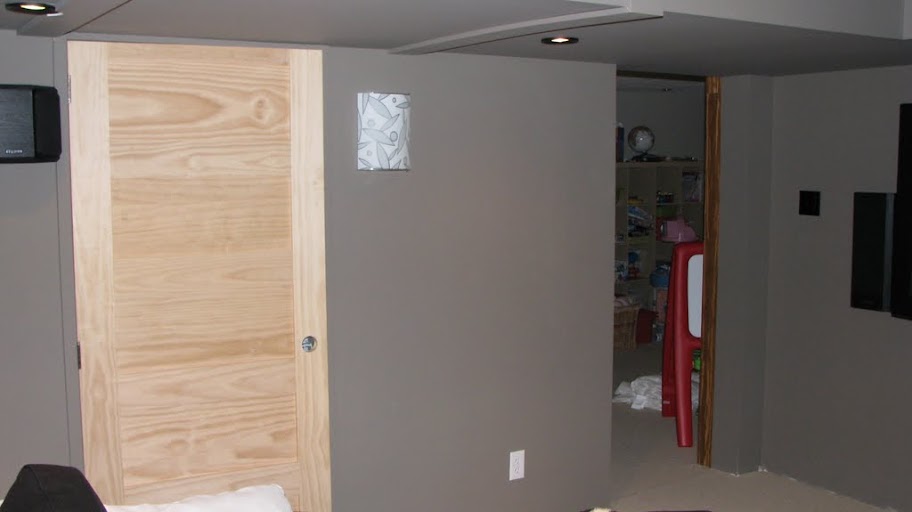
A few new pictures tonight. I got my backer boxes up for the can lights that go in to the soffits. I also got them wired up back to the light switch. Took a while to get them attached since I didn't want them snug, but just held in place by a few finishing nails until the bottom of the soffit goes in. I then ran the wiring and stapled them in place.
The back wall:
The right side:
The left side:
Another shot of the equipment rack area. The blue boxes are adjustable but since they are cut out in the back, I made an entire sealed part around that entire area to keep the sound somewhat contained. . . . Oh, and the neighbors across the street who had an open house this past week, here is their "theater room"...
Sadly, for many people that is what they think a home theater is, a dedicated room for watching a movie and nothing more; perhaps this is just the beginning stage for their HT and a severe case of upgraditis will set in.
It's not like I can really make fun of anyone at this point. My current HT room is just a living room where I have my gear. My new space still won't be dedicated strictly to home theater, but I sure hope I can have fewer compromises and have it look nicer.
Keep in mind that the people currently living there are in their upper 70's. I'm surprised that they didn't need a larger screen and something besides in-ceiling speakers so that they could actually see and hear the movies...
So tonight, I am planning to (among other things) wire up power for the rope lighting I want to put in along the soffits.
Due to the Christmas holiday season, I can get some cheap, single color rope lighting for about $20 for the whole room which just uses 1 plug and I hook up that outlet to a wall switch for simple on/off functionality.
OR
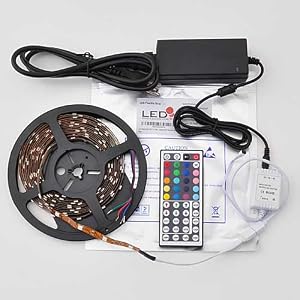
I look into getting color changing LED strip lights that will run about $160 (at least) for the two side walls and the back wall (I don't want it above the screen)
The problem is that there are only a couple of places that are selling it for that price, and while people have had good success ordering from them, their customer service and pre-sales communication is about zero.
I was hoping that I could use a single power supply and a single remote to run effectively 3 "strips". It seems as though the included power supply is only powerful enough to run 1 16.4 foot strip, meaning that I would need 3 outlets at 3 different locations around the soffits. To top it off, they all have good sized power converters (supplies) that I have no idea how I would hide. I can hide 1 behind my false wall that the screen is going on, but the other 2 would be really difficult.
Any ideas? Or should I just go with the $20 cheapo single color and hope for some other option later on?
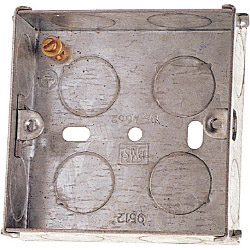
The junction boxes I had up looked similar to these:
Basically, any time that you connect multiple wiring runs (splices) you need to put them into junction boxes and those boxes need to be "accessible" to be valid for code. Mine weren't going to be since they will get covered with drywall.
"Accessible" just means exactly that. So if a junction box had any removable item (panel, cover, even a light or outlet) it is valid.
The only "boxes" in my latest pictures are the "backer boxes" made out of MDF. Those are not considered junction boxes since the wires will be accessible through the light that is going in the boxes.
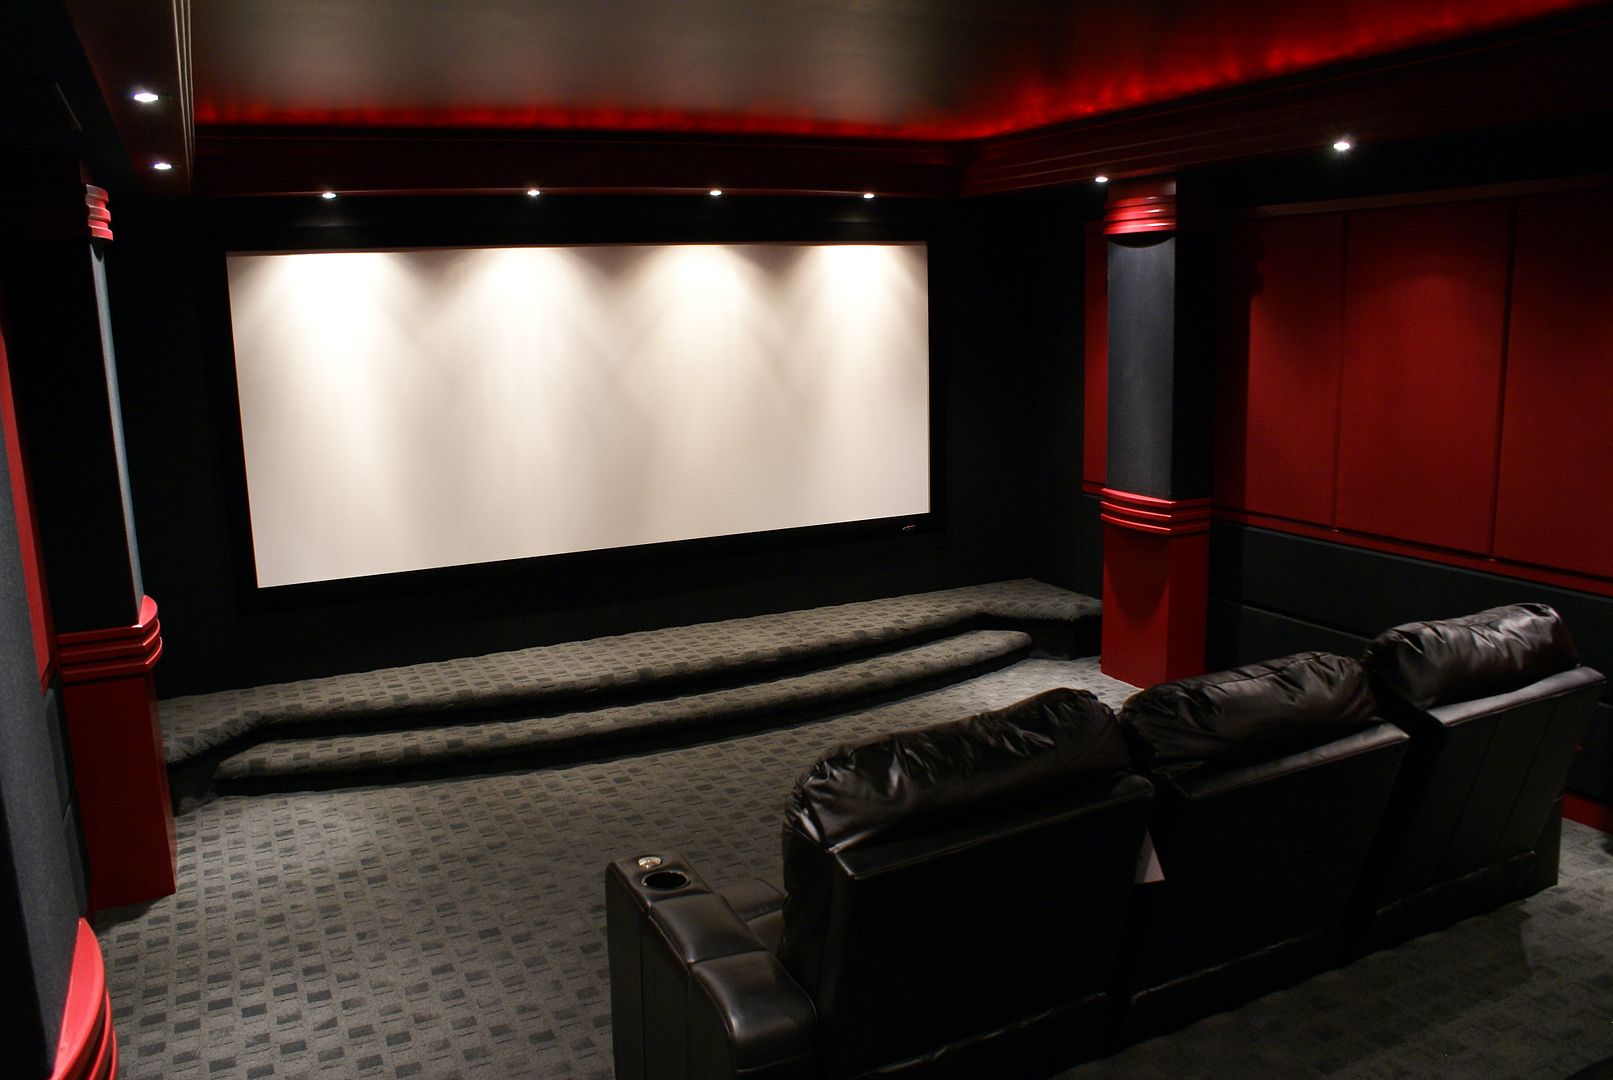
Just some inspiration for me. Mine won't be as nice as this since my room isn't as tall, and mine is almost 3 feet narrower. So I don't have the width for the columns.
So today was another day of many things going on... We went looking at a few cars for my daughter, spent some time doing more fall yard work (almost done with that), and I didn't get started in the basement today until about 7:30 pm. Well, now it is 1:40 am and I just got out of the shower.
I spent a lot of time doing some measurements and planning, plus some trial and error with the soffits and the can lights that are going in to them. I had Home Depot rip me some OSB for the sides and bottom of the soffits. This was a huge help, and Home Depot does it for free (Lowes does a total of 10 cuts regardless of how many pieces you have or how much you spend).
I started by putting up the sides first. That wasn't too terribly bad, however, each piece needed to have a number of screws started in the OSB so that I could hold it up in place, make sure that it was lined up, and put the screws in. That meant some measuring and marking of the pieces. That wasn't too bad but was time consuming.
Next, I was getting ready to put the bottom pieces on, but before I did, I marked the locations of the backer boxes, and made several measurements to calculate (tomorrow) where the can light holes need to be cut. I picked up a 3" hole saw today, but alas, it is just a bit too small of a hole. The nice size available was 3 1/4" which was too big. Oh well. I took a scrap piece of OSB (5/8"), cut it in half and screwed the halves together. That is when I tried the 3" hole saw and cut through both pieces of OSB. The second piece was to simulate the drywall layer. When the 3" hole didn't work, I tried a few other things... Since it was mainly the wiring box of the can lights that was getting stuck, I tried using a Dremel with no success minus some burning wood, I tried to mark where the corners of the box would go and drilled some holes and then cut another 3" circle. The holes basically turned into notches in the circle. The box fit, but then the light was a bit too tight. So I just got out the reciprocating saw and just cut the hole a little bit bigger. After some messing around with the two built in clamps on the light, it fit nicely into the double thick hole. Now that I knew that the lights would work, I went back to putting the bottom boards up.
So I made those marks for the backer boxes on the side pieces that were already up, and then started putting the bottom OSB pieces on.
These are about twice as wide as the sides are tall, and they were a bit more challenging to get aligned and screwed into position.
A second person would have been a huge help with this.
So now, I just have 2 custom size pieces of OSB to cut out tomorrow and put up. They aren't where any lights go, but I want to get them in place. I will then finish calculating the light locations exactly, mark them, and cut them out.
I would put my acoustical caulk up, but the inspector may want me to take dome some of the OSB, so for now, they will just stay screwed into position, although, I may take down the pieces that are getting one of the 12 can light holes cut. It will be easier to do that on a work surface than over my head.
By the way, I found out that I *CAN* connect 3 sets of the color changing LEDs up to a single power supply and run them all from one remote. A nice person at AVS (yeah, I know "nice" and "AVS" don't always go together) tested this out for me. He took down two of his sets, and connected them together to try it out for me. So that helps. I will just use a remodel box or a single gang adjustable box for the outlet and put it up in the soffit part that will end up behind the false screen wall.
So after this, I still need to wire up electrical outlets along the room for code and subwoofers, plus the outlet mentioned above, one for the projector, and one on a switch for my star ceiling panel. Then, all of a sudden, my list of items to do pre-inspection (and thus pre-drywall) is almost done.
Well, time for bed. I'll see about snapping a couple of photos tomorrow of the soffits.
So last night I got a number of things done. Of course, it meant a lot of tearing things out just to put stuff in.
I had to take down the vapor barrier and insulation from the outside walls of the home theater. I then had to measure and run outlets for the room and equipment rack. This seems easy, but getting them all within 12 feet of the next outlet, and somewhat symmetrical with the outlets on the other side of the room took some time.
After I had them wired up, I wanted to use something like "Putty Pads" to seal up the outlets and wall sconces. I had been tipped off to this "Duct Seal" compound over at AVS that is real similar, but comes in a block that you need to flatten out yourself. It really wasn't hard to do, and a single block that cost less that $2 a block) covered two single gang outlets really easily. Probably could have even managed 3 single gang outlets per block, but the stuff was cheap, why make it too thin.
So I sealed them up, and then back went the insulation and wrap. It took a little longer than I wanted do to my corded drill died on me, and I was working with my cordless to drill holes in the studs to run the wiring. Normally not a problem, but one of my two battery packs was dead from the night before (I went through 2 batteries pretty quick last night, and only have 1 charger) and the other battery pack made it most of the way through all of the studs before dying, but with a 3/4" spade bit, cordless was pretty slow.
Tonight I need to add the star ceiling outlet and the rope light outlet which both need to run to the switch box. I need to also run the projector electric, and put some more Duct Seal on a few outlets. I need to re-run an outlet in the wet bar area quick. Not a big deal. And get power to the wet bar lights. Hopefully I will also get 1 more outlet ran in the bathroom, and that will make for a pretty full night. It is gaming night after all, so I only have a few hours.
I need to make a box to try to muffle where the video cables come through the ceiling, and cut 2 additional odd-ball pieces of OSB for the bottom of the soffits, but they are small easy pieces. After that, I am down to the small stuff, like testing all audio/video/network connections in the whole basement, and crimping the can lights to the "hanger bars" once I have them absolutely lined up. I need to strip the outer sheathing on all outlets and switches and label them so that they can be tucked into the boxes easier for the drywall stage. I will wire up all of the new lights as a test and to make the next step easier... I then need to pull out all of the old lights and wiring for the old lights. Then it is clean up, including the tear down of my 3' x 8' workbench and tools.
When I am ready to start building in the theater again, I think that I will just need my compound miter saw and table saw to do a bulk of the work, so the whole workbench will just stay disassemble until spring.
So it is moving along.
Here is a link to the Duct Seal Compound I am using. Gardner Bender Duct Seal Compound The packaging in the store was different than this, but the product number was the same.
The theater is right below our master bedroom, so that is why I am trying to do what I can within reason. I mean, some people are spending $10,000 and up just on sound proofing per builds I am seeing at AVS. If this product seals nicely and costs about 50 cents a box, then that works for me.
So for those not in the loop, I ordered an Onkyo TX-NR709 receiver today. Pretty sweet receiver for a pretty sweet Black Friday Week price.
EDIT: Holy Crap! I just got my shipping notice from OneCall... I will have to see if it is actually in transit later tonight, or if someone just printed my shipping label.
My tracking number says that it is scheduled for a Saturday delivery in 3 days. I am at my relatives' about an hour and 15 minutes away. I might need to make a quick trip home on Saturday to sign for it...
My tracking number says that it is scheduled for a Saturday delivery in 3 days. I am at my relatives' about an hour and 15 minutes away. I might need to make a quick trip home on Saturday to sign for it...
Hehehe, that's Dedication. I can't say i wouldn't do the EXACT same thing though.
Notes above the pictures above since I will be driving back to be with the relatives in about 15 minutes...
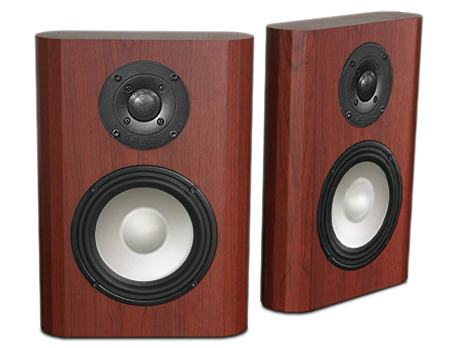
The M60's sound as awesome as I remember.
The VP180 was hard to judge in how it will all blend together since I hooked it up by itself, but I am confident it will be amazing.
The QS8s are always good.
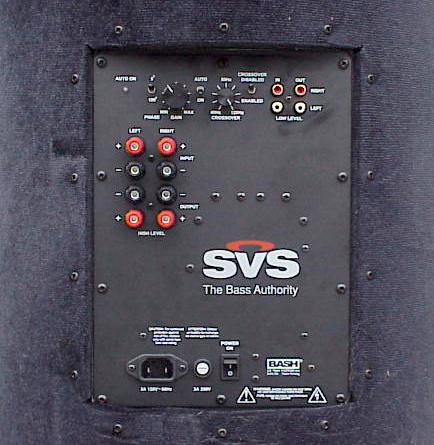
The cat's name is Sampson. He is 16 years old, and yes, he likes to "snuggle" next to the speakers, especially the SVS, so that is his cat fur near the bottom.
The white wire in front of the left speaker is just the FM antenna wire.
I can't wait to get my basement and theater done to try this all out at once....
So I am away this week on business and I find out today that the new projector should be shipping out next week. Crap. I will have all of the electronics minus the bluray player, and no room to put it all in. I told my wife that we should hook it all up ok the living room in the meantime. She said no, that I need the incentive to finish the basement.
So I was out of town all week for work, and then out of town last weekend for Thanksgiving. It felt good to get back to working in the basement. I started stripping off the outer jacket of all of the Romex (electrical wiring) and trimming them down to about 7" sticking out of all of the outlets/switch/light boxes. That took a while.
I also finally ran the power for the wet bar's pendant lights, ran a 3rd subwoofer cable (it will be tied in to one of the others just to give me a second placement option for the second sub), realized that somehow I forgot to connect half of the bedroom wiring when I re-ran all of the "home runs" to the circuit breaker so I fixed that...
I ran the final coax cable to the office, added the final outlet to the bathroom, put wire "staples" over a lot of the still loose wiring running in the ceiling and up various studs...
Then tonight, I decided to get some of the permanant lighting wired up to switches to that when the time comes I can pull out all of the old wiring and still be able to see. I now have working lights in the game room, wet bar (main lights, not the pendants until after drywall, but they got tested anyway), the hallway, the family room, the finished closet that we will store out German board games and Wii/XBox stuff like guitars/drums...
Tomorrow I hope to get the office lights working (the power for the lights go through 8 electrical outlet boxes first, so it will take a little effort), and some of the bathroom lighting.
The home theater lighting is going to be recessed into the soffets AFTER the drywall is up, and the wall sconces obviously will need drywall first too. I will have to wire them all together and at least test continuity to make sure that they are all good, but they should be perfectly fine.
One thing that I am not looking forward to is connecting up all of the outlets. Since each room is made up of many outlets that just run in series (physically, not electronically as they would be in "parallel"... you get my point), I need to pigtail both sets of wires in each box to a third wire so that the third wire is all that is connecting to the outlet. It seems so stupid since the outlets have 2 screws for the white wires, and 2 screws for the black wires, but code says that you can only connect a single white and single black to the outlet. So dumb in my opinion....
Oh, I forgot to mention that I also ordered my color changing LED rope light and a special adapter that allows even more color/brightness control plus an option to have it "flash" to music and such. I probably won't use that feature, but I can see the kids and their friends getting a kick out of it. I wired up that outlet too.
Last night I didn't get anything done because I was enjoying a band/choir concert at the high school, and tonight was a bit time limited, but I managed to get the remaining 6 outlets and the main switch boxes covered with mt own very of putty pads (I think I mentioned it before. Comes as a brick, tear it into 2 pieces, work it into two sheets, and cover a single gang outlet/switch box with each piece, or use one whole brick for up to a 3 gang box).
Anyway, it takes a little time, but that is done. I also had 4 studs that decided to twist on me since I put them up. They all had, of course, outlets or switch boxes on them, so I needed to twist them even more to make sure that at least the box is perpendicular to the future drywall. Easier said than done, but they are just that... Done.
I also had to completely rewire a "floor outlet" that I put in to the living room upstairs. Half of the outlet was on a switch in the living room, which was fine, but the other have was wired to the older wiring in the basement that I am now going to pull completely out. Oh, and there were junction boxes involved too. They had to go. That took almost 90 minutes of fishing wire from the basement, up throw the ceiling and into a wall cavity, and then wiring it all up.
Tomorrow I plan to finally line up all of the can lights, and crimp them to the mounting "rails" so that they are linted up perfectly with each other. I also have a little bit of light framing to do around the basement breaker box, and I need to put a low voltage box in to the office since it will be the "hub" for internet coming into the house and being hard wired out to the living room, office itself, home theater, and future family room. That will be super quick. Then I will do another walk around to see what other small things I could be missing, like a wire staple here or there, and then I will start cleaning everything up. My goal is to have the basement completely ready for inspection by next week. If I really get my act together, I could possibly even shoot for an inspection this Friday afternoon as I have to burn some vacation time before the end of the year, and I have the afternoon off.
It is crazy how it just all of a sudden is coming together.
I will take some pictures tomorrow night of some of the details of the home theater...
Oh, I almost forgot, I should be getting my sample of some Seymour Center Stage XD screen material tomorrow. My color changing LED rope lights should be here too. I ordered them plus that music controller option, but got an email from Amazon that my package was essentially destroyed in some accident. The rope lights themselves will be here since they are shipping right from Amazon and they waived the overnight shipping, but the controller (which WAS originally shipping from Amazon) is shipping from some 3rd party, so it will be another 7-8 business days for that. Oh well.
Biggest news is that the projector is shipping tomorrow (Thursday). I should have it by Tuesday of next week.
I am going to order my Green Glue tomorrow to get it coming, and the seating probably the week before Christmas. I don't need them yet, but need to get them bought and paid for before the end of the year. We have to start applying for financial aid for our oldest for college, and we were told by someone we know who works for a university admissions/aid office that we need to get as much money out of our checking/savings accounts as possible before the end of December. Since the money we have is earmarked specifically to finish the basement and other improvements, it seems silly that we would have to count it like we always have that kind of cash lying around. Anything else we will see about pre-paying for things, or buying Menards/Home Depot/Lowes gift cards or something. Worse case, we do owe my in-laws a good chunk of money that we borrowed a couple of years ago. We could just pay that back too.
Anyway, enough of the goofy economics. The good part is that things are getting done, and gear is starting to ship/arrive.
Most of the walls were constructed on the ground and then lifted up and secured into position as on solid unit. I had a lot more control of getting things lined up quicker and more accurate than toenailing. Plus I didn't risk the chance of a nail going into a stud, hitting a knot, and firing sideways into my foot on the other side that I would have been using to hold the stud in place for the first nail or two each time.
The twisted ones now have the original two 3.25" galvanized, ring shanked nails in each end, plus some toenailed nails in as well to help hold them in place better.
At least they twisted prior to drywall. This is my 4th time finishing a basement, and I've never seen this happen before.
And what is the luck that the only 4 that did this all happened to have an outlet or switch box on them? If they didn't, then I would have just left them alone.
So I was about to order my Green Glue today from The Sound Proofing Company (those people who visit AVS Forums may have seen Ted White's name over there as he is one of the 2 guys running the place). Anyway, I talked to John from there and we had a good conversation about my plans, where I am at, so on and so forth. He thought that my walls, outlets, soffits, etc were all solid plans, but my ceiling was my weakest link... By a lot... Crap. I knew that already, but was hoping that some insulation and Green Glue would be "enough"...
So we talked about clips and hat channel. The thing that I was hoping to avoid since I don't want to lose ceiling height, and the stupid clips I've seen run at least $4 a piece... Anyway, he said that the way he would do it would be to put some 2x4 pieces between my ceiling/floor joists every 4 feet. Raise it up a little bit so that it isn't flush with the joists, but sort of "recessed" up a little bit. He said to make sure that the channel sticks down about half an inch below the joists to make sure that the drywall ceiling is decoupled.
Hmmm... I lose half an inch is all... My ceiling height in the unfinished room is 7 feet 10 inches, so it isn't real high, but it is only half an inch more instead of almost 1.5 - 1.75 inches lost doing it perpendicular to the joists themselves...
So anyway, we start talking price. Now I need to get exact calculations of how much I need, but it was looking like another $250 TOPs (probably closer to $225) to put in hat channel and get about twice the sound control over double drywall, Green Glue, and insulation alone. Hmmmm.....
Their discount for the GG and the speed loader for both calling in and for being an AVS member put the GG alone about $75 less than what I was expecting to pay, so mentally it is about $150-$175 more for a lot better performance (plus the cost of some 2x4s of course.
If you think 7' 10" is bad. My future HT site is only about 6' 10" after flooring. I'm not even going to try and decouple the ceiling, except for gg and a thin second layer of drywall.
I've been toying with the idea of some rubber strips between the joists and 1st layer of drywall. About 2 inches square, about one foot apart (with glue sticking them to the joists), and about 1/2 to 1/4 inch thick. I know it won't be as good as the Soundproofing companies products, but can't help but think it would be better than not doing this. Not to mention a whole lot cheaper. This would decouple about 90% of the ceiling.
Something like this that can be sliced up into 2 inch squares.
Sorry, CV, your message was meant to go before mine. I just took a long time writing mine.
Rubber idea reminds me of building a floating floor. I agree that it *should* help. How much, I don't know since you are still screwing the drywall into the joists through the rubber in a number of places. Not saying that it will hurt anything, and the benefit might be better than direct connection to the joists, but you may want to look at something with more than a 12" spacing. Just my thoughts. I have no professional expertise with that at all, but just basing it off of my conversation with John from The Sound Proofing Company.
Color changing LED sets came today. I had to try them out. They all work, and look pretty cool. I could probably get away with the 3 sets as-is, but I really think that the music module will be cool.
So I lied. I didn't take any pictures tonight. I did, however, manage to pull out all of the old wiring (that was coming out), and all of the old lights. The only wiring that is left that was from before we bought the home is the stuff going to the furnace/utility/storage room, to the outside light and outlet by the sliding door, and to 2 outlets in the bedroom. There were so many wires coming from some of the locations, that I had to trace them back to the next spot before pulling them. I pulled some wires that were just going to odd locations that I didn't even realize. I did, however, have to leave those 2 outlets in place as they were feeding up inside a wall and then up to the main floor for something. Too much hassle. There is only the one drywalled wall in the basement, and it is where the sliding door and two windows are. Per building code, since that is fully framed construction, it needed to be drywalled when they built the house. It also needed to be mudded and taped, and I didn't want to tear into all of that either.
But overall, I made some good progress, and a good mess. I do have the light in the storage/utility room that I need to run power to (it was originally just tied in to the rest of the basement lights). I have the switch run, just need to get the power, but it was going to take about an hour to do because I would need to move a bunch of stuff in the storage room to reach where I need to. I will save that for tomorrow.
I don't know how much those clip/rail systems help with cutting noise. I had some in my bedroom at my old house. We were in a high air traffic area and it was put in to help cut down the noise coming from outside. I don't think it did much as the plane noise sounded the same no matter which room we were in and the clip/rails were just in the bedrooms.
I did some additional reading up on this late last night...
It is the clips in conjunction with the double drywall/Green Glue, plus most people attach the clips at every stud on walls (16") when the recommended spacing is 48" meaning that they have 2 additional connection points for every 2 that they are supposed to have, and since the point is to decouple with the clips/channel, and then dampen with the extra mass, if you are missing one, you aren't getting a lot of benefit. For me, I have my walls decoupled already with staggered studs, but my ceiling will still be coupled, and adding mass of the DD+GG will help, but not nearly as much as if I do that (increase mass) and decouple (clips/channel)...
Plus if all surfaces aren't "treated", you can get sound flanking, meaning that if the walls are done, but the ceiling/floor isn't, then sound can transmit to/from the ceiling/floor via the walls, or vice versa and you are screwed.
The analogy that kept coming up in the research I was doing was the old "aquarium" one. Sound will escape like water from a leaking aquarium if you don't have all surfaced treated. I'm not sure how fish get food/oxygen in such an aquarium, but that was the analogy used a lot.
Concerning the sound flanking from walls to untreated ceiling. I know you're supposed to leave a gap between each flat surface so that it is not in direct contact with the next surface, such as wall to ceiling, or wall to wall, or wall to floor. Then this gap gets filled in with some sound damping material, like green glue, but not green glue. (Just can't remember what it's called.) It seems that this should eliminate most of the flanking.
I'd like to know what the square footage cost of the extra expense of doing your ceiling with the clips/channel that the Soundproofing company is selling you + cost of extra lumber needed to mount it.
For my room, the ceiling is basically 14 feet by 24 feet. I had to build my soffits before the main layers of drywall to avoid some complications with the inspector. So my area in-between the soffits is what I am going to be working with since the soffits themselves effectively decouple that area...
So now I am at about 11 feet wide by about 22 feet. The ceiling joists run "width-wise" meaning that my clips/channels will be that 11 foot length. You need one for each end as well, so that comes to (not quite perfect in my situation) 13 rows of channel with 4 clips on each row.
Again, the clips go every 4 feet and the rows should be spaced every 24 inches apart (They can be closer than 4 feet and 2 feet respectively, but not further. The point is to decouple, so going to the max distance is ideal).
So that is 52 clips and 143 linear feet of channel.
Clips are $1.98 each and the channel at $0.34 per foot. So that comes to $102.96 in clips and $48.62 in channel.
Add one 2x4 stud per row at $2 each 7% tax included (my joists are about 20 inches on center) and there is $26 in studs.
Total additional cost for mine will be $177.58 plus the shipping costs on the clips and channel. I am already going to be paying a chunk for shipping of the green glue, but I don't have a total for that yet. I will be getting two 5 gallon buckets for $189 each and $29.99 for the speedloader gun.
I just decided to look, and I can buy the hat channel locally for pretty much the same price at a home improvement store and then I don't have to try to ship 11 foot long sections. (They come in 12 foot lengths at the store, not sure about the place I am buying the GG from.)
I should end up with something kind of like this only my channel will be running parallel to the joists to save height...
This method adds Decoupling, Mass, Absorption and Damping, which is all 4 of the 4 aspects of soundproofing.
You fasten the portions of 2x4 to the joists, lengthwise, near the bottom edge, but up a bit, so that the bottom of the rail that you fasten the drywall to is only 1/2 below the existing joists.
These 2x4's would need to hold a lot of weight. I think I'd use liquid nails and a couple of bolts to hold them in place.
My joists are engineered I-beams, so I am going to take some time and cut my 2x4 to the distance where the vertical part of the joist is (the "skinny" part) and then notch the bottom so that it will literally sit on top of the bottom part of the I-beam. Glued (Liquid Nails sounds about right) and nailed. That way a bulk of the weight is on the bottom "plate" of the I-beam, and not just supported by a few nails, liquid or real....
That is just a picture representation. The I beams in our house are pretty beefy. Engineered I beams are supposed to be better as long as they are the right ones.
Engineered beams are supposed to be more dimensionally stable. Which means fewer squeaks from the subfloor resting on it over time, among other benefits.
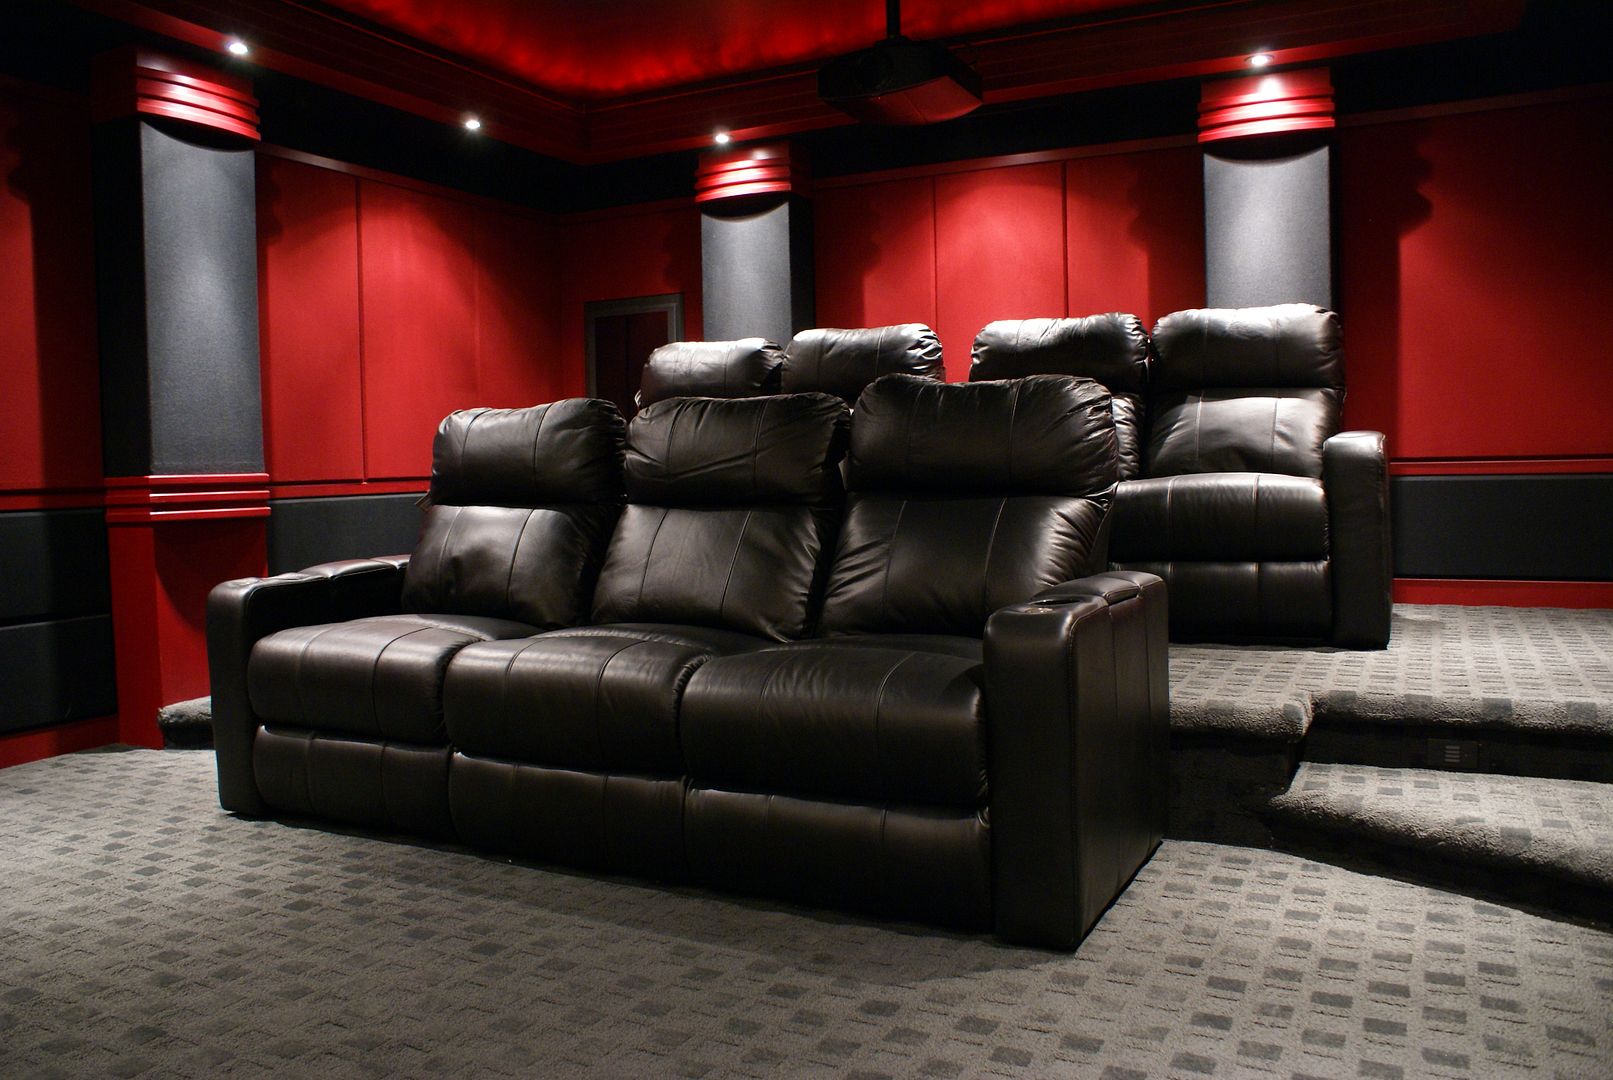
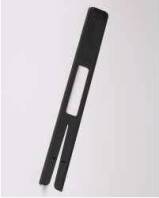
Harmony One remote... Worked great for V3.0 of the theater.
By the way, I just got done spending the afternoon/evening on Friday, a good part of Saturday, and then about 6 hours today finishing things up and getting the whole basement cleaned up in hopes of a successful inspection tomorrow. I REALLY hope that we get the stamp of approval and then we can start the drywall process. Things will really start to take shape then....
I just got done painting two rooms in the basement, working on the tile floor in the bar area and bathroom. Will be so glad when all the flooring work is done, it's killing my knees!
I don't know why, but I am so nervous that something will go wrong. I've been working on this soooo much since I got my permits June 20th, and before that I spent a lot of time finding the drain pipes and breaking up a couple of tons of concrete (literally) to move the bathroom to a better location. I just want to get to and through the drywall stage so that I can get things to a usable state. I want to be done with this part of the project and not have to redo anything.
I just have one minor fix, and it was something done when they built the house. Just need to add a little bit of plywood to a hole in the ceiling under the master bathroom's tub to create a firestop, and I am good. No reinspection. Technically, they would never know, but I've got the materials, so I am just going to do it right!
Considering that the whole floor is really plywood sitting on top of joists, and then covered with carpet/tile/whatever, it is just to make it so that it isn't a super easy path from the basement to the main floor, or even from becoming a chimney. Obviously if there is a big enough fire, the whole thing is toast (pun intended) anyway.
Congrats on passing the inspection Nick! Also on the deliveries - new stuff is always fun even if it's construction material. Are you going to setup the projector upstairs on a table or something pointing at a bedroom wall? You know, just to make sure it works? (I would enter a toothey grin smiley emoticon here but I fear Bob is watching!)
Considering that the whole floor is really plywood sitting on top of joists, and then covered with carpet/tile/whatever, it is just to make it so that it isn't a super easy path from the basement to the main floor, or even from becoming a chimney. Obviously if there is a big enough fire, the whole thing is toast (pun intended) anyway.
Ya, I get that. I'm just more used to industrial codes here at a Telco CO. Holes in the steel and fireproof sheetrock have to be plugged with this special fireproof goo or the entire wall has to be replaced. The goo is less pretty but allows you to reuse the holes later, if need be.
I hear you. He said plywood, sealant around the edges, and make sure that it is sealed really well, and it will be almost as good as a solid piece of underlayment.
Hey Cam, as long as it is in the warmer months, you can just wheel around to the back and come in the basement door. Besides, that will put you right where all of the action will be anyway.
:-)
Got the first call-back from a drywaller. No idea on price until he comes tomorrow night and bids it out, but it sounds like he is booked until the beginning of 2012. I guess that would give me time to get the insulation and wrap up, plus my clips and hat channel...
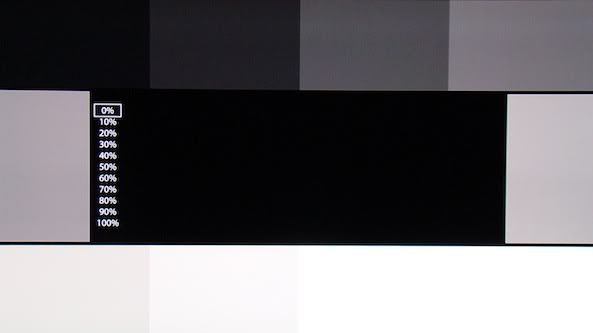
I had to open the projector box tonight and at least try it out. There has been talk about convergence issues with some of the RS45s. Mine was pretty darn good. I would say that it was off just barely... maybe 1/10 of a pixel, and that was only noticeable when I was about 2 feet from the image.
I grabbed my wife's crappy laptop and the first DVD I could find (Spiderman)... Not a great first test material being DVD and not blu-ray, but it was good enough for a quick test. Not I need to box it back up...
The following image is with out-of-the-box settings except for focus and zoom. Projected on to a taupe colored wall. Less that ideal on all accounts.... Still looks better than the laptop's display, although in the picture, it isn't representing the laptop correctly. It doesn't have that much of a blue tint to it in real life. Still, pretty nice (uncalibrated) projected image.
Oh. I also decided to test the HDMI cables in the home theater. I had 3 to test. All start in the equipment closet. One runs to the projector location, the other two run to the future family room, just on opposite sides of the room.
Well, I am glad that I did. The two in the family room worked fine, but the one to the projector location was a no-go. It wasn't even as long as one of the family room runs and they were all bought from the same place (Monoprice). I will order a replacement and send the faulty one back if I can. I will have to look up their return policy. I also tested the speaker wires yesterday and they all worked 100%. So one cable out of all of them isn't too bad.
Maybe they should use their own tester before shipping their cables....
Actually, for all I know, the cable got pierced when I was running my other wiring or it got snagged on something, I won't know until I pull it out of the ceiling.
Speaking of drywall. Just got our first estimate. For materials and labor, start to finish (from delivery of drywall, to hanging, mudding/taping, to finishing)... $6400. Yikes! I was hoping for something around $4500.
Now my wife is saying" Maybe we could hang the drywall ourselves and have someone else mud/tape....
That means, maybe *I* can hang the drywall. Ugh! Next quote will not be until Friday.
Maybe a little less, but I am putting up the clips/channel, and I am applying the Green Glue and acoustical sealant. They are just putting a second layer perpendicular to the first. The amount of mudding/taping/edges/finishing is all the same whether 1 layer or 2...
Hanging (other than the ceiling) isn't very hard. Personally I don't really mind taping/mudding either (cept for the ceiling). Sanding is what can suck (especially the ceiling!). I valued my time less than $6400 so I did it all myself (with help of my bro-in-law).
Hey guys - quick tip to cheat sanding the ceiling (cuz I hate that too). Instead of mudding & sanding the ceiling joints, when I did my HT we used 4 inch wide mdf boards and painted them to match the HT colour. Then we attached those over the drywall seams in the ceiling. The ceiling finishing was way faster with less mess and I really like the final look as it gives the ceiling some texture. I'm not home now but can take some pics and post this weekend if you're interested in how it looks.
Hanging (other than the ceiling) isn't very hard. Personally I don't really mind taping/mudding either (cept for the ceiling). Sanding is what can suck (especially the ceiling!). I valued my time less than $6400 so I did it all myself (with help of my bro-in-law).
We are now looking at this as well. I've hung drywall in our 2 previous basements, including the ceiling. Some times I'd even hung 4x8 sheets on the ceiling by myself with no jack. That wasn't fun, but I did a 14x40 foot ceiling that way.
We are talking about trying to recruit my dad, father-in-law, and maybe a few people from work. We were quoted 123 total 4x12 sheets of drywall, so I would probably look at converting that to 183 total 4x8 sheets. Either way, we will have the drywall delivered. For like $75, they will deliver them to the exact rooms/locations that we want. Well worth it in my book.
Lots to figure out. If the guy comes in on Friday with a quote near $4500 where we were hoping to be, then we will probably go with them for all of it. That guy is one that some friends used and had a real nice finish to everything, where-as the $6400 guy is supposed to be really good, but it almost seems like he doesn't need the work as he has been working steadily for the past 3 years doing flood-recovery work here in Cedar Rapids from their massive 2008 flood. He works those jobs about 90% of the time, and fits in some other work in-between that regular work. I have no doubt that he does quality work, but maybe isn't "hungry" enough.
Another trick with sanding drywall mud, is that you can purchase an attachment (similar to a sanding block) for a Shop-Vac hose that you put the sand paper on. It cuts down on the amount of dust because its sucked through the paper and into the Shop-Vac canister.
My life changed 3 years ago when I went dustless for drywall. A $70 Ridgid vacuum, a $40 steel coil 10' hose, and a $29 Ryobi mouse. The joint compound kills sanders after a few months, but for $29..
The Ryobi has a dust port that, with a couple of rounds of duct tape to enlarge it, fits snuggly on a 1 7/8" hose. You will create more airborne dust by hand than with this system. It's so good, that I have even left furniture uncovered.
Needless to say, it's fast and the results are better.
Edit: And buy a cheap filter, cover it with cut-up pantyhose (so the fine dust never makes it to the filter), and, most of all, get a vacuum that takes bags. You will still get exhaust port dust without a bag.
I buy them at the dollar store. Black, big girl, re-enforced toes and saddle.
Women still wear pantyhose, Tom. In Seattle, if you look real closely, you can see that they're hiding feminine "leg lawn."
Seriously. They keep the filter ridges from getting clogged. Instead of removing it and cleaning it, I just use a stiff hair brush and brush off the dust that's clinging. And, if they're black I can see just how much dust is on there.
I see what you are talking about now. I kind of visualized it, but the pictures help.
PS, I own a number of R/C vehicles, but never get the chance to get them out: 2 battery powered cars, 1 nitro powered car, a souped up airplane, and helicopters - both the tiny 8-9 inch kind, and one bigger one. I used to have another plane and a nitro boat too.
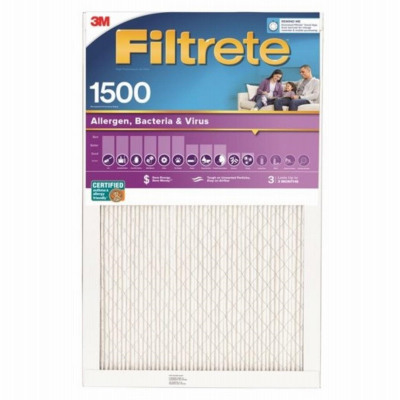
Oh, and on-topic, I returned a bunch of R19 insulation today, and bought some R13. I wasn't thinking correctly when I bought the 5.5 inch thick R19 and framed it 3.5 inches (2x4) thick. Cheaper fix at this point was the insulation vs. reframing everything with 2x6s on the exterior.
I also picked up my hat channel, super strength screws, liquid nails, more nails for my framing nailer, and a new (nicer) dust mask. I used up my last cheap one last week, and put up a few pieces of R19 insulation into the ceiling above the future bedroom. I started hacking and coughing that fiberglass crap after a couple of pieces. I wasn't putting any more up without a new mask. This time I was a big spender. I went from $1.50 mask to a $5.00 one. Probably should have just bought a $30 respirator before I started this project.
After supper, and a little Amazon.com shopping for Christmas, I am going to try to get the ceiling insulation back up in the home theater, and see if I can crank out all of the exterior wall insulation. The walls will go a LOT easier since there aren't all of the pipes, wiring, ductwork, etc to work around.
PS. Got my quote for drywall. $1650 delivered and "stocked" into the house. Now to figure out how much the guy yesterday would deduct from his $6400 amount if we bought and hung the drywall instead of him subbing it out to someone else.
$1650 was for 1/2" walls, 5/8" ceilings, home theater double 5/8" walls and ceilings, plus some expensive anti-mold product for the bathroom. Although the supplier said that most people are just using regular drywall and making sure that the vent is working and is ran for a while after a shower, as it should be. The old green board product used to sag, and it was determined over time that it wasn't mold resistant anyway.
Nick, on the RC front I run the electric buggy (Slash 4x4)with 2s or 3s LiPo's. I already trashed that VW body - need another new one for Christmas! And electric heli's. I'm still a noob with the helis and really just mastered a nose in hover. Using a Blade 120SR until I'm ready to step up to a collective pitch.
On the double 5/8ths drywall - I was advised when building my HT that if you doubled drywall you would benefit more if doubling with different thicknesses. That way the resonant frequency would be different between the two layers. Just thought I'd point it out as something to consider, although I don't know in practice how much of a difference it could actually make. Have you looked into that?
As for the two different drywall thicknesses, I had read that too, but heard from some of the "experts" that the difference is only detectible with specialized equipment and that the better bet is having the all around more mass of dual 5/8" vs. a 5/8" and a 1/2". While the two different layers did help reduce some specific frequencies, the extra mass of the dual 5/8" helped across a much larger frequency range. Not sure how someone would know for sure in real life unless some serious build up, test, tear down, build up, test, compare results and hope that the second method is better type of situation.
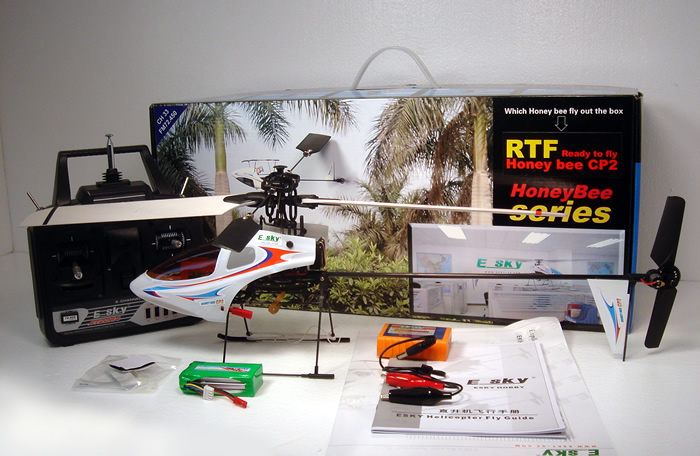
How big is the Honey Bee CP2? My bro-in-law got me into the RC thing. He plays with 4 or 5 helis as well as multiple trucks, rock crawlers and the Mini z's on dedicated tracks with computer timing. Cool fun that is. His big heli is a Trex500 which he has mounted a small camera on. It's really neat to see both the on board video and ground filmed video of the same flights. I would kill someone if I tried to fly that thing!
The heli is about 20.5" long with a 21" rotor span.
In the basement I managed to get all of the insulation up for the external walls. With a ceiling height of a little less than 8 feet, every piece needed to be cut a few inches. There were a number of other framing obstacles to cut around. What a messy job. This time I wore a long sleeve shirt and a decent dust mask. I am a lot less itchy tonight than last night when I was wearing a short sleeve shirt and was lacking in the dust mask department.
Tomorrow night I will get all of the home theater ceiling insulated and see how far I can get on the walls. I will (I promise) take and post some pictures.
I have an old RC10 and JRX2 buried somewhere in the basement. Used to really love racing RC cars (dirt) as a hobby. My first RC car was the Kyosho Raider (entry level car back then). I used to keep up with and even beat some of the better models of the day. I keep saying someday I will pull them out and rebuild em.
I have a Raider Pro. That silly thing was nearly indestructible. I would take it off any jump/obstacle, and it seemed like a ball joint would pop off if it was really rough, but that would be it. Then back off and running.
Raider Pro (Stock Photo)
My other electric car is the Tamiya Dirt Thrasher (Stock Photo)
Maybe I am getting too old. Maybe it is because it has been too long, but I can't recall the name of the nitro powered car I have. It is in a box in our storage area.
I've got the same transmitter as you do, but for an amphibian RC model. It crashed on my first flight and I lost one channel on the receiver so I upgraded to a new transmitter and receiver that's programmable on my laptop.
I was out flying my powered electric glider yesterday. Perfect, no wind.
I'm a big fan of the Traxxas Stampede (brushless) for off roading. Super fun vehicle!
RC is one super addicting hobby, but it is a money pit. Especially if you like putting love and care into them with hop-ups. That's what I like about Traxxas RC's is there is a ton of support for after market parts and you can mod the hell out of them to make them your own. You have to be committed to this hobby or you will just end up blowing money and regretting it in the end.
I get it. Sort of a regressive retreat, where we can all bring our juvenalia for show-and-tell. This'll be cool. I'll bring my handpuppets and marionettes.
I have to admit, though, I've always been intrigued by the helicopter. I there weren't such a huge time/practice curve to learn it, I'd have already had one with a mini night-vision cam attached to it. And I'd already be in prison.
In Massachusetts, we use RC to plot against gvt. bldgs. A week after that idiot's arrest, an RC plane DID land on a US govt. bldg in the suburbs. The long-time hobbyist who lives near by had no idea where it had gone, until the Feds rang his doorbell. It was intact.
I've got the same transmitter as you do, but for an amphibian RC model. It crashed on my first flight and I lost one channel on the receiver so I upgraded to a new transmitter and receiver that's programmable on my laptop.
I was out flying my powered electric glider yesterday. Perfect, no wind.
Cheers, Alan
That transmitter that came with the helicopter got fried when I used a home-made transmitter to USB connection to use it with a flight simulator. It was odd. It worked for months before getting fried. Oh well, I had a "real" transmitter that I used with my airplane that has selectable channels on the back, so I just set up a "profile" for the helicopter and it works much better.
On a topic related note, I found out some of the ins and outs of drywall today. I was wondering why the drywall material quote I got was $1600 vs. about $700 that I thought it would be if I went to Lowes/Home Depot/etc... The BRAND makes a big difference. Not just in price, but in quality. Makes sense. I just thought, heck it is ground up and compressed gypsum sandwiched between two sheets of paper... Wrong! The stuff that the drywaller and the supply company were quoting is the good stuff. Not to mention, it doesn't have the "Chinese Drywall" issues. So I then priced up the same brands at the big box stores. Lowes wants $17.63 per sheet of 1/2" x 4' x 12' sheet. The drywall supply place wants $10.32 for the exact same sheet. So I am saving $7.31 per sheet, to then turn around and pay $1.04 per sheet to be delivered into the house and "stocked" in each room. Still a $6.27 per sheet savings and I don't have to haul the stuff, and it is quality product.
Hey BlueJay, yeah, I love the Traxxas stuff too due to all the parts available. As you saw from the photo my Slash is not stock - slowly replacing with hop up parts as I break them. Want to do an LED lighting kit this winter just because it'll be all shiny! My bro-in law and me both have the brushless Slash 4x4 so we have a good chance of fixing them on the spot if they break due to the common parts pool. Though they are very tough. My son launched it into the side of a house and hit about 5 feet off the ground (the jump was a real beauty) and it just drove away.
Good to know on the drywall quality Nick, I've always just bought the stuff Home Depot is peddling, never gave it a thought.
I guess that the preferred brands for the drywall hangers and for finishers are National Gypsum and United States Gypsum (USG). According to some drywall forums, pretty much all of the other brands out there are junk. Either they are flimsy, or have voids in the gypsum itself, not compressed enough, cheap paper that acts like a wet napkin when they try to mud it (creates little paper balls), etc...
And on the off-topic topic, I will see if I can easily get to my RC car box in the storage area and find out the nitro model I have.
I would probably have to do a full engine tear down, clean, and reassemble to get it to work. It was put into storage a number of years back and I don't think that I even cleaned the engine before putting it away.
It seems that the Lowes and Home Depot in my area, only carry these brands when checking online: Lafarge, Gold Bond, SheetRock, ToughRock. Anyone have any "good" experience with these?
After checking reviews:
Lafarge: Junk Gold Bond: Made by National Gypsum SheetRock: Made by USG ToughRock: Made by Georgia-Pacific (Chinese drywall problems)
My local cost for 5/8 4x8 piece. Lafarge: $8.44 Gold Bond: $10.87 (1/2" fire resistant) SheetRock: $15.39 ToughRock: $8.44
Gold bond I saw too, but never looked up the company relation. Again, numerous company names were mentioned on a drywall forum and the only, and I mean only, two companies that weren't ripped to shreds were USG and National....
I still have my first RC car called The Frog; here's a thread with pictures. It was really cool because you can easily turn it into a truck (one of the first I believe). I ended up breaking the steering mechanism after I installed a faster motor and drove it into a garage door, kamikaze style .
I would like to get a truck, but because I have very limited dexterity (can't move my fingers or hands), I would possibly only be able to operate one of the old box style radio controllers with the two stick-like controls. Unfortunately, all I've seen online are the gun style remotes.
My original was the Tamiya Fox. I actually still have it in a box but over at my brother's place. All original, nothing really broken on it if I recall. Totally 80's paint job on the body with base black, hot pink stripes and lime green paint splatters. Boy I had artistic style back then!
My brother-in-law and I used to mess around with the cars. He is a few years younger than me, but that is fine. Anyway, he had the original Hornet which was surprisingly quick. So then, years later, he bought a Super Hornet. It sucked...
Nick, Never got into the RC car thing, or heli's so far. I'm intrigued by heli's but I'm told they're very difficult to fly. A friend of mine is a real heli pilot for the Canadian Coast Guard (he watched me when I first tried a take-off with my RC amphibian plane.) He thought I was over-correcting after take-off, which is likely because the amphib flys much faster than the glider.
Anyway, that would be great fun to have all the RC enthusiasts bring their models at the next Axiom get-together.
When I first met Ian Colquhoun in the early 1980s, he had a real float plane.
I can't comment on drywall! Funny mix of posts. . .
Awsome, Nick. Your thread has now reached 21 pages!
It has included HT, soffits, fender benders, I-Phone cameras, Apple bashing, college applications, saw blades, old Burger King ad campaigns, a German Shepherd, BACON (the new neutral), panty hose, RC and lies about Mark's high school dating resume.
The guys I work with bought a German RC helicopter (can't remember the name) that had I believe eight small electric motors and propellers that they were able to program different flight sequences from their PC, it was amazing just how nimble, quick and precise that thing was. They actually attached an infrared camera onto it and would fly it over agricultural fields to determine 'hot' or 'weak' spots within the crop, would then download the info and images for the farmers so that they could prescription spray the desired rates and types of chemicals to be sprayed.
Yea it was laid out similar to that Nick, but the motors appeared to be larger and it didn't have a center cockpit like the one you have pictured. It didn't have long gear like that either. I do know they paid several thousand dollars for theirs.
Also Nick, I wonder how many folks can guess why the one motor leg is painted red ... it took me a while to figure that one out.
So today we had another drywaller over and should have a second estimate by Monday. I also put up more insulation. Including the home theater walls. That was great as the room is now fairly enclosed light wise. So I took the beast of a projector downstairs and shot on to the vapor barrier (plastic wrap) to mess with sizes so that I knew where I would need to mount the projector mount in the ceiling, as well as confirm seating distances... Then when my wife and oldest got home (at different times of course, we reviewed the image size and seating distances that I worked up. I DID take some pictures and I resized them for the internet and uploaded them to my web storage, but we then left to do some Christmas shopping so I didn't get the images posted. Now I am sitting outside a dressing room while my wife tries some things on. I will get the pictures out here yet tonight. Tomorrow I only have a few hours to work in the basement, but I hope to get some of the hat channel up. Maybe I will get it done and the ceiling insulation back in place. I won't know for sure until I get the first channel up as to how long it will take...
I recessed a box and an outlet so that my star ceiling panel has a place to go to make it able to attach to the ceiling vs. being suspended down from the ceiling like last time:
Here are the projector video feeds and power. After testing today, I will end up moving these back 1 floor joist. The boxes are adjustable to acount for the depth of the 2 sheets of drywall:
Last, but not least, are my "Duct Seal" covered outlets. Or at least one of them. These are like Putty Pads only they come in blocks and need to be worked into pads. $1.90 for 2 outlets vs. about $4 for the pre-flattened ones, and quite a bit cheaper than the "acoustic" Putty Pads but should yield the same result. These went around outlets, switched, and wall sconces. I am going to put some on the video feed and projector power boxes yet.
I have done pretty much everything myself. I even started the whole thing by breaking up almost 2 tons (literally) of concrete to relocate the bathroom to a new location. What I haven't done was the underground plumbing, and connecting the shower. Part of the "package price" includes them connecting up the toilet and sink when we are to that point.
We are pretty much set on hanging the drywall now too. We need to get the price down a little bit, so we will be working that. I have done mudding/taping/texturing in the past, but it takes me forever to get it all done to a point that I am happy. So for time reasons, we will still have someone do that.
I will do the tiling in the bathroom and just inside the sliding door that goes outside, but I have never installed carpet.
I will also be building a wet bar at some point, but it might get back-burnered while I finish a new deck this spring.
Ah, new deck.... I build a pergola last may... same, but not the same...
DIY network had a pretty cool drywall tool to help installing drywall with 1 person..you might be able to google it..
I have 5 tons of pavers i need to lay in the back yard, just waiting for the ground to dry out so i can move 4-10 yards of dirt to get ready.... Down here (Dallas) we go 100 days without rain, and 10 days before the date i want to dig, we get 10 days of rain!!!.... grr.
I say quit your day job, and finish the project faster!
Nick, this is just fantastic. I am SO impressed by the quality of your work and ability to manage a million details. Moreover, your efforts to document the project will certainly help many others in the future.
Back to a derail for minute - I was at my brother's place on the weekend and liberated my old Tamiya Fox from his basement. Looks like it's in good shape though I have not tried to plug in batteries and check servos yet. At least I have it in my garage to work on when I find the time.
And that $999 will disintegrate in the 1st 80mph accident while trying to get to 100 mph! While very cool, where can you actually get to those speeds and keep the little bugger in sight to control it?
On-topic, I spent hours, and I mean HOURS, measuring for the clips/hat channel ceiling. It is amazing the variance in distances of a ceiling joist from one side of the room to another. I must have monkeyed around with 6 different scenarios of where I could (attempt) to place my recessed braces (the 2x4s that I would put up and recessed perpendicular to my joists so that I can recess all but the last half inch of the clip/hat channel depth). It seemed like no matter what I tried, my spacing would at some point line up with a joist. Not good when you are trying to recess. While I could make some areas narrower than my 24" spacing between where the clips would go, I wanted it as even as possible.
SO I got that done, and then I needed to make another 156 measurements just to mark out where my 2x4's will go in each row with some rows having four 2x4s and some having five to make a staggered pattern which is supposed to yield up to 5db better performance at "certain frequencies" (whatever that means in real life) vs. putting them all lined up with each other and with the same number of 2x4s/clips per row. Those measurements also include the lengths of the 2x4s that I will cut tomorrow.
I also measured that I will need to cut 5/8" x 3/8" off of each end of the 2x4 pieces so that they sit at the right height in the I-beam joists. As mentioned earlier, I will be using liquid nails, 3.25" nails from my framing nailer, plus the fact that it will be somewhat resting on top of the bottom of the I-beam. Again, reference my diagram earlier. I think that will make it pretty darn solid.
So tonight I made quite the mess. I needed to cut all of the blocking pieces that go between the joists. Normally, that it pretty easy, but since I have I-beams for joists, I had to basically cut out a "lap joint" on both ends of each blocking piece of 2x4. Keep in mind that there are 52 total pieces, and while most of them were either 19" or 18.75", there were 5 other sizes that needed to be cut.
So I got to it, cutting them all out. That was fun (not) considering that my workbench was torn down prior to the first inspection. So I am cutting on the floor.
I took an 8 foot length of R19 insulation, folded it over, and tried to make some level of padding for my knees.
So after a while I had this: A nice collection of 52 pieces of blocking:
Next was the lap joints. How the heck was I going to do that? I had 104 to do, plus whatever testing pieces. Well, after some thought on using a jigsaw, or a circular saw, or even a table saw... I broke out my router and made a little jig... It doesn't need to last forever, so I just whipped it together in a few minutes.
End result is 104 (plus my 1 test) nice and perfect lap joints.
Remember that these are designed to rest on top of the bottom of the I-beam so that it is effectively recessed up into the ceiling joists, yet is down far enough that when I put up the clips and hat channel, the drywall will end up 1/2" below the actual I-beam joists for the decoupling.
Tomorrow night I will get them up as well as the clips and channel... Drywall gets delivered on Thursday afternoon, so I need to get things cleaned up in the basement to make sure that nothing is in the way of where they are going to "stock" the drywall.
I was trying to come up with the easiest way to do it and get a good surface when done. Plus I don't trust my table saw right now. I think that it is out to get me... Seriously...
I was ripping a number of 2x4 boards in half to use for building the skeleton of my soffits, and after about twelve 8-foot boards the saw blade (or actually the whole motor/blade assembly) started jumping around when first starting and cutting the boards. Everything is tight, so I am guessing a dull blade, but I didn't have a replacement, and I didn't want to kill an hour to go buy one...
The router worked well. Took about 1 minute to do each board, plus some times to get up and get blood flowing back to my legs/feet.
Yeah, I muscled through them, but probably should just pick up a new blade some time soon. It is a cheap table saw. Funny how its blade is pretty much unusable (because it was cheap), yet the blade on my DeWalt miter-saw, which is about 2 years older that the table saw, and gets used a LOT more, still cuts just fine.
Well, it took 4 guys about 35 minutes after they got the big truck set up and the first load on the crane. We had a tree in the back yard that prevented them from getting right outside the door, so that time was with them going down a slope and then unloading on to some carts right inside the door. They put 35 sheets of 5/8" in the home theater room, 10 sheets of 5/8" and 5 sheets of 1/2" in the game room/wet bar area. And the remaining 5/8" and 1/2" went into the family room. 108 sheets of 4'x12' drywall in total. That would have taken 162 sheets of 4x8 had I gotten it myself, and I would have been dead tired after just a few sheets since I would have to unload at the street (no crane).
I am also going to "rent" a nice drywall lift from the lead guy that was here for $50 for as long as I need vs. $95 for 1 week from a rental place (that was the best time/price deal).
Now to get Christmas stuff done so I can try to start hanging drywall by this time next week.
The first one is them using the crane on the truck to reach further into the yard to make their work less difficult (notice that I didn't say "easy"). If the tree wasn't in the way, they could have gotten almost right to the back door.
Sorry about the shaky cam. I am used to using our camcorder and not my cell phone for video.
The second video was them unloading off of the end of the crane and into the house. They put about 12 sheets on to the cart shown in the picture and then moved the cart around to get the drywall where they wanted to unload it, even if that was 10 feet away.
I thought that before the weekend (oh wait, it is 1:42 am on Saturday - Christmas Eve) that I would post a quick update.
Today I worked on finishing up securing all of the 2x4 blocking with both liquid nails and regular framing nails. I hope that they are strong enough. They should be, I was able to hang from one of them, and I am no small guy...
Anyway, I got them in place as mentioned, and then it was the task of marking the line on the boards as to where I needed to screw the clips. A chalk line would have worked nicely, but I was home by myself. So a couple of screws and a string helped to get that done (albeit with a lot of overhead marking. Then I used my super duper screws (#10 of some brand that is supposed to be awesome instead of #8 as the minimum needed per the instructions). It took a while, and my neck was sore from looking straight up for a couple of hours. I also used some plastic vapor barrier to cover up the wall between the game room and the storage room. I am trying to keep as much dust out of that area as possible.
Next week, after we get back home from visiting family, I will be ready to cut the hat channel and put it in place. I then need to put some more of the plastic vapor barrier wrap up over 1 more exposed area of the basement as well as seal off the stairway for when I start drywalling, which is next after that. Fun times are coming!
I've gotten a few PMs about the blocking, so I thought that I would post one of the diagrams sent to me by the Soundproofing Company. There is a much more detailed one with measurements, etc that they give you end you buy their products, but since these are their diagrams, I don't want to post more than this without their permission, which I can understand them maybe not wanting to give out for the detailed ones. The diagram below gives 4 elements of soundproofing. Decoupling with the clips/channel, absorption with the insulation, added mass with the 2 layers of drywall, and dampening with the layer of Green Glue in the middle. The guys at The Soundproofing Company have been SUPER great to work with. Ted online, and John over the phone. I would recommend them to anyone!
I would love to hear some feedback on the sound isolation that you're doing (including green glue). I know you can't do a A/B comparison, but would love to hear your feedback after the green glue dries/settles in. I read that it takes a week or more to cure and to become (more?) effective.
If I ever my the condo below me, I would seriously considering turning the basement into a HT (with sound isolation).
I will definitely provide some feedback on the soundproofing.
So we are back home from being out of town the Christmas. I managed to get a drywall lift picked up tonight too, so tomorrow (Wednesday), I am going to get the hat channel up in the home theater room, and with any luck get the first lay of drywall on the ceiling in the home theater. I also have another project that I need to finish. In another thread, I posted about my 12 year old getting a chameleon for Christmas. Well, I need to build a stand for the cage, and get a few other items for that. So I will have to factor that in too. Then, I will get back to drywalling and see if I can get any more of the ceiling done in the basement. I would love to have all of the ceilings (which include a lot of soffits around ductwork) done by the weekend. IF I had some help, I could probably cruise through a bunch of it, but trying to do most of it by myself will take some time for sure.
Man, I thought I saved a lot of money by running all my cables throughout my house! It completely pales in comparison to what you're doing. The way I see it, you banked enough savings to buy an 80" tv and then some!!
Got some stuff done today. As usual, not as much as I wanted, but that was partially because I forgot about a key element, and also because my 12 year old gets her Christmas chameleon tomorrow and there were all sorts of "Dad, can you help with this?" kind of stuff, including building a 19"x19"x30" (LxWxH) stand for the cage... That and the fact that I completely forgot about the projector mount (that is what I was eluding to before) it took a chunk of my day. I had to drive an unexpected total of about 2 hours in the 2 trips to the home improvement stores to get everything, plus the time at the stores, again, because I was brain dead and didn't get the mount stuff while I was at least at one of them and had to make the return trip).
Anyway, what I did get done tonight: Shortened the projector cable conduit since the projector will be further back. Relocated the projector cable box. Relocated the projector power box. Cut two notches in the framing for the recessed outlet for the star ceiling so that the hat channel would fit correctly in one of the rows. Put the projector mount up (the part that goes into the ceiling, not the part that attaches to the projector) - See pictures below. Put all of the insulation up in the theater ceiling. Put the last piece of insulation up on the theater wall. Put up all of the hat channel after needing to cut them down to 128" in length. Took down all of the panels that made up the bottom of the soffits. Put acoustical caulk on the bottom of all of the backer boxes for the can lights that will be in the soffits. Put all of the soffit bottom panels back up. caulked all of the seams and joints on the soffits.
The only thing left before I can start drywalling the theater is I need to put some putty on the back of the projector cable and power boxes. I was about to do it, but decided that the crap that fell into my eyes, even though I was wearing my safety glasses, had been bugging me enough and I needed to come upstairs.
Anyway, here are some quick photos of the projector mounting "plate"... The top of the 2x6 board that the mounting plate connects to. I used some cool little "washers" that had a square hole and little teeth (sort of like T-Nuts, but just a square hole).
Here is the 1.5" floor flange (didn't know what they were called before. These are found in the plumbing section by the way.) bolted on. Nice long bolts with lock nuts.
After cutting off the long bolts...
Up and in place. Recessed enough to not touch where the final ceiling height will be. I grabbed a 6" long pipe for it as well. Hopefully it will be long enough, but if not it was only like $4 and I still have the UPC sticker on it. The next longest size was like 18"... This will at least let me get the drywall cut out and lined up.
Alright. Off to take a shower and go to bed. Have to go get a chameleon in the morning.
It's chameleon day at the Ubol's house! Pix, pix, pix! OK, you can leave out the pizza thing. Maybe pose him/her on top of a frosted cake. Peppermint frosting. Ha! Let's see the little sucker pull off THOSE colors!
I liked lizards until the day that I was at an indoor miniature golf where they had animals in cages spaced out around the course. There was this rather large iguana in a cage that I was looking at, rather close. He lunged for my face and was fortunately stopped by the wire fence around the cage. If that hadn't been there, I'd hate to think what might have happened. I'll never look at a lizard the same way again.
Keep in mind that chameleons are meant to blend in, and different ones CAN get pretty dynamic colors. Those tend to be the larger Panther chameleons. But if you are expecting something like this:
You will be greatly disappointed.
Here is the kind that she is getting (female Jackson's chameleon):
It will mainly turn different shades of green, brown, yellow, and black. It can create spots and rough stripes, but that is about it.
The most colorful ones are Panthers (as mentioned above). Here is an example:
So I've got a few hours of drywalling in between yesterday and today, and I hate it already. I did start with the most complicated ceiling area so that I am working with smaller parts of sheets and so that once I get this done, I can start picking up noticeable speed. I did, however, decide that I am getting rid of 1 of the ceiling height changes. I loose 3 inches of height, but it was between to other areas that were that already 3" and 12" down around ducts. That meant taking down a partial sheet of drywall (that I already had the can lights cut out of), and doing some quick framing. Now I need to pry the 2 can lights' nails out of the joists, and frame them down 3" as well. It will be worth the delay it is causing in that the ceiling will look a little cleaner.
Oh, and I killed my Craftsman rotary tool cutting those two can lights. I had used it in my previous basement, and it worked well, but liked to suck up the drywall dust. Well, I killed it this time. So I *almost* bought a RotoZip today, but the smallest that would really work for what I needed was about $75 and it is a dedicated tool, so I opted to spend that money on a nice Dremel set that was on sale. Now I am nervous about using it in fear of killing it with the dust even though it comes with a drywall cutting bit and says that it works with drywall... Maybe the hand-held drywall saw will be the way to go anyway. No fears of having a "run off" and needing to patch it later. I will using the Dremel for anything on the walls (outlets, switches, sconces, but hand cut everything in the ceiling... Yuck!
Cool. I was wondering how I was going to cut drywall for the 4 can lights I'm going to be installing in my new office. I've got a Dremel, just have to find a drywall blade.
Drywall bits are pretty common actually. Just look for one with the tip that is smooth so that it doesn't cut into your can light. It acts like a guide for the rest of the bit. There are also some really nice bits (xbitz or something) they are nice, but pricey. If doing just a few, go with the lower cost ones and you will be fine.
OK. Cutting can lights with a hand-held drywall saw sucks too. It took forever to cutout 2 can lights tonight (the ones that I had to re-do). I ended up spending a bit of the day working on the chameleon setup. We are fighting humidity issues (as expected). Hard to keep humidity inside a 100% mesh cage, but we are getting there.
I also had a helper tonight for some of the ceiling in the game room. My wife came down and I spent some time "training" her on how I wanted things measured, as well as how to cut things. It was a little slower than just doing it myself, but will help speed things up as we go along. She measured up and cut out one of the largest, pieces so far that also had a bunch of cuts while I was fighting the cutouts for the 2 can lights. That alone was worth it. We are 2 skinny pieces and one larger rectangle away from having the game room ceiling done. The wet bar ceiling will be 2 rectangle pieces, so that will go up quickly (of course, more lights to cut out), the hallway will be 1 piece as well with 2 more stinking lights, then we will go back to more difficult ceiling pieces like in the bathroom and office... I will start updating more with photos when we get to the home theater.
I am thinking about picking ip the door for the theater tomorrow so that I can get it hung so that I can drywall right up to the door jam. Anyway, is a solid core exterior steel door still be best approach for soundproofing? I know that I will need a good threshold jam too...
That's what I've been told (read). Thou I picked up a bunch of foam core interior doors for my project. They sure are a lot heavier than the standard hallow ones.
Yea, I know that it is all about the mass, but I am seeing some people asking this question elsewhere and never getting the straight answer of a solid core exterior steel door like it was a few years back. Thought that I better check. I think that there may be a compromise in door type in order to make sure that it looks just like the other doors in the basement, so solid core interior doors might be what I end up with.
I am also trying to figure out what to do about sealing the bottom. Of the door. A lot of people are using a wood or metal threshold, but that isn't going to go over well with my wife.. I could just put the door a little closer to the floor so that it is a little more snug with the future carpet, but the. The door could get to be difficult to open and close which would be bad....
I went to Menards today because they had a bunch of doors on sale plus had an extra 11% rebate that ended today. The extra 11% is on in-stock items only, and the exterior door I wanted was a special order, so for now I picked up a cheaper interior door that was filled and marked "sound proofing" which as we all know can mean little to nothing. It was already almost closing time, so I figured that I could just return it if need be.
Anyway, I am wondering if I should. It just didn't seem *that* much heavier than a regular hollow door, and as we know, mass is important.
If I look a the link above on 'How to Sweeper,' it mentions not using a door with recessed panels. I wonder why because every other door in out house are those 6 panel designs. Hmmm.... I really want to get a good door for the theater for soundproofing, but the more I dig, the more questions I have about what will actually work.
Oh, and I had a couple of helpers for a few hours today. My daughter and her boyfriend wanted to try doing some drywall, so I put them on measuring and cutting duty...
Wow. Buy a regular solid core door on sale for $75, or buy a steel solid core for $150, or buy a steel solid core door with a 7.25" jamb (to account for the 2x6 wall, plus the 3 layers of drywall) and it jumps up to $400+.
I might do with others did and create my own jamb extensions and if I need to add mass, I can add a 3/4" sheet of MDF to the part that is inside the theater and cover it with an acoustical panel or something.
Nick, I know a thing or two about hair crown patterns and I really wouldn't trust that kid with MY daughter. And sure as hell not with all that drywall around!
LOL. I loved this picture that my wife took. My daughter laying on the drywall to hold the T-square, her boyfriend using a blade knife to score the drywall... They took about 15 minutes to put the measurements on to the drywall and make the cut... And I am in the background doing about 20 things in the same amount of time.
That said, I was grateful to have the assistance. It was because of them doing what they did that I could get a bunch of other things done at the same time.
Poor Nick. He has a pre-teen daughter, with a chameleon, and a teen daughter who, by definition, is a chameleon.
In order to raise teens properly, one MUST have completed at least some course work in zoology. Some cryptozoology wouldn't hurt, either. When I taught teens, I found the threat of waterboarding to be quite effective.
Nick, the drywall will not hold out long enough for this application, therefore I suggest Durock or cement backer board.
Last night was nice and productive. A coworker came over for about 90 minutes with his 11 year old son. We cranked out the equivalent of 7 full sheets of drywall. That is more than any other time that I worked down there, even on days where I spent 8-10 hours down there. Granted, we focused on the easier stuff from the vantage point of what sheets could be hung with the fewest cuts, but wow does it look like some nice progress.
I really only have 1 slightly tricky ceiling piece, which really just comes down to having to reroute my cable internet wiring from the main floor dining room (which has been subbing in as an office) into the office area in the basement. That should take about 20 minutes to reroute the cabling, and then that piece can go up and I can cut out the last 2 can lights. Then I can get working on the last 7 sheets of the heavy 5/8 drywall for the exterior walls.
We mainly hung interior (1/2") sheets last night, and they are so much lighter than the heavy stuff, so I am looking forward to more of that.
Of course, I still have half of my 5/8" drywall stacked up in the home theater room. I am still committed to getting the drywall done in the rest of the basement before doing the theater. I want to really be proficient at my hanging and cutting skills to get things as perfect as possible in the theater room, plus I can focus all of my mess in 1 room at that point.
I'm thinking a teenaged daughter with a boyfriend in a sound proof home theater is probably not a good combination. I strongly urge to to install an internet webcam in that room. You also might want to make sure the boyfriend sees you cleaning any pistols or sharpening any hunting knives that you own while discussing the rules of the theater room with him. Visual presentations are truely the most effective way to make a point.
Funny, but true, story. In V3.0 of my theater, we had both of our kids convinced that we had cameras in the home theater even though we never did and never had anything that even looked like a camera in there.
I am going to use my IR repeater "eye" which will be on the front false wall pointing towards the seats as my "yes, this is a camera" deal. They have no idea what it will be and will believe it.
Nick they are getting older and therefore not as easy to fool, especially if the hormones start raging. LOL take it from a man that has raised a daughter and has had boyfriends hanging around the house. Then stop and remember what occupied your thoughts as a teenage boy.
OK. It has been a little while since I updated. I have been drywalling like crazy and it is still taking forever. I am almost to the "home stretch" before the home theater... I really should be able to crank out the last few sheets/pieces of drywall for the entire basement, minus the home theater, tonight. (Disclaimer: there are 2 larger pieces that won't go up until the home theater is done) Then the fun begins and more updates start to flow about the part of the basement that everyone really will want to see.
I will try to get a quick (as in short) video up tonight or tomorrow night with a quick (again, short) walk-through of the space. It is a lot easier to get a feel for it with the drywall up.
I will just need to hang the door for the theater and secure the projector mounting "board" to the ceiling before I can drywall in there. I am putting the door up so that I can get my drywall as close to the door frame as possible. That was recommended by the soundproofing folks. I hate hanging doors, but at least it is just one for now.
Well, I got a lot done, however, as I was looking at the closet in the bathroom, I decided that I wanted to use a narrower door so that it looked a little better, that meant tearing down a little of the drywall, running to the home improvement store to get a 2x4 and some 1x4 pieces, coming back home, cutting it all and putting it up, and then starting the rest of the drywall. It looks a lot better, but it definitely slowed down progress. I got a bunch of little crap done, and one large piece. All that is left are some 4-5 inch wide strips along a few soffits, a 12" wide piece on side of the beam that we moved last fall, and a couple of 4.5" wide pieces where the new drywall meets with the existing stuff from the stairs. After that, it is done. Probably 2-3 hours tops (it always takes longer than is seems like it should). So with my busy schedule tomorrow night, that means Friday night I should be ready for a new video.
Alrighty. So the basement (minus the home theater) is drywalled. Yea! I still need to put some screw in the "field" of some of the sheets, but only a few of them. I will wait on that until I am in the "got the mudding/taping bid" phase and the "everything is textured" phase.
Anyway, the updated video is uploading right now. YouTube claims that it will be uploaded by just a little after midnight central time tonight (Friday). Of course, then it needs to process it...
Best bet is to look at it on Saturday sometime if you are so inclined.
Damn...impressive work! And I love how the sound changes the instant you walked into your HT room. Can't wait to hear your GG impressions. I heard it takes a week or more to take effect.
The room will become more "live" once the drywall goes up, but the insulation, staggered studs, double drywall, and Green Glue aren't for live/dead room acoustics, but for holding the sound in (or out) of the theater. The video does show the effects of sound absorption as-is though...
LOL. I just realized how much my head congestion comes through when I speak on the video. I couldn't breath normal at all, and it is noticeable. Sorry.
I know. OF course it is all of those corners that make paying someone else so expensive...
So today I was able to spend a little time... IN THE HOME THEATER...
I was putting up layer 1 of the drywall. I am going vertical for the first layer and then horizontal for the second on the walls. All of the ceiling pieces and layers will be perpendicular to the hat channel.
Here are some quick snapshots.
Dust was everywhere (including on my cell phone's camera lens), but you get the idea.
Looking good Nick. The thing that has amazed me with every renovation I have done is how rooms actually seem to get bigger when the drywall goes up. It's totally counter-intuitive for me, but the framed rooms always seem smaller and then get bigger as the walls get that visual definition from the drywall.
I agree Dan. The two times we built a house and saw just the first floor layed out, we thought they had the dimensions wrong as it looked so small. Looked bigger after it got framed in and bigger again when the drywall went up.
It is indeed an odd illusion that is the opposite of what you would expect.
I think that it is all about a point of reference.
We don't live in homes without wall coverings (drywall, plaster, logs, whatever) so our brains don't process the space correctly. We also don't live in houses without furniture, so without a size reference, we have a difficult time seeing what can fit. I mean, the pictures make the room still seem small, but when I lay out how much space will be used by the seats and such, I end up with a good amount of space left over, so I know that in the end it will be a nice size.
Paint, now that is debatable. Some argue that it can make a room look larger... Brighter paint on the walls and darker trim "feels" bigger than darker (not just dark) walls with light colored trim.
I've read that soft tones of blue and green maximize the "larger feeling" effect.
Of course, this is a theater. The shades will be a little darker, and the trim will be just a couple of shades darker than the white trim in the rest of the house (against the darker walls, it will have the contrast illusion of being white without being "too" white)...
Who cares though. I mean, as long as the screen looks big enough, the seats are comfy, and the sound is amazing, I don't care too much.
So after a couple of nights of nothing happening in the theater (due to kids' stuff going on), I got some time in the theater tonight. The problem is that I had about 29 sheets is 12 foot long, 5/8" thick drywall to move. The last remaining side wall (for the first layer of drywall anyway), is where the drywall delivery guys stacked the drywall for the room. So it all needed to be moved. Can't put it in the middle of the room, or I will never have a place for the drywall jack, so it went on to the far wall that already had a layer of drywall on it.
My wife came down to help (after I was a little bit into it) and that was a huge help. We got down to about 10 sheets and she said, "Why don't we just put some up on the ceiling instead of moving it across the room?" Sounds good to me. I rarely get any help, and the ceiling I was going to need some help for sure to get the sheets on the lift.
Now, I'd like to say that I got a full layer of drywall up there, but I didn't. I did get 4 almost full length (one needed to be trimmed about 10 inches) of drywall up. I also started in the equipment rack area.
Tomorrow we are super busy again, but Friday night, if I have help, I will get the rest of the first layer up on the ceiling, and if I don't have help, I will get the remaining wall done and the last piece in the equipment rack area.
Saturday we will be out of town (more kids' stuff), but Sunday and Monday are fair game since I have Monday off for President's Day. Who knows, I might start Green Gluing sooner than I thought.
No pictures but I just finished up caulking the seams for the first layer of drywall in the theater. What a pain, but it should be worth it in the end.
It was hard convincing my wife and kids that 1 layer wasn't "good enough" and that more work needed to be done... I think that they hate me, but I am moving forward.
Tomorrow (or today rather) is a holiday for all of us from work and school (my first time getting President's Day off of work) and my father-in-law is coming over around noon to help out. I am going to try to have some of the sheets cut and ready for Green Glue and attaching. I am actually thinking about using him to help me with the upper walls instead of the ceiling. My wife and kids can help me load sheets on to the drywall lift for the ceiling, but the upper walls takes pure strength to do. I guess that is me anyway, but maybe we can get my wife to at least put the starter screws in while my father-in-law and I hold them into position.
OK. I am really sore tonight. My father-in-law came over and we cranked out some 2nd layer drywall magic. By that, I mean that we got the walls done (top and bottom sheets) and all but an 8" x 11' (yes, 8 inches by 11 feet) piece for the ceiling, and then one of the "columns" where the movie storage is. That is a LOT more than I thought that we would get done.
I do still need to do the 2nd layer on the soffets, but those too are very manageable. I am anticipating being done with all of it tomorrow (Tuesday), although it will be a full evening to do so. On Wednesday, I will caulk up the inside corners and under the bottom sheets along the floor. That is per instruction from the guys at The Soundproofing Company.
Calls are in to some drywallers to see who will have a reasonable bid for the mudding and taping. I REALLY hope that they aren't too expensive because I really don't want to do it with all of those edges...
Pictures will come once I get the final layer up on the areas mentioned above. I am so happy that the heaviest piece of drywall I will have to work with will be about 15-20 pounds. Yeah!
PS. Green Glue has now been dubbed "the goop" around here. Even when it doesn't get all over the place, it gets all over the place. If you've never used it (we got the 5 gallon pails) then it is hard to explain. Whenever we had a sheet dry-fitted, one of us would hollar, "this one is ready for goop" or "...ready to be gooped". Green Glue has an odd smell. It isn't horribly strong, or even real nasty, just has a smell to it that I wasn't expecting.
Nick, the meticulousness of your efforts have basically ensured that I will never attempt something like this. You clearly are incapable of embracing the mantra of "close enough". I'm sure the results will be very satisfying; perhaps even good enough for your wife and kids to hate you somewhat less.
Calls are in to some drywallers to see who will have a reasonable bid for the mudding and taping. I REALLY hope that they aren't too expensive because I really don't want to do it with all of those edges...
Hope for the best, plan for the worst.
Originally Posted By: nickbuol
LOL. My 13 year old daughter had the NERVE to ask me last night....
"So, how much longer until we have carpet down there?"
One guy was supposed to get back to me tonight, but didn't... He is good friends (or at least poker buddies) with the guy who sits next to me at work, so I am guessing I will get it tomorrow. The other guy is getting me a quote tomorrow as well.
One guy came in and was done getting the info he needed in about 10 minutes, the other guy took about 25 minutes. Different methods I guess.
I saw some numbers online of $0.25 - $0.40 per sqft to mud/tape/texture. I've got about 4000 sqft of drywall exposed (actually less once taking out all of the cut scraps), more drywall than that went up, but about 19 sheets (4x12) in the home theater are covered up by another layer of drywall... So, at $0.40, that comes to about $1600. Now, I've got a good amount of corners, so the price will be higher, but I don't know by how much.
One of the drywall guys is bidding this out from his own drywall business, the other guy works for a drywall company during the day, and is doing this as a side job (cash). Both have been around for a long time, and both came recommended by people that either my wife or I know and had drywall finishing done by them.
I will report back on that tomorrow.
So, I started getting a little crazy with the Green Glue. I was expecting to have about 1/3 - 1/2 of a bucket left over (still cheaper than getting tubes), so I was adding it on kind of thick... Now I am starting to run low. I will make it fine, but just barely.
Oh, and the "just need to hang drywall on these easy soffits" idea was dumb. They were a pain because they still required the lift, and they still required working above my head. I made some good progress, but it still sucked. I am also getting low on 18" or wider 5/8" thick drywall pieces for the bottom of the soffits. I might need to get creative, or if I have to, I will just need to get another 4x8 sheet and be done with it. Of course, that means getting the minivan from my daughter (the only vehicle she is allowed to drive due to her "great" driving record) and she needs to drive across town tomorrow night. Maybe I will have to come home from work early and snag it quick.
I was up until after 1:00 am last night putting screws in a ton of the sheets of drywall that just were up with 6-8 screws to hold them in place. I put in enough to meet code in the entire basement (ceiling included) except for the game room/wet bar area. I still need to go around and "sink" a bazillion of them so that they aren't sticking up. Even with a drywall drill bit that is supposed to just barely recess them (tried 3 different ones in 2 different styles) there are a bunch (again, bazillion) that just need a little bit more turns. I also have 4 pieces of drywall to put up yet. 4 of them are for the rear "columns" in the home theater, so they are about 7 feet "tall" by about 6 inches wide. Goop them with the last little bit of Green Glue and up they will go. I also have one small piece to put up above a door frame that is 5 feet long by about 1.5 inches wide. Again easy. I took a vacation day tomorrow and will finish up that stuff and then have the drywall "screw" inspection at 4:00. Should go OK.
Mudders/tapers start on Monday (I am traveling for work) so I should come home later in the week to some nice progress.
FYI. One big from a guy that runs his own drywall company was $3600. We've seen his work and it is very nice. Another bid, from a guy who is a drywall mudder/taper/texturer by trade and is doing it on the side (cash) was $1850.
The first guy was actually subbing it out, so there is double profit in there. Profit for the sub-contractors, and profit for him.
I've seen the second guy's work too and it also is very good. He is giving me a "deal" too (or so he says) because he is good friends with a guy I work with and my co-worker told I guess has given him enough business like this, that he said I needed a good deal.
I have so many brand new (to me) blu-rays that I have purchased since I started in the basement last summer. I haven't seen most of them because I wanted to wait for the theater. The first one I bought that I DID see was TRON, so if that helps you think of all of the movies that have come out since then...
Not sure what I will watch though. I should create a vote for that some day. It will need (yes, NEED) to be something with some action, great sound, and great picture.
Watch TRON again as a comparison piece between the HT's.
Also for the drywall bits - I have never had luck with them either. I find it faster to just countersink manually with a regular bit rather than having to revisit each screw after the drywall bit failed to do its job. Maybe I've just never found a good quality brand/design?
I used my bro-in-law's drywall drill/bit. I have no idea the brand but it worked fine for me in my current basement project as well as the basement remodel in my old house. That said when we had more people screwing than had drills I didn't mind just using my reg cordless... just have to be a bit more careful to stop screwing when its at the right height/depth.
The dedicated drywall drill guns seem to work good. Maybe they have to build them better since you can't change the bit and your paying for the whole powertool.
Well, I passed the inspection with flying colors... Yea!!!
I think that I will do some cleanup down there tonight, take a picture of two of the drywall pile, and maybe a quick video.
Those of you that commented about how the last video's sound changed so much (more dead) when I walked into the theater might be shocked at how "live" the room is now with the drywall up. That is normal and will be improved with carpet, furniture, and acoustical treatments later on. I will try to post some stuff yet tonight.
Alright. Some quick pictures of "stuff"... No, not the rooms, the "stuff"....
First up... Drywall scraps. Yes, those pieces that you wish could be recycled back into a full sheet (or 10) and returned to the drywall supply store. I've got to load these up yet tonight (won't have a vehicle that they fit into until about 10:30 pm. That is going to suck. I need to get these to the landfill and be back home by 8:00 am tomorrow too. Won't that be fun?
I also picked up the requested amount of mud too. Six 5-gallon buckets, and 11 boxes. Oh, and a case of corner-bead (63 piece in a case). None of this was light to move.
I did have an ingenious idea (after I had already carried the buckets and case of cornerbead in). We got snow last night...my kids have a sled that never made it into the attic yet...the basement door is "downhill" from the street where I parked the van. YES. 3 boxes WILL fit on the sled. Hurray!
That's a lot of mud! I think you're basement is using just a little less than twice as much mud as mine did. Granted I didn't drywall my ceiling.
Here's an experiment for ya... get that spray rubber that seems to be all the rage right now, why I'm not sure. Anyway spray it all over your HT room to see if it removed that echo.
No, it was expected to sound that way. It will all be good in the end.
So I spent a TON of time yesterday and today marking and setting all of the screws. What an utter PITA, and I am not talking about a type of bread. I also caulked the seems and edges in the theater. I was working on the wall/floor edge, but ran out of the acoustical caulk and I am heading out to New York and Atlanta for work this week (need to be up in 4 hours). So I will have to tackle the rest of that when I get back. Everything got cleaned up from the basement, and all other small pieces are done. I will tell you this. Fishing for the surround speaker wires in the walls (even with the walls marked) was also a PITA... I ended up cutting multiple holes (yes, into my nice DD+GG wall to access them. Anyway, I got them out and filled the holes with a lot of mud. The holes were only 3/4" around, but still. We also picked up the paint today for the basement. That is usually a horrible process trying to pick colors, but we managed somehow to do it in a decent amount of time.
I think that we ended up with something like 14 gallons once factoring in the white for the ceilings, a special white for the bath ceiling (long story), the 2 colors for the home theater, the color for the bath, and the color for the rest of the basement (all 5 gallons of that alone). Plus it will take all of the 10 gallons of primer, and we might still be short a gallon or two there.
With all of that paint, I need to decide how to apply it. I like the idea of spraying it, but I have never sprayed a ceiling before. Heck, I've never sprayed an interior before. I used a commercial grade sprayer to spray the outside of a house, and it worked really well. All of the time is in the prep work of masking. The primer will go on everything, so that seems like a no-brainer. The bathroom would probably just get rolled for paint just because it is relatively small and I don't want to have to clean those 2 unique colors out of the sprayer for such a small space. Maybe spray the primer, then spray the white ceilings everywhere but the theater and bath. Then spray the 5 gallons of common wall color, and then figure out what to do in the theater. Probably spray it too since there is a good amount there.
Hopefully we aren't off too much in our quantity.
I also got the green light to order the seats. We changed things up a few times on the style and color. I thought for sure that we would end up with black, but we aren't.
In case you hadn't noticed, I've kept the colors out of the conversation. You all will have to wait and see.
Oh, and the mudders come tomorrow. I have a couple of days off coming up after this work trip, but I am going to try to tackle replacing the vanity/sink in the kid's bathroom. It needs the update badly, plus it will be nice to have a taller sink and a faucet that doesn't drip. Gotta take advantage of the time off and not being able to work in the basement to get other things off of the project list.
I used my brother in laws professional sprayer in my previous houses basement remodel. You are right, all the work is in the prep as the spraying is very fast. I do like the look of sprayed trim a lot. The downsides are you will use a LOT more paint than rolling. Also rolling helps bind the paint to the wall a bit better. It will resist chipping a bit more. Also spraying the walls will reveal any drywall/mudding imperfections more than rolling since it leaves a smooth finish. I have read contractors sometimes spray the walls then roll them while its still wet. But I've also read how thats a ton of wasted work.
Overall it's nearly a 50/50 decision for me... after spraying our last project I opted to just roll everything this time. I kinda wish I would have spent the time to prep everything to spray our doors and trim this time but I would still just roll the walls.
Some updated pictures for you... The screen wall...
The back wall...
The rear side opposite the door...
The mudders are at the house now working on getting mud on all of the outside corners. Hopefully it will dry by tomorrow night and then they finish the inside corners in the theater and start the finish coats Friday/Saturday and are ready to texture on Monday or Tuesday.
I have been pleasantly surprised at how much of a mess they have NOT made. Plus, part of the contract is that they clean up when they are done.
I also forgot to mention that I ordered my seats today. The company had a sale that saved me $250 more than the cheapest price I had seen in the past. I had to jump on it. They should be here in just over a week. I hope to find some place to put them when they get here. There will be 16 boxes for the 8 chairs.
Nothing new to show. The stupid mudders haven't been back since Thursday night. They loaded up the corner bead, but weren't sure how long it would to take dry. I put some small heaters (don't want to bake it, but want to get rid of air moisture) and a few fans down there.
The main guy was supposed to be over Friday night to check on it, and to do the last inside corners (at least the first layer) in the home theater. Then Saturday was supposed to be the finishing coat day with a couple of drying days for a Tuesday night texturing job.
Well, a few phone calls and text messages and I haven't heard ANYTHING from this guy. At first I was polite and just asked for the "schedule". My last message wasn't so polite. We were planning on painting this coming Saturday, but I have a feeling that they will still be working down there. We also need to order carpet since there is a great deal going on and of course installation is 2-3 weeks out from today. We really need paint on the walls to get a good feel for the carpet colors.
Good thing that I haven't paid the mudders anything yet.
Tomorrow I am going to talk to the guy at work who knows and recommended this guy. Maybe he can get some action out of him.
My carpenter was supposed to be here 3 weeks ago (as of today) to put in the last couple of hours to finish his work in the kitchen, and I haven't heard from him.
Some contractors suck when it comes to scheduling.
LOL. So I randomly got a text from the guy yesterday morning. He said that he was out of town still due to a "sudden and tragic death" in his family. I heard that he had some close relatives living in one of the areas that we devastated by tornadoes last week, and the timing lines up, so I wonder if that is what happened. I don't have a lot of details yet. He was planning on being back at our house working tonight and doing texture tomorrow. I am going to guess that he won't be texturing until Saturday though.
Today is texture day. The guys got here about 90 minutes ago. One is mixing mud, the other is doing a final light sand of things. Carpet guy just left. He was taking measurements, but the guy looked like he was in his upper 80's, low 90's and wasn't very friendly, but hopefully he got the measurements right. Of course, he couldn't tell me how much sqft we had. I guess that I should just measure things myself. Hard to ballpark a cost between different carpet stores without knowing the amount of carpet is needed.
Tomorrow morning we are going to prime everything, and then we are going out of town that afternoon and will be gone until Monday night. It doesn't look like we will get to any painting until Tuesday. I am going to start in the theater first so that we can get moving on risers and the stage before they carpet. I told the old guy that we would be adding them, but he just gave me a grumpy look like he had no idea what I was talking about and that he wasn't happy about it.
Ok. My wife, 13yr old, and I spent almost 7 hours priming the walls after they textured last night. And we still aren't done. We have the whole bathroom to do, most of the office, and then the ceilings in the bedroom and in the theater. And just think. After it is primed, and after the drywaller guy comes back for the light standing that he recommends (an often missed step), we still have to paint all of it. I am hoping that we have the priming done Sunday afternoon before we head out of town. Painting should start on Tuesday and I am wanting to do the theater first so that I can start construction of the riser and stage.
What I'm suprised at, Nick, is that your daughters aren't royally peeved with you for waiting until they were teenagers to finally build them a stage. You go! You nipped that Toddlers in Tiaras syndrome in..the..bud!
I have a dumb question. You said the walls were textured. What kind of textured drywall surface is it that can be sanded it after it's primed (or ever)?
Oh, now I think I know. There's a contractor involved, right? So he charged you extra to texture the walls and now he's gonna charge you again to sand the texture off, so they'll be nice and smooth. I start a 4 week surface rehab project Tuesday and I'm gonna see if I can work in those line items. Brilliant!
LOL to Bob... No, the trick is that they texture (we went with orange peel) and then they lightly (very lightly) sand the surface. It was actually quite noticeable to the touch. Not sure that it looks any different, but when sliding my hand along the "unsanded" wall (already primed) it has a slight sandpaper feel to it.. Just really small edges here and there that you could feel. The lightly sanded parts looked the same, but weren't rough feeling.
Anyway, he also had to come back and fix a few spots that weren't noticeable until the primer was on. He worked on that yesterday and tonight. There were 5 spots in the theater that I wanted fixed (one was a spot that would end up behind a QS8, but I wanted it fixed)... One was in the family room, and one in the bedroom. Everything else has been lightly sanded and we can start painting those rooms tomorrow. Then we focus on the theater so that I can get the riser and stage built.
I am thinking about stealing this design for the stage...
Oh, and my theater seats were supposed to be delivered to the distribution center in town today, but they weren't One more day or maybe two. I still need to find room for 16 large boxes (each seat comes in two parts)
Lastly, here are some pictures of the room primed. The blue arrow is painters tape marking one of the "please fix this" spots.
I remember when I was about 15 years old and my parents (ok, my dad, my 2 uncles, and I) built a large deck. I mean, this thing is HUGE. Anyway, there is a section about 15 feet wide where the deck has a curved section that bows out similar to that stage design. That wood was a B17CH to get curved, and that was with the piece being wet for a couple of days and half as thick as the rest of the frame. Obviously, it was 2 pieces thick when done.
Anyway, these folks (and MANY others) are doing it with two thinner pieces of plywood. I've heard that some are doing two .5" thick pieces, and some people are doing a combo of two or three .25" thick pieces.
I plan to do that method. Obviously being thinner, the plywood wouldn't need (nor would you want it) to be wet.
Drywall mudder/taper finished fixing things tonight, that meant more dry time and more primer. Managed to get everything primed, and then worked on the ceiling white. Got that done in all of the rooms (except for the theater which will have a different color).
We also got the bathroom walls, office walls, and game closet walls done. The color of the paint is definately darker than the paint chip. I know to account for it being a littler darker, but this is several shades darker. Not sure if we will still put it in the rest of the basement, or somehow lighten it up. We have about 4 gallons of it left (bought a 5 gallon bucket of it).
With any luck, tomorrow my wife will start in the home theater as the primer will be dried for sure in there.
So we started painting the theater tonight. You can't tell from the picture, but the ceiling is a nice rich and dark brown. The walls are still primer as we ended up putting a second coat of white ceiling paint everywhere (I thought that the primer would have helped, but I guess not much). We also did some second coats in the office and game closet on the walls.
Anyway, that isn't why I am posting. I marked off and put up some masking tape up to mark the *maximum* screen sizes I could go with physically. I am not saying that I will go this big, but I wanted to see what it looks like.
Below are two pictures of the front wall. Keep in mind that I need to build the stage and false wall yet, so this is just for visual purposes only.
I could go with a 2.35 or 1.78 (HDTV) size. Going with the same maximum width (I don't want to extend under the soffits as the projector image could get "clipped"). The width is 126", so that yields a 137" diagonal 2.35:1 (wide for blockbuster movies), or 145" diagonal for HDTV format. Exact dimensions are:
2.35:1 - 126" wide x 54" tall 1.78:1 - 126" wide x 72" tall
With the 1.78:1 *IF* it was that big, even with a riser for the second row, the bottom of the screen will be partially blocked by people in the front row. This is a limitation due to the low ceiling (7'9" in the theater room). The 2.35:1 doesn't have this problem.
I was sold on the 2.35:1 for a long time since we will watch probably 95% movies, maybe 2% TV, and 3% XBox gaming, but now I am wondering about movies like The Dark Knight and Transformers that switch aspect rations mid-movie. I would miss out on the effect of the IMAX portion of movies like those.
Again, not going by screen size alone since this size would be somewhat at the upper limit of my projector when paired with a 1.2 gain AT screen that I want (It wouldn't be a problem with a higher gain at all), I am torn as to what to do. The screen will be DIY for sure, and the fabric will cost the same since it comes in 92" widths which will become my height and then I will buy 126" plus several extra inches for wrapping around my frame if I went with something this big.
So do I just go with the 1.78:1 and know that for a majority of the time when there is 4 or less people in the room that things will be just fine, and it is only when a lot of people are over and watching something in 1.78:1 like maybe the Superbowl or something, then the bottom would be obscured for the back row.
Thoughts? Opinions?
For those that like to play around with it, here is an awesome projector calculator. Again, select JVC RS45, 1.2 gain screen, and a throw distance of about 18 feet. http://www.eliteprojectorcalculator.com/
Oh, and I don't care about 3D.
Here are the pictures.
And one with my 13 year old daughter standing up front. She is tall for her age. Not sure how tall though, but at least it is something for some sort of reference.
IDIOTS IDIOTS EVERYWHERE! Running is futile, because you can never escape!
Outside of the drywall mudder/taper issues (I was "fixing" things even last night), I get a call 5 minutes ago that the shipping company is AT MY HOUSE with my theater seats... I am at work. They were SCHEDULED for this afternoon, not 9:30 AM!!!
Oh, and I have meetings all morning and can't leave.
My wife and kids are home because of spring break, but they got back late from Chicago (3:00 am) and we all still sleeping.
"Sorry honey, but you need to get up. Some strange man will be at the door to unload 8 theater seats. Good luck!"
Yea, even though it isn't my fault, I will hear about this one BIG time!
I almost think i would have told the driver to return at the SCHEDULED time..... and called a supervisor or something.... regardless of having to wake the wife up... They probably blew through their deliveries and figure ah. What the hell.... Or you guys were loaded last, so of COURSE you need to be unloaded first regardless of the specific time you put for delivery..
Sorry nick, shit like this REALLY pisses me off... i am the type of person who expects someone to be where they said they were going to be WHEN they said they would be there...
You should stop on you way home and buy flowers and chocolates, on the card you could put, "i am sorry for the retard that could not read the scheduled delivery time"... (my standard recommendation for all of you married guys! )
Of course, significant box damage to 2 of the seats with interior damage to the seats (oh joy) and two other boxes with small punctures that don't seem to have damaged the inside. I am heading home in about 30 minutes to see for myself.
I am of the opinion that you should have the biggest futhermucking screen you can possibly have, which is indisputably 1.78. While you might THINK you're going to be watching a lot of 2.35 content (movies), you also might start watching "more" television-related content, at which point you're not going to be getting all the image you can.
But my opinion is clearly influenced by my own viewing habits, so do what you want. Go ahead and "decide" on one or the other, and live with that decision for a week or so before you do anything about the money, etc. involved. If you have regrets or doubts, try on the other option for size.
I am concerned a little bit that going 1.78:1 will mean that I will need to decrease the overall size, this making the 2.35:1 viewing material even smaller (when displayed on a "better sized" (smaller) 1.78:1. I mean, I still need to build a stage under the screen.
Unless I scrap that whole idea of a stage and make just a floor to ceiling screen wall. I guess that would be cheaper as I wouldn't need to build a monster stage filled with sand (my back hurts already thinking about hauling it). I could build some solid platforms behind the screen for the speakers to sit on, but that would be a lot less work (and again, materials) than a full stage that only the front would be seen. The subs could reside on the floor with a DIY dampening pad (I've seen places sell these things for like $100 each which is just really thick plywood on top of some dense and grooved foam just resting on the floor. Hard to describe. It would also keep the carpet costs down. If I wanted a "stage" look later, I could build a faux stage that is really just the front part, cover it myself with a black carpet, and just set it (with minor securing) in front of the screen bottom.
I've always fell under the impression that if you have guests, they probably won't realize if they have a smaller TV screen size (relatively of course, it's still freakin big) because most people are still in a mindset where they don't expect to watch TV on a wall. Movies however, people like to be wowed! The more wow factor for a movie the better.
Got the chairs unboxed and put together. Found a few issues with them. At a minimum I need to send just one cup holder and the back of a seat back for replacement. IF I have them replace everything (whether it is noticeable when in use or not) I would be sending back 2 full seats, 2 additional backs of seats, and a cupholder back to them. I will have to get my pictures gathered and ready to email to them. I would even settle for the minimum 2 items and some money back or upgraded cupholders or something. Should be a lot cheaper than shipping 2 whole seats back and forth.
Oh, and a snapshot of the seats. Bad camera quality and horrible lighting conditions. Sunlight in the background, shadow from the house in the foreground....
i am guessing that you are responsible for the shipping cost associated with sending back the damaged product?
If you were home, could you have refused delivery on the premiss of the condition of the boxes? Not trying to start anything, just want to know incase i buy something like this off of the net.
P.S. you should label the outside chars at "teenager chairs" just a though.
The damaged items look like it id due to packaging, not shipping. Even though the one box was damaged, and damages on the inside were in a different location and so forth. Refusing the shipment would have meant refusing all 8 chairs and then rolling the dice on the next set of 8 chairs too. The list of items are basically 4 seat backs have hard creases in the material on the back. 3 of those creases are on the "flap" that velcros on to the seat bottom. Not a huge deal, but still. The creases were caused by them not laying the material in the box flat before closing it up and stacking them on top of each other. The other seat back has a crease at the top of the padding, very noticeable, and the stitching is messed up. Sort of like they stitched it, pulled out the stitching and tried again. VERY ugly. The cupholder has a crack/hole in the visible rim, it needs replaced. The seats have small wear marks on the burgundy material on the front and/or rear feet. If they were in the back row (maybe even the front row), they wouldn't be seem normally. These seem to have gotten worn in shipping. There is also a 2 inch long tear on one of those seats, but it is where the side of that seat joins another and will NEVER be seen once installed. That same seat also has a cracked plastic foot. Probably never seen, and probably will never be an issue, but again....
At a minimum, I MUST have the one seat back with the bad stitching and crease at the top replaced and the cupholder. The other items I can deal with as long as they compensate me either with money back or with something like an upgrade to stainless steel cupholders or something since I will have steel colors in the room as well.
For the price, we will be happy in the end, but getting there is another story.
Now to go plan out my riser while my wonderful wife paints the theater walls.
Sux about the seats. As for the screen I was going to vote for 1.78:1 because there are plenty of movies filmed in that aspect. But I started thinking about your issue of the bottom of the screen getting cut off and figured using up the entire width with 2.35:1 could be better. Then I assume 1.78:1 content would just get black bars on the sides.
If you can't do a wall to wall 1.78:1 because of height then I'd say do a wall to wall 2.35:1. It basically comes down to which format you want to appear to be larger. With more movies being 2.35:1 that might be the way to go. Of course I don't know much about projectors so I could be completely wrong about their ability to do this.
As for the stage, if you're worried about it taking too much height away, could you just build a very short one? Just a few inches to give the front a different look from rest of the room? Just a thought, would be less sand that way as well.
Brown paint takes SO many coats, even with "premium" paint... My lovely wife was painting like crazy today while I spent 2.5 hours (2 trips) to and at the home improvement store today. I now I all of the riser stuff in the basement and have all of the boards marked and ready to cut. It will be done tomorrow. A lot simpler design and a lot less cost. Pictures will be posted.
So we came to an abrupt halt on the riser (does anything in this project go 100% the first time? Don't answer that!)...
I did get the basic part of the riser built. Pretty much everything short of putting the two layers of 3/4" plywood on top. We put it into position, and then I realized that I added width for the seats (no "exact" fit for safety reasons) and even more so when I account for the 1.5" recommended (rounded over) overhang, the walking path around the riser to get to the movies and equipment would force people to navigate around where the side QS8s would go.. Crap. I will probably have to tear part of the riser apart and make it narrower, but in the mean time I decided to get all of the can lights and wall sconces wired up. The problem, yes another one, was that I tried to trim off the excess mud/paint from around the can light locations, that pretty much all of them ended up with visible gypsum (white) against the painted surrounding (Chocolate Truffle brown). Even the can light "rings" didn't cover them, so I needed to go back, patch them with some mud, and paint. So while they work, they won't be "done" until tomorrow when the paint dries and I can put the rings up.
I also had a field day with the sconces, but that was somewhat expected. The boxes for the wall sconces mounted mid-stud cavity, so they were held between two studs by an expandable metal rod that the came with. This would have been perfect for a single layer of drywall, but with 2 layers of 5/8", they were recessed quite a bit. I knew that this would probably be a problem, but wasn't originally planning on doing lights, so I was ill-prepared. I ended up digging in the garage for about 30 minutes to find some of my old workshop stuff (still never unpacked it since EVERYTHING is in our garage waiting for the basement to be done). Anyway, I found some thick plastic washers that I picked up about 13 YEARS ago when I was building a "swinging/swaying" bridge for my daughter's playhouse. She was 5 at the time, and graduates high school in May. Anyway, a couple of those were perfect and the lights are on solid.
But then, in the excitement, I forgot that I needed to caulk the sconce boxes to the drywall. Urg. That will be tomorrow because we didn't have the small lights for more than 1 of them. Again, I wasn't planning on doing lights today.
I will get them caulked, back up, and the lights in them tomorrow, but that and the can light stuff mentioned above will be about it as we have some stuff going on tomorrow night.
So the other delay was that I needed to wire things for bass shakers, or at least get two sets of wires from the equipment rack to the riser. When the design was going to be pretty much a short riser for the whole back end of the theater with a taller section for the chairs (sort of an island for the chairs with a step level all the way around), it would have been easy to hide the wires. We changed the design to just have the riser "island" since tall people would have been ducking as they walked around under the sconces. So the concrete floor has a cut in it that is somewhat deep. I originally had this filled with caulk. I had to cut it out which was easy since it was a hard caulk. I then had to try to cut out the super flexible acoustical caulk from under the wall edge to make a path for the wires to go along the edge of the walls and then into the "canyon" like cut into the concrete and then pop up under the riser. It should work just fine, but I need to caulk them into place yet, BUT I still don't know how carpeting is going to work. Will it be better to carpet the whole room, and then carpet the riser separate, or secure the riser to the floor and carpet around/over it? The first option is probably the more long-term versatile, but then it creates some coordination complexity:
1) carpet the home theater first 2) Cut a small hole into the carpet to route the bass shaker wires through. 3) When they start working on the rest of the basement, I scramble to get the riser back into the room using some yet to be bought/constructed dolly system to wheel it in on-end. 4) Measure and position the riser. 5) Glue and screw the first layer of plywood (pre-cut, routered, and labeled. 6) Add a layer of 30 pound roofing paper. 7) Screw down the top layer of playwood (again, pre-cut, routered, and labeled.)
This is of course assuming that they are willing/able to do a decent job. If it was just a square box it would be easy, but I don't know how they wrap a side and back of a step (inside corner) so that it looks OK.
I'll try to snap some pictures tomorrow night, but at the same time, I might wait until Tuesday when I get 2 chairs down there to test out some sight lines, and everything else is pretty much cleaned up.
Ya know Nick, I feel pretty good about how hard I worked on my basement this weekend then I read one of your posts... I donno where you get all this energy from but it makes me feel like Sh__!
Tonight was a busy night, but it doesn't seem like I have much to show for it. After building up the riser minus the top for the second row of seating, I tried to walk around it. Sort of a "test fit" if you will. I also noticed that right where the step was on the riser was in line with where the side QS8s were to go.
So that brings me to tonight. I reduced the width of the riser by 6.25" That is still about 4-5 inches wider than the feet on the row of 4 seats, and once adding in the "lip" that the top layer will create, I felt that it would work. As a safety precaution, I am also going to put some "tracks" out of some 1x1 or other material that will attach to the top of the riser, and hold the inside 2 seats from moving left or right. Since all 4 seats are connected, this should help with any "wiggle room" issues, and still stay fairly hidden since they won't be under the outside seats.
So after tearing some of the riser apart (got to break out the ever popular Sawzall), which I used not only to cut through my 3.25" ring shank nails (suckers are about impossible to get out), but I also used it to cut the appropriate pieces and re-notch the one step. Then I put it all back together and did another test fit. Much better. I also opted to move it back about 7 inches away from the screen. After doing some quick measurements, the front row would have been about 11 - 11.5 feet from eyeballs to screen and with the AT screen material, I heard that a safe distance for someone with REALLY good vision so that they can't see the weave or perforations was 12'. That is the new target, and will be 2 feet closer than my older theater was and be going from a 104" screen to something around 130-140" (max). It should be quite immersive.
I know that people want pictures, but there is so much crap in the room right now, that I wouldn't be able to get any decent photos anyway.
Oh, and the lights are all in and caulked. Managed that last night. I don't have them on switches yet (will be temporary until I order dimmers) but that should happen tomorrow. It gets so warm in there with six 60 watt wall sconces, twelve 50 watt halogen can lights, two 500 watt shop lights, and one 300 watt shop light. For now, I like having it really bright in there so that I can work, but it gets toasty.
Thanks. Like I said, the colors are off a bit, so is the brightness and contrast... The room has a much "cooler" feel to it than is reflected in the pictures.
OK. So I spent a couple of hours in the basement, but only about 1 of those was in the theater. I did some painting elsewhere, as well as getting some measurements for things like tile in the bathroom, etc. So anyway, I basically got the 2nd layer of 3/4" plywood on the riser and the two layers of 3/4" plywood on the steps of the riser. This puts it to 11" tall before carpet. That should be nice for seeing over heads.
Anyway, I never got a chance to use the router to round over the lip around the riser and riser steps, and thus I didn't clean the room up for pictures. But, I promised something, so here is a picture of the riser...
So like this only with a "shield" to direct light downward...
I need to have light near the two steps on my riser (rope light is out due to the fact that I can't get power to the riser (easily). There are outlets on the side walls pretty much in line with where the steps are. I was going to go all light, but I need the outlet component to meet code.
No go on this:
The reason it needs to be black is that I am going with black outlets/switches and brushed nickel wall plate covers. So I need the black/nickel combo to match the rest of the room.
Kruncher, I've seen those. They stick out a noticeable distance from the wall since they basically just plug in to the outlet.
I would just go with: but I am afraid that the light will be distracting for people sitting in the second row.
Here is a picture of a similar brushed nickel wall plate cover to what I have to help people understand a little more of what my limitation is:
Tom, "Second box" ???? Do you mean a whole additional 1 gang outlet box? Even so, the ones in white above have their own wall plate as part of their design that can't be removed, so the box would need to be a little distance from the current outlets, and then with all of the soundproofing I did, I would be compromising the integrity of that. Crap.
I would think that if your choosing brushed nickel, even a small amount of light through the grill will reflect and be distracting.
Depending on your definition of how much is distracting, I'd probably choose to blend the lighted boxes into the wall with a darker shade. You could still use brushed nickel for wall switches and such. I think that because 'to guests' these will appear to have a specific use, floor lighting, and no one will even think of the questioning "should they match the light switches and other outlets."
Just my personal thoughts, guesses admittedly, never having seen your room in the dark.
But why not just use a standard duplex outlet, put an LED nightlight in one of them, and build some quick 1/4" wood hoods to give you the exact amount of light spill/throw that you want?
I KNEW someone was sitting in the (single) theater chair. Sort of like Goldilocks!
If the need for an outlet wasn't an issue (for code purposes), then I probably would just get a light only module (in black) and be done.
Mark, I was thinking about trying to find some sort of plastic "visor" to put over the top of the following style...
But so far, no luck in sourcing something that would seem to work. Of course there is something that will work perfectly, but it is attached to something else that I am just not thinking of. And since I can't think of that oddball item that would have something that could be turned into a "visor", I am still searching.
I think that I will pick up one of these outlets (don't care of the color) today and test it out. Maybe use electrical tape instead of paint for a test too.
I'm just gonna bite my tongue when discussing "code" and such.
I've been looking around for LED lighting myself (for the stairwell). I can't say I've stumbled upon anything that completely meets your requirements thou.
It is 2:00 am. Started prepping and tiling around 11:30 AM YESTERDAY.
Like, totally. But once you've tiled a few ceilings, the walls and floor don't seem so bad. Nick, I know you only have weekends, and you're excited to get 'er done, but it's OK to have more realistic expectations about what can get done in certain amount of time. Just don't beat yourself up.
Just took way longer than I wanted. A LOT of of cut pieces for the bathroom.
Today, I get to tile in front of the sliding patio door. Only needs 2 tiles cut, and one is already done. It will be a LOT easier to get done. Grout will happen later this week as I will be in the St Petersburg/Tampa Florida area for work.
I will brush up on my research of how to connect the toilet and sink water lines (they are Pex, and I am sure that there is just some adapter), and then see about getting the sink/toilet in some evening just after Easter.
I will gain back a bunch of garage space getting that stuff installed.
Before carpet, I also need to run my bass shaker wires, and I still need a good bead of acoustical caulk along where the walls come down to the floor.
Lot to clean up too, so I will be focusing on the theater wiring/caulk first when I get back from my trip just in case the carpet people are ready to install.
As soon as carpet goes in, it will start to look like something. We are really getting close, and yet have so much to do (lots of outlets/switches to wire up for example). I do see a light at the end of this tunnel though, and I think that it is playing a movie. Can't wait.
Oh, and I have a replacement seat coming this week to resolve the issues I had with my order of 8 chairs. At least it doesn't cost me anything to ship, and it will fix all of the issues with just 1 replacement seat.
Carpet guys are here today. Hammering away at the tack strips. They are working in the home theater first to get the carpet down, and then I get to move my riser in there and they are supposed to carpet it too.
Problem is that they don't know exactly how they are going to do it. Since it is more like an "island" in the room and needs the top and 4 sides carpetted, they have concerns which has me concerned.
The carpet place told me it wouldn't be a problem, but he doesn't actually have to install it.
OK. Stress diverted. The guy thought that I wanted the riser carpeted on the top, sides, AND bottom. When I told him that the bottom doesn't need carpet (since it is sitting on the floor which has carpet), he was much happier. They are going to do it in 4 pieces. Since I have a lip on the top/steps, it will work nicely. The top and each step gets a piece that wraps and gets tacked to the underside of the lip. Then they are going to put a long skinny strip all the way around the sides. It will meet up under the lip and that seam will be hidden. There will be a seem in the middle of the back, but it won't be very noticeable if at all. Whew...
Pad is going down in the theater in a couple of minutes, and then the carpet. Woohoo!
They could just direct glue it and then contact cement the sides, I have done many of them that way. Then they don't have to worry about streaching the carpet.
I want pad on the top and the two steps though. Maybe they are going to do that with the sides? Not sure. I will know in a couple of hours I guess.
Once they lay the carpet in the room, I have to wheel the riser into the room, over the door threshold which will be the "best" part, I am sure... Anyway, once in the room, I need to connect my wiring for the bass shakers, then lay it down into position. Measure the location as best as I can, then put the subfloor glue on the 2x10's, and the first layer of 3/4" plywood. Then I put on the 30# tar paper, and the second layer of 3/4" plywood. Good thing that I have everything cut, routered, and prescrewed (so that things will go much quicker today putting it back together). Then it is up to them. If they decide to tuck the carpet under the bottom of the riser, that will be quite the job since it is so fricking heavy.
I am thinking about taking my Axiom's down there tonight to get them out of the hallway/dining room where they currently sit. Heck. I am thinking about taking my projector, receiver, and blu-ray down there too. It will be hard not to start setting things up, but I am on a tight and strict schedule for getting things in the whole basement done. I've got 3 phases. 2 weeks from tomorrow we have pretty much my wife's whole family here for the weekend. We need to get rooms ready for temp occupancy. Outlets and light switches need to be done, doors still need (more) paint and rehung. Bathroom needs to have the shower head and knob installed, the toilet installed (still need to install the flange meaning drilling through tile with a tile bit, and then switching to a TapCon bit for the concrete), and the vanity installed and plumbing connected. Those are the bare minimums. My wife wants the home theater up and running even if it isn't 100%, but without even having the screen material on order yet, or the time to do it, it will be hard. The 2 weekends between now and when they get here are shot too.
Then there is the inspection phase. Everything needs to be completely finished and done including door trim (and if time allows, baseboard trim, although not a code requirement), some access doors to certain areas need to be installed, all of the can lights need to be adjusted for height of the light inside the can, and then the trim rings installed. That is easy, but takes time.
Oh, and I can't forget that I need to get the drywall mudder back to fix some things in the bathroom. Either that, or I could hammer them out myself in about an hour of time total and not wait for him. Those fixes will need to be repainted.
After that, I need to get things ready for the graduation party we are having at the end of May. Home theater needs to be 100% complete including crown molding, rope lights (led strips), acoustic treatments, etc.
It doesn't sound like much, but I have an itemized list that is HUGE for each phase.
Nick, I'm so impressed with your work, and so grateful that you've chosen to document and share your journey.
While I am sometimes inspired by this thread, I don't think I can remain drunk enough for long enough to actually thing going through a similar process would be a good idea for me personally. I just don't have your diligence or skills. The QUALITY of everything is just astonishing.
Good thing it is where the toilet goes. A small crack won't be noticeable and can be sealed eaily, although it is just tile, thinset mortar and concrete anyway... Not like there is wood to rot if there was a leak.
Carpet is (finally) done in the home theater. They even helped me move the riser and plywood pieces in there too.
I was being a bit impatient since it takes a long time to put all of the tack strips down and glue the pad down. Plus they had to tear out the old carpet on the steps (didn't take long), but pulling out the old pad and putting some different tack strips so that they can tack them down really nice. Before they were the "waterfall" look, and I am having them do the "upholstered" look where it tacks down around each step's lip. Oh, and they also re-scraped and swept the floor even though we scraped and swept a bunch last night.
Tomorrow will go a lot quicker I think. They have most of the carpet at least seamed and laying down. That gives me tonight to get the riser exactly where I want it for tomorrow and then they wrap things up (literally) tomorrow. Woohoo!
Damn... you can almost touch the finish line. Congrats! You certainly put in a lot of work and should be - deservedly so - proud of your room. After the GG cures a bit more, would love to hear your overall impression.
My youngest has a dance competition today and my oldest has state solo ensamble contest most of the day. However, I managed to carry the Axioms down into the room between a few things earlier today. I have a feeling that we will end up watching something some evening even without a screen or acoustical treatments.
Just ordered the screen.material. I was going to get a premade frame from Jamestown screens and then put the Seymour XD acoustically transparent on it, but they are backlogged 2 weeks. So I will build my own frame and use the same Seymour material.
FYI that the uncalibrated image on a brown textured wall looked really good, and on the 8.5" x 11" screen sample looked awesome.
To top it off, the family voted and we are going to go with 135" diagonal 1.78:1 screen. I was afraid that they would veto that size of screen, but no.
Man, I can't wait to see the finished room. Like most people here, it does depress me that I'll never get my own home theater into such a shape, but at least I'll have your thread to refer to and inform at least some of the decisions I make.
I am sure that I will have a bunch of "lessons learned" things to share. I've learned so much, both good ideas as well as issues, from others but there is still a number of things that I couldn't find info on, so someone (like me) needs to get practical information out there for others to build from.
Anyone here ever work with a DIY screen frame and velvet?
It just hit me this morning that with the screen as large as I am going, and with velvet in a max width of about 60", I am going to need to put some sort of seem on at least the top and bottom of the screen frame since they will be around 120"... I don't want to buy 11 feet of velvet at about $15 a foot just to throw most of it away but have seems only in the corners....
Ideas?
I guess I could try to go "borderless" on the screen, since it is going to be on a false wall that is going to have black GOM or some other black acoustical fabric. Let the false wall be the frame...
So I go online (on my phone) last Saturday in-between my oldest daughter's solo and ensemble performances to order the screen (Center Stage XD from Seymour AV). I send an email to get the process started since they don't have an online store for DIY stuff (since everything is "custom"). Anyway, after a few hours, no response. I am getting anxious, so I give them a call. Ring #2 of the phone and Chris Seymour answers the phone. I mention who I am and the email I sent earlier as well as a small email conversation that he and I had a couple of weeks back. I tell him I would like to order if he can get my the screen material quickly.
He tells me that they can get a 12' cut of the 98" wide material out on Monday. Woohoo. Here is my money....
Monday comes and goes, and since this guy is just a 2 hour drive from me, I am thinking that it might be at my house on Tuesday. Tuesday comes and goes. No package. I contact Chris again to find out that their current batch of screen material is messed up and then are taking an entire giant roll of it and cutting out the bad stuff and trying to fulfill orders with what is left, but it will ship out on Wednesday and be hand inspected. He will send me a tracking number when it ships.
Wednesday, guess what? Yup, no tracking number. Maybe he forgot. Thursday comes, it is busy at work, so I don't get a chance to contact Chris until about 2:45 pm. Yup, still not shipped and not shipping out today either. His words were " We might get it out this afternoon." which to me says "Not gonna happen."
So even if it does go out tomorrow, we are into early next week before it will be here. Heck, I could have waited a couple more days and had Jamestown Screens build me the frame and ship it with the Seymour product. But nope. I'll have to wait.
Not that I don't have enough other things to work on, but dang....
Now if I could just find my original T-Brackets for my first pair of QS8s I'd start hooking up speakers. (I am waiting until I find them because I know that as soon as I have audio, I am going to lose HOURS of time in the home theater instead of doing fun stuff like door trim, and shoring up electrical outlets (a lot of the boxes are too far into the wall and I need to put spacers on the outlets so that the covers fit nicely)... Fun fun.
I know it isn't Christmas, but "Do you hear what I hear?"
Of course not. You aren't here. Managed to get a poorly configured 5.0 system up and running tonight. The only speakers that are in the correct locations are the "side" surrounds. I put my v3 QS8s at those locations. The new style mounts/wire connectors are pretty slick. The front right and left are sort of close to a decent placement. The center is sitting on the floor and way off to the right side.
I still can't find the older style "t brackets" for my other QS8s...
The last major thing I need in mine is the carpet which won't be for a few weeks still... I've been resisting setting up some speakers myself for the reasons you mentioned. I have too many little things to finish off that I'll never get to.
I wonder what is in the tall cardboard tube? My youngest is standing there for a size representation, but since you don't know how tall she is, you can see that even at an angle it is too tall to stand upright in the hallway. Oh and there isn't much difference between the inside length and the length of the cardboard tube (1/2" tops).
PS. I passed the final inspection today too. Woohoo. Now I can "finish" the basement with all of the things that weren't required, but need to be done. Especially in the theater.
I am not going to bother with the velvet screen edge. I am building a frame that the screen material will wrap around, and then it will be surrounded by black acoustically transparent panels that will be my "edge" for now. Then, down the road, I will come up with something... Maybe... It has dropped pretty low on my priority list due to cost/time. I need to get this room done and a million other things in the basement need to be squared away for a massive graduation party for my oldest that happens 1 month from tomorrow (26th of May). I've got a pinball machine to "dust off", a MAME arcade that needs put back together, pachinko machine to get set up, foosball and air hockey are easy ones. I need to finish taking stuff out of the dining room (temp office for a year), down to the real office and move the dining room stuff in, and reset the kitchen eat-in area. There is yardwork to do, a garage to clear out and clean (at least a bunch of it goes INTO the house), a bunch of touch-up painting, baseboard trim, shelves in the storage closet, bathroom closet, and bedroom closet, plus all of the theater stuff yet.
Wow, that is a long list. I guess my 2am bedtime is still in effect. 6:30 am wake-up comes early...
The details never seem to end, do they? I 'finished' my basement about 3 years ago - about the same time I bought my Axioms - but there are still many things to do. Trim on certain areas, but waiting to put shelves up 1st which in turn was waiting on network reconfiguration and termination, still have a shower to put in even though the rest of the bathroom is done etc...
For the screen, were you able to order 'oversize' material to give you the extra to stretch around the frame to leave you with the desired finished screen size?
The screen material doesn't have a lot of stretch to it since it is a woven AT material, but I have a huge 98" x 12' roll of it. The "limiter" is actually the 12' length. It is enough for a 165" 1.78:1 screen and I would still have a strip of 18"x12' left over.
While my projector doesn't produce moire, I am still going to put the screen on the frame at an angle and wrap around the back. This will prevent moire with any other projector in the future. So I will still have plenty to wrap around the back.
When you were sound deadening your room, did you ever consider using 3/4" plywood instead of drywall? I haven't done any research on this subject.. Again, just piggybacking on your research
There are a couple of options there. One is thick plywood and then cover it all with fabric panels, another is to use the plywood as the first layer and then drywall over that. I've seen that done from time to time and the added mass of the plywood is nice, but there is a BIG price jump from say a $5 sheet of 5/8" drywall and a 3/4" sheet if plywood. The cheap plywood has voids in the layers and wants to curl on the edges and corners even after attaching to the studs. Plus drywall is heavy enough, but I can carry a 4x8 sheet of 5/8" drywall (with plenty of effort of course), but a 3/4" sheet of plywood is just dang heavy. I struggled with that when building my seating riser.
So yes, if you can pay the price for the material and the price on your back/arms, it will help. It just takes more efforts all around to cut/trim/etc as well.
We had 20 people staying at our house this weekend, so I put some of the guys to work building a screen frame, and helping to get the false wall assembled. Well, we didn't get as far as hoped, but progress was made. The frame is done waiting for the screen material to be attached, and the main pieces for the false wall are sub-assembled and painted. I am in Denver today and part of tomorrow, and then in Little Rock for a couple of days before heading back home. I will get the screen up and on the false wall for sure this week, and with any luck, I will also get my bass traps and the rest of the front wall treated.
I also managed to find the small box that held my T-brackets for my original QS8s, so they got mounted this weekend. I also put in a temporary equipment rack. I need to order dimmers and some fabric to cover the yet-to-be-made panels that will go around the screen on the false wall, as well as cover the acoustical treatments on the front wall. Maybe I will order that yet today. I just should have figured out how much I needed for the false wall...
We had 20 people staying at our house this weekend, so I put some of the guys to work building a screen frame, and helping to get the false wall assembled. Well, we didn't get as far as hoped, but progress was made.
This always happens when i have buddies help... We never make it as far as i think we should either... This is because they are over helping on their "day off"...
Coming later today (it is 12:45 am here) I will be posting some pictures. I already snapped them, but I can't find the cable to connect to my camera. I WILL find it after I get some sleep.
Anyway, I spent a huge chunk of time building the bass traps and front wall treatment today. It all started with a trip to the fabric store.
I had a couple of 50% coupons, so I got the black cotton fabric that covered the whole acoustic treatments (traps and wall) in a nice wide 108" "roll"...
For the bass traps, I had done a TON of research, and yes, you can do like what other have done and cut out Owens Corning 703 or 705 and make superchunk traps that have the dimensions of 17" x 17" x 24" on the edges, or use some other materials, like the denim insulation in the same triangular dimensions, however it gets compressed under its own weight and can end up costing almost as much as the OC703 once it compresses itself. Plus the denim insulation is nearly impossible to cut with anything but a toothless diamond blade for an angle grinder or circular saw. So more and more research yielded that if I went deeper (and wider) with the bass traps, I could stuff the corners with regular R-30 insulation (pink or yellow stuff that is really cheap)... I like the sound of cheap.
So I put up some 2x2's on the wall that were 24" from the corner. This was going to yield essentially a 24" x 24" x 34" triangular area from floor to ceiling. A decent amount deeper, but I had the space.
So I debated on how I wanted to fill the space. I could cut triangles out of the insulation, but the insulation would compress just like the denim, so instead, I went with the 15" wide R-30 and "hung" it from under the soffits. I was able to hang 2 full pieces (full = 15" wide x 10" thick), and then I took a 3rd piece, cut it into 2 pieces. One piece about 5" wide, and the other 10" wide. I took the smaller one and filled in a spot where the corner was tapering and took the wider one, and put it right in the middle of the front "face". This filled the corner nicely. I wasn't sure how well the fabric would hold the insulation from bulging too much, so I took some good ol' chicken wire, and put that on the front face to allow me to sort of hold it back. Not quite as "clean" as if I used the rigid stuff like the OC703, but this was going behind a false wall, so I wasn't too concerned.
I build up the other side, and then made a large framed section for the rest of the wall. I wanted to cover it with the 3.5" thick denim insulation, but needed to build some sort of structure to it. Probably overkill, but I basically framed up a whole other wall, attached it to the ceiling and used a couple of bracket to hold the bottom in place, filled the cavities with the insulation, and then it was time to cover everything.
So since the fabric was wide enough to go floor to ceiling in one shot, I just lined it up, and started stapling away. Oh, I bought an air stapler. WAY faster than using my electric one, and every staple went in perfectly. No more mis-fires or needing to hammer them in like with the electric stapler.
OK. So the acoustical part is done for the front wall, on to the screen. Staple, staple, staple, and a little while later, the screen material is on the frame. I used some metal French Cleats that I bought at home depot to hang it, so I put them on. I also got the main part of the false wall lined up, assembled together, attached to the ceiling and the floor, and the screen hung.
Wow does the image look SO much better (obviously) than the brown textured wall.
So I have pictures of all of that that I need to get off of the camera.
The "biggies" left to do in the theater are: *) Make and hang the black panels for around the screen (finish the false wall). *) Put in my Lutron Maestro IR dimmers. *) Put up the crown molding. *) Install the color changing LED rope lighting. *) Connect the bass shakers to the seats and wire them up. *) Put up baseboard trim. *) Install the star ceiling. *) Calibrate the audio. *) Calibrate the video. *) Cover up part of the step lights as they cast a LOT of light onto the screen as well as into the peripheral vision of people in the 2nd row.
I don't see me using the stapler much after this project, so I just picked up a cheap 'Tool Shop' brand one at Menards for $20 on sale. It came with a ton of staples too. That alone saved me at least another $7.50 vs. my original intent which was to buy more staples for my electric stapler...
I received a PM from a couple of people asking about the acoustical benefits I noticed, if any, of the treatments behind the screen.
I have no measuring tools, but only practical information based off of what I hear.
Before the treatments, I could be talking to someone and as I showed them around the room and would simple walk towards where the screen was going (or is now), my voice would literally start sounding deeper and resonate more (boomy). It was really odd. Odd enough that my wife thought that I was "faking it" and making my voice deeper in an attempt to get her "approval" for the acoustical treatments.
I also noticed that the room was still a little bit too "live" for my tastes. I ran a couple of sound tests using an old CD I had that would simply play a series of tones at different frequencies in short bursts. You could hear a distinct (even though slight) echo of a bunch of the frequencies. This is something that would reflect nicely on a waterfall chart or whatever those with testing equipment call it. Anyway, I could hear it, and I knew that this meant that audio was getting muddled and jumbled with itself (comb filtering?).
After the treatments, my "Barry White" voice went away. Now I sounds the same (good or bad) when moving around the room. I also popped in the test CD again, and alas, the amount of echo was GREATLY reduced. Keep in mind that it wasn't terrible to begin with, and really wasn't even noticeable when not running the test, but now, only a couple of frequencies even had a slight hint of echo.
So overall, I would say that they worked very well. MAYBE someday I will worry about first point reflections or treating the rear wall, but honestly, I doubt it. So much of this has turned out great from a sound perspective.
Things that were worth it: *) Staggered stud wall/double wall construction *) Double 5/8" drywall with GreenGlue for the inside of the theater *) Hat Channel for the ceiling (plus the DD+GG mentioned above) *) Kraft paper faced insulation in all wall/ceiling cavities. *) Flexible duct for the air vents (kills all sound coming in or out of the room via the HVAC system) *) Bass traps *) Front wall treated *) Solid core, steel exterior door. Some people build these massive doors by adding an inch of MDF, special (expensive) hinges, etc, but this worked better than expected and with the custom jamb to fit the staggered stud wall, cost me about $220 vs. at least $125 for the upgraded hinges alone going the other route). *) VP180 center channel upgrade from VP150 (Wow!) *) Second pair of QS8s to envelop the 2 rows of seats *) Use "Wall Nuts" (I used ones made by WAGO). These make electrical connections SUPER easy and your fingers don't start to get sore or blister from twisting wire nuts on. NOTE: I did not have great success with stranded wire and these. It wasn't stiff enough, but that is usually just the last connecting piece of a light fixture and not a big deal. They look like this and come in a lot of different sizes. I used 4 and 8 connector versions mostly: *) Use conduit for running speaker wires not so much for future expansion, although it is an option, but more for protection of the wire. Either this or run them between the two "walls" of your staggered stud our double stud wall. It will take a 5" screw to get to my speaker wires and what the heck would I be doing with that big of a screw. *) Document EVERYTHING and take pictures with documentation IN the photo itself. This helps us to remember what exactly we did and why so that any future needs for modification can work out well the first time. *) Monoprice.com is your friend for cables and connectors. (Please read comments in the next section about lessons learned too.) *) You can be happy with some cheap seating. I went with about the cheapest home theater style seating I could, and it wasn't like there weren't some issues, or that they are the absolute most comfortable thing out there, but they work well, add to the look of the room, and are better than the simple couch setup we had before in that they recline and have a taller back for comfort.
Things that I am not sure helped or I would have done differently. *) Putty pads (OK, I used a cheaper alternative) on the outlets. Just not sure that they actually did anything since the only thing that can escape through the small gaps are higher frequencies and those are generally stopped by the kraft faced insulation in the walls. *) Acoustical caulk - Not that you shouldn't use it, but a good quality 100% latex "50-year" caulk seems to be about as good and is really cheap. This stuff should be used on the FIRST layer of drywall since it is a P.I.T.A. to mud/tape/paint over. It took a ton of primer that was "designed" for all surfaces before it could be finished. Also, caulking along where the drywall meets the floor took more caulk that everything else combined and I am not sure that it helped at much . You are filling basically a 1.25" deep area (lots of caulk) that isn't that thick, has the bottom plate for the stud wall, cement, and thick drywall surrounding it, and is blocked by the thick carpet pad, carpet, and baseboard trim. I think that as long as your drywall came down far enough that there wasn't a gap ABOVE the bottom stud wall plate and the drywall (which would be an incorrect installation of drywall), and there weren't any gaps UNDER the bottom plate when building the wall that this could be skipped. - Wow, that is a lot about the caulk. *) Soffits - I was working with a limited height room already, and in order to keep up with the soundproofing efforts, needed "backer boxes" around my can lights that were going into the ceiling. The backer boxes took up so much space that the soffits are lower than I would have liked. They aren't so low to make people have to duck or anything, but I think that aesthetically, they would look better if they weren't as "tall". A solution would have been to drywall the entire room BEFORE putting in the soffits. This is the preferred method anyway when soundproofing, but it gets tricky when trying to go through inspections with a building permit like we did. It would have cost me another inspection fee, plus "red flagged" the room which probably wouldn't have been an issue, but still. Looking back, I probably would have just done the soffits last. *) Plan for all audio wall plates (test fit) BEFORE drywall. I have some thick HDMI connections back by my equipment rack that do NOT want to bend to go inside the wall cavity and are thus pushing out about 1/8" the one side of the 3-gang wall plate. This will most likely never be noticed once the equipment rack is in place, but it bugs me. *) Do NOT, EVER, under ANY circumstance, even REMOTELY believe that an existing wall (whether wood or poured concrete) is even slightly straight or square. Unfortunately I made this assumption and despite measurements being right in some areas (I didn't check *all* corners, etc when building), the one side of my theater is actually about 1.5" longer than the other. You don't "see" it, but when I was hanging drywall, it was evident. *) Do NOT, EVER, under ANY circumstance, even REMOTELY believe that the floor joists above your room are even close to being the same distance from the floor or are parallel to each other. This one wasn't as big of a deal since I believe that it is because the concrete floor was SO unlevel, not that the joists had that much variance. They were far from parallel to each other though. *) Realize that 12Gauge electrical wire is a pain to work with unless you put in 20 amp outlets and switches, and even then it doesn't "tuck" into the outlet box easily and you will end up monkeying around with outlets and switches in order to get them to lay flat and even once screwed down to the box. If going with at thick wall like I did, get the deepest, adjustable depth boxes you can. I had 1 choice, and if it was even 1/2" deeper it would have helped a lot. *) If using in-wall rated speaker wire (like I did), remove the outer sheathing BEFORE drywall phase, this will help the speaker wire to hang straight down better instead of wanting to curl up and make it difficult to find later on once the drywall is up. *) Do NOT get too gung-ho on your connection purchases before the build is almost done. I spent a LOT of money at MonoPrice on what I *thought* I would use for wall plate connections, just to find out things like my projector doesn't have a VGA connection, so there goes the VGA wall jacks and the long and heavy duty VGA cable that I ran. I also have a slew of HDMI wall plates and adapters that I will never use because the plans changed over time. I went from this: to this: and now have $25-$30 in the first type (both single and double connection) that are WAY beyond the 30 day return policy. *) Test ALL cabling as soon as you receive it. My primary HDMI cable to my projector was DOA (or was it DOI - Dead On Install), but again, I had it for a couple of months before I even really needed it, so no return for me. Another $35 loss.
As I think of more things, I will post them.
Ask any questions you like about any of the things listed above. The point of this thread has evolved over time from something for me to keep me motivated to keep working into something that hopefully holds some documentation value for others.
There is still much more to do, but the last tip I will share: AVS has a LOT of knowledgeable people that are willing to share their thoughts on a variety of different subjects, but just be aware that you get a whole gamut of things from people that just buy stuff because the advertising to people that dive so deep into the technical aspects of audio/video/construction that the only people that even understand what they are saying are those that already fully understand what they are saying... A lot of people there also clearly have a LOT more money than I do and can drop $1000 per seat, or $900 on a "DIY" door, or $450 on a tool that they will use half a dozen times for their theater build and then never touch it again. It is the principle of diminishing returns. You can do a lot with a little bit of money, but to get that last bit will cost you the most. Think 80/20 rule. It takes 20% of your resources to get to 80% of the desired result, but to get the last 20% of the result, will cost you 805 of your resources. Of course, I only have about 25% resources, so I could never get above about 82.4% of the desired (ultimate) result anyway, but this is still 100x better than anything I've ever had in the past, even if I don't have flashy woodwork, 3 rows of seats, tiered 11 foot ceilings, 4 subs, 11.4 sound, etc...
I can't wait until I get the bass shakers and the color changing LED rope lighting up. The kids are going to flip! In a good way too! I didn't tell them about either.
*) Do NOT, EVER, under ANY circumstance, even REMOTELY believe that an existing wall (whether wood or poured concrete) is even slightly straight or square. Unfortunately I made this assumption and despite measurements being right in some areas (I didn't check *all* corners, etc when building), the one side of my theater is actually about 1.5" longer than the other. You don't "see" it, but when I was hanging drywall, it was evident.
Holmes on homes discusses this pretty often in his series.. I was waiting to see if you were going to mention this as i was reading.
Nick, did you document the building of your acoustic treatments? if so, would you mind posting a DIY?
Thanks. I got them from Theater Seat. They are the Eros in burgundy with stainless steel cupholders and the middle "loveseat" option. They look a lot nicer in person than either my pictures or theirs and best of all, I got all 8 seats for about $262 each seat after factoring in the "upgrade" to loveseats. They charge $125 per row to "remove an armrest and put on clips to connect the two seats". I say BS because the cartons that each seat came in were one of 3 distantly PRINTED part numbers. One for the chair with 2 arms, one for the chairs with 1 arm, and one for the chair with no arms.
They always have some 5% off "sale". And I mean ALWAYS... One expires, a new one starts the same day. I did have the opportunity for 10% off or free lighted cupholders, but I was looking at a different model that cost a little more but was out of stock and then discontinued. That was around Thanksgiving/Christmas that they offered that price.
I was OK with missing it though because I found a slightly better deal going to their HTOutlet eBay site and buying them there. They may list one color, but you can call them and they will match their own price but with the color/options you want.
My next closest option was about $425 a seat, it was manual recline like these, but had leather "where you touch" or whatever they say, so not 100% leather. The next from that was about $550 per seat for full leather and motorized. Probably really nice, and for the level of seat they were a great deal, I just couldn't pay $4400 for 8 seats. Oh and those two options did not offer the loveseat configuration that made the rows a little narrower for my 14' wide room and to make my wife happier.
- - - As for my previous comment about posting some diagrams of the acoustical treatments tonight: Not going to happen. I am about 3/4 of the way through building my center speaker stand for my VP180, and some smaller platforms for my M60s. I need to finish those and get them painted tonight, and then I have a few other things to work on that are time sensitive for my daughter's HS graduation.
I posted this elsewhere, but thought that it should be here too. I build the center channel stand and the smaller "stands" for the M60s to get them in line with each other and to have the tweeters at a good "ear" height. They went into the garage after this picture and got painted flat black. I will "install" them tonight as long as they are super dry, which they should be. Then I can start looking at building the remaining false wall panels and finally calibrate the audio.
Keep in mind that these stands are all about function, not looks. If they were going in front of the screen they would have been built to look nicer, but they are solid and stable and will be unseen.
M60 stand was just a couple of 2x4's holding up a 2x10 top plate. the VP180 stand was 2x12 top, bottom, and sides, with some 2x4 "feet" on the bottom for more stability, and a couple of 2x4 pieces on the top along the front and back that made things a little deeper to accommodate the 12" depth required for the speaker feet to sit solidly on top. Also, since I was using scrap wood, I didn't have a 2x12 that was long enough to go the full 40" wide to match the width of the VP180. I thought that it looked a little nicer to have a full width appearance to the top too. Those top 2x4's also helped to lock the 2x12's so that they stayed square.
So tonight I installed the speaker stands and then ran the full Audyssey deal on my Onkyo. While it doesn't take forever, it is hard to sit there through 8 sets of microphone placements being as still and quiet as possible...
Then I checked out what it adjusted, and popped in Mission Impossible: Ghost Protocol. Holy crap. A LOT of sound was missing before that I was now hearing. I only watched up to where they "light the fuse", but wow, oh wow...
BUT...
The vocals were a bit light.
I went back into the settings and looked and it set my center channel to -4.0 db. That's odd, so I set it to +1.0, and tried again. MUCH better. And still WOW!!!
I have NEVER, EVER, EVER, EVEREVEREVER, loved the sound of my Axioms like I do now. I thought that they were good, but I still remember going to Randy's (SirQuack's) place a few years back and being blown away by how much better his setup sounded. In fact, truth be told, that he is one of the main reasons I even did acoustical treatments (yeah, I owe you one Randy). It was that "audition" back then that did it for me and drove me to build what I am building now. And the audition wasn't even for me! I had owned my Axioms for a few years, and he was doing an audition for someone. I brought over some demo DVDs, and the auditionee brought some stuff too. It was great...
But now, my Axioms are really singing!
The biggest shocker during the calibration was how "hot" I was running my sub. It says to manually set it to 75db, and I had it up near 100 db. I had to turn the gain down quite a bit to get down to 75 db before it would calibrate the room. And it sounds great now!
So after that, which I didn't start until 10:30 pm tonight due to graduation party shopping with my wife, I decided to start figuring out the game room layout. I had designed a cubby area for the Pachinko to go, but the layout got changed, and now that cubby is blocked by the pinball machine. Oh well. The pachinko will go elsewhere. I also managed to get the pinball back on its legs, positioned in its spot, and fully tested. I did have to tune a few of the under-playfield "gates" that activate when the ball rolls over that area in the playfield, oh and find the missing 4th ball, but all is well.
Tomorrow I will replace a couple of burnt out bulbs, and give it a good cleaning. Then, I might start setting up bass shakers in the theater, or get the MAME arcade started being put back together too... Then it is PROM for my graduating daughter, so that will take up a few hours with pictures and such.
Sunday is of course mother's day, so we will see how much time I get to work around here. I need to get the wood for the black panels for around the screen, so maybe I can at least squeeze a trip in to the home improvement store. Then I will at least have the materials to get them built. That will probably be the last thing that I will realistically get to before the grad party in 2 weeks. I really wanted to rope light up for the "cool" factor, but it will be difficult to get the time.
I am interested to see what my system will sound like with Audyssey... Nick, does your receiver have the Audyssey pro software? If so, are you going to either buy the pro took kit, or have someone come over to calibrate it? The Integra processor i am thinking about getting has the pro software, i need to do some reading to educate myself about the benefits of Audyssey pro.
Some with Audyssey MultEQ XT do have the "Installer Ready" option for the additional microphone positions and such. Mine does not. I would think that it might be worth the XT32 upgrade if you really want better performance vs. getting the professional tools/software to work. But that is just an opinion. I haven't checked the pricing models.
I posted this elsewhere, but thought that it should be here too. I build the center channel stand and the smaller "stands" for the M60s to get them in line with each other and to have the tweeters at a good "ear" height. They went into the garage after this picture and got painted flat black. I will "install" them tonight as long as they are super dry, which they should be. Then I can start looking at building the remaining false wall panels and finally calibrate the audio.
Keep in mind that these stands are all about function, not looks. If they were going in front of the screen they would have been built to look nicer, but they are solid and stable and will be unseen.
M60 stand was just a couple of 2x4's holding up a 2x10 top plate. the VP180 stand was 2x12 top, bottom, and sides, with some 2x4 "feet" on the bottom for more stability, and a couple of 2x4 pieces on the top along the front and back that made things a little deeper to accommodate the 12" depth required for the speaker feet to sit solidly on top. Also, since I was using scrap wood, I didn't have a 2x12 that was long enough to go the full 40" wide to match the width of the VP180. I thought that it looked a little nicer to have a full width appearance to the top too. Those top 2x4's also helped to lock the 2x12's so that they stayed square.
Curious, since the speakers will not be seen, did you consider the in cabinet version of the M60?
I bought my first round of Axioms (M60s, VP150, and QS8s) back in 2004, and they didn't offer in-cabinet versions. Plus up until now, my front speakers were all out and visable. With the false wall, I have the best of both worlds. If things change again in the future, I still have "regular" speakers. I left a reasonable amount of space behind the speakers to let the ports breathe.
So I lied once again, this time I was saying that I was NOT going to work much on the theater, and yet I did. Around noon on Saturday, I went to Home Depot to pick up some wood for the false wall black panels. The place was packed and I was buying some "by liner foot" priced lumber, so I had to wait a while to get a couple of feet cut off of the wood I was buying. No sense buying more than I need.
Anyway, I got started around 2:30 after the long trip to HD, some lunch, and getting sucked into another episode of Dream Machines.
Anyway, It is now 3:20 am on Sunday, and I am post some pictures. I spent the time from 2:30 until now building the frames (most of them) then going to take PROM pictures, then getting dinner with my wife, then cutting some more lumber for another panel, then going to the PROM announcing ceremony where we paid like $2.50 a ticket to get a reserved seat to sit and watch as they announce the kids arriving. We bolted after our daughter was announced, then it was off to get some ice cream with our 13 year old and my wife's folks, the next thing I know, it is 10:00 pm and I still have to assemble 1 panel, and none of them are covered.
I spent the next 90 minutes assembling, test fitting, making adjustments, to the panels, and then painting the last frame (the other 3 got painted earlier in the day so that they were black behind the velvet coverings). While that was drying, my 13 year old and I started covering the other 3 panels around 11:45 pm. It took a while even though it wasn't hard. I was slightly stretching the fabric, and she was using the air-stapler to attach it once we wrapped it around the frame. The staples went in the back, and thus were hidden and didn't add to the width of the panel or bind up anywhere.
We got done with the 3rd frame and it had been long enough that the 4th frame was dry, so we did that one. We finished up right around 2:00am. Maybe a little earlier. I am sure that I could have stapled 10x faster, but I wanted to make sure that the material was stretched correctly.
So anyway, here are the 2 photos. The first one is of the first panel in place. The room looked better already. The panel is the one below the screen. The frame on the ground is the next one (black side down) that would go to the left of the screen.
Here is the screen wall finished with the bottom panel, side panels, and 3.75" tall (10' wide though) top panel. Sound was still great. No noticeable difference when the panel was in front of the speakers. This is mainly because the whole center channel and about 80% of the two front speakers are behind the AT screen.
I would go to bed now, but my daughter is coming home in 25 minutes with about 11 other people. I've got a breakfast casserole in the oven and I will need to stay up at least long enough to get them all situated. They claim that they are going to watch a movie too, but I think that at least half of them will crash. I know I would.
Funny thing. They are all crashed in the theater room. Here I am dinking around on the computer. It is 6:11 am and I stayed up later than all of them. Woohoo. I think that my prize will be going upstairs and crashing on the couch...
Nick, how many man-hours do you think has been spent on your HT to date? I have been looking at some of the rooms over at AVS... And, well.... Some of those builds are quite intimidating on a DIY scale for a homeowner+buddies....or homeowner+ LOTS of buddies
I couldn't even begin to fathom how many hours were just for the theater... Since I was finishing a whole 1600 sqft in my basement, it would be hard to recall everything.
There are some factors though for sure.
1) Getting permits definitely slows down the process. Not because of the permit itself, but knowing that you want to pass each inspection point can turn some simple elements into complex, over-engineered components. While I think that you can certainly finish a space without a permit, and I have done so in the past, things should still be done to code.
2) If you need to rework any existing areas that can really slow progress as well. Existing electrical runs might need to be sorted out (as in a "what were they trying to do here?") so that you can either tie into existing work safely, or adjust things to prep an area. This is also true for physical structures like support beams (I moved one of mine) and plumbing (remember that I had to bust up, by hand, just over 1 ton of concrete and then after the new plumbing was in, pour just over 1 ton of concrete back in).
I spent probably the equivalent to a month if not more just doing all of that stuff. That did include an almost 100% rewire of absolutely everything in the basement too.
3) Sometimes you can plan things to death. Just go buy what you think you need plus a few extra of whatever. You can always return it, and you never know when a plan will change "on the fly". I wasted about 2 hours one time trying to get an exact count of the number of 2x4's I was going to need for my theater walls. I went and got them, and then when I started construction, I found a couple of shortcuts that saved a few studs, and some limitations that cost me a couple more. If I would have just bought the rough estimate I would have been within I think it was 1 stud (1 leftover). Instead, I was 5 short, and I wasted about 1.75 hours trying to get it "exact".
4) Helpers are great, *IF* they know what they are doing already, have great direction, or are used for basic manual labor. There were times that I got huge help out of people for some hauling of lumber and such, or giving a boost in confidence (plus a few extra hands with the support beam move for example). That was great. I've also been bogged down by "helpers" who want to really help out, but are slower, or need a lot of instruction and training. That old adage of you can do it better/faster yourself... There also may be a different level of "quality" in the end product as well. I experienced that with someone who helped me a lot. He knew what he was doing, but tried to do it so fast that there are a lot of errors/touch-ups. He really slams a lot of stuff in when he is working, but if I wanted things done with any level or precision, I either REALLY needed to make that known, or again, just do it myself. The problem here is that he is a "close relative of my wife". I will leave it at that since his help in the end was worth more than the re-dos or touch-ups his speed caused.
I am sure that there are lots of other things too, but these all factored in to my project.
As for AVS, I LOVE following some of those builds. There are some definite "master craftsmen" over there. The end products are so amazing, but the ones that are doing most of the work themselves are taking 1-2 YEARS to do their theaters, and a lot of them are still hiring out things like drywall or maybe some framing/electrical/HVAC. They have theaters that are worthy of the most prestigious magazine write-ups, or some sort of "Oh My Gosh, This Is Utterly Awesome" award. While mine pales in comparison aesthetically, I am not done yet and have some other elements to add to it to make it have a little more "pop".
I was having a lot of trouble visualizing your front/false wall. Now that I see it, I REALLY like it, especially with the bass traps cutting the corner behind and to the side.
While we certainly enjoy our family screen time, I doubt I'll ever go to the lengths you have to ensure an absolutely top quality experience. You should be very proud of and satisfied with this work.
I hope you and your family enjoy many happy hours together there.
Of course, now that I calibrated the audio, I have this itching... No BURNING feeling that I want to calibrate my projector. I've done some tweaking with the Disney WOW disc, but without a meter and some proper software, I can't fix the gamma/gray scale properly, and I keep hearing that those two will make a HUGE improvement in the viewing experience.
If course the meter is around $140 - $250 depending on model. The software I would be using a free. I've got a graduation party to fund, plus a big family vacation the end of June to Los Angeles that is starting to really add up now... Not sure that I SHOULD justify the expense (notice that I said should and not could... I am sure that I can convince myself, but I probably shouldn't.) Maybe this fall...
Tonight I was priming doors still for upstairs (long story), and then I did some errands in prep for the big grad party in a week and a half, but I still managed to get the two Lutron Maestro IR dinners in the theater. Wow, what a cool improvement. I can press one button on the remote and the can lights Nd wall sconces dim (independently too) to some preset level. Another button, and the either go off, or up to full on. Two other buttons do individual increments up or down. So nice. Now, back to another coat of primer, and then back to finding more pictures for a slide show. We are busy again the next two nights, but I hope to do something to dim down the step lights in the theater. I am hoping that the clear covers come off and then I will paint the inside edges solid black and then see what the options would be for the main part of it. I am sure it will be a work in progress for a couple if days.
On the surface, that seems really similar. The Insteon could be better/worse... I didn't dig into, I just know that this will be great once I get my Harmony One programmed for everything. I can see it now. For "Listen to Music/Radio" the lights will stay on. For something like "Watch TV" or "Watch Blu-Ray" it would dim. Of course, with the power on time of a projector factored in. Since projectors take a little bit of time before they are actually "on" with something visible, I would just program it as best as I can to delay the dimming until the projector is up and going. The only thing that I wish was different, but I knew about going in, is that I can't manually over-ride the two switches independently. They both receive the same IR signals/codes, so a "full on" command to one, it also received by the other. Lutron makes a separate command box that can set up scenes, but it seems like a lot of overkill for what I am doing, and for the price it wasn't worth it.
Survived the grad party and then graduation today. Tonight, with all of the family over, the guys (at least most of them) and my youngest daughter watched Inception. Great movie. I saw it once before when it first came out on blu-ray, and it was really enjoyable the 2nd time around. System did very well, both for the non-stop slideshow for the grad party (I used ProShow Producer for the first time. What a cool program, albeit pricey) and for the movie.
The biggest compliments I received were during the grad party. So many people talked about how they liked the room, but 3 people really made my day. One was the head of the high school band program (big school with a really outstanding music program) and the other was a true music prodigy/genius who is also graduating. The head of the band program talked about how great it sounded, and how it was much better than a system he had in his house. He used a local A/V company to design the room, and install/calibrate his system. Wow. Thank you. The prodigy went a little more in depth. He talked about how wonderful the frequency response was, how clear the system was, and the fidelity was outstanding. He talked about hearing frequencies that I knew only someone of his caliber could hear or appreciate (I know the stuff he was talking about I had never heard/noticed before). Holy crap. Thank you too.
I felt so accomplished. Like all of the hard work was paying off. This was also just from the slideshow that was using stereo audio for the background (mp3 at a pretty good sample rate), but the receiver was doing a DTS Neo setting to fill the room with sound, so there was a bunch of simulated sound, but still great.
And then I broke it. Audyssey had set the front speakers to 40 Hz cross-over (instead of 80), and during the slideshow, the surround sound was a bit loud, so I manually tweaked things after the party last night. I bumped up the crossover, and messed with some of the levels manually. Well, the viewing of Inception wasn't as great sonically tonight. Still very good, but I wasn't going to run the full setup again to fix my changes and delay the movie 30 minutes.
Congratulations on the compliments, Nick. Your work is definitely phenomenal. Mine won't be nearly as nice, but I'm still hopeful I can use your project as a source of inspiration, at least.
I think your room looks pretty dang good. I favor simplicity over gaudiness myself.
I've watched a couple movies in my basement so far with just my old M3's and VP150. Nothing too serious (Puss in Boots ) but I'm already pretty happy with how it sounds. Can't wait for my M80's to show up!
And then I broke it. Audyssey had set the front speakers to 40 Hz cross-over (instead of 80), and during the slideshow, the surround sound was a bit loud, so I manually tweaked things after the party last night.
Maybe tomorrow night.
Hey, look on the bright side, Nick, at least you didn't sneeze into the cocaine.
Major effort, super cool results. Happy for you that the kick- back-and-enjoy times have arrived. Yay!
One more thing knocked off the list tonight... I got the 8 bass shakers wired up and working. We are going to watch a movie tonight, so hopefully it will be something with a soundtrack that will utilize them a little. I am big on subtle with transducers...
So a coworker stopped by last night and wanted to play my pinball and see the theater. He has his own theater/bar/gameroom in his basement. He mainly wanted to try out the bass shakers.
We watched clips from Act of Valor (boat extraction scene), and the Matrix (basically the assault on the building to get Morphius until the end). He and his 17 year old son were impressed with everything and now are talking about getting some shakers themselves. I told them that I like them to be subtle, but knowing him like I do, if he gets them, he will have them "rumbling" even when someone is whispering on screen. Oh well, to each their own.
I also, FINALLY, found the charging cord for my Harmony One remote the other day, so it was time to charge it up and reprogram it last night. Works like a champ. It is running the projector, blu-ray player, hd-dvd player, main receiver, bass shaker reciever, Dish DVR, and Lutron lights.
There are 2 things that I need to tweak yet. One is the "projector off" control. My projector wants you to hit the off button twice, so I need to program that in or see if it can be disabled in the projector settings to accept a single "off" signal. The other is one that I hit in the past and was able to fix easily. That is that the Dish DVR device (or the "watch TV" activity) do not have a "DVR" button, so I can't get to any recorded shows/timers. Easy fix, just need to do it.
Other than that, it is worked well, and sure will be nice to get rid of those 7 remotes and have just 1. When I get the color changing LED lights up, I will manually program that in as well and prevent an 8th remote from being in the mix.
I know that these aren't noticable improvements to the room itself, but after being over budget on the basement finish, then throwing in a bunch of expenses like grad party, college expenses, pre-paying for other kids' activities, and still dropping over $2,000 on our trip to Los Angeles that we just got back from, I am not spending more $$$ for a while. I do have some credit at the one local hardware store, so as soon as crown molding goes on sale, I should be able to pick that up as essentially no (new) cost, and I already have the rope lighting, so it should be a straight forward add-on when the price is right.
My wife also gave me the green light (for this fall) to add some acoustical panels to the walls. Thank you studio tours in L.A. where they had small screening rooms with panels...
So tonight I got the projector shutting off correctly via the Harmony One remote. I didn't add the DVR button yet though as I was busy finishing up another project.
The computer that was at the heart of my MAME arcade crapped out on me when we moved, and I finally got things rebuilt and running again. Slightly newer/faster hardware, and the best part is that it works. At least for the most part. I think that some of the ROMs on the old hard drive got corrupt as I was unable to play a few of the games that I used to love playing (Metal Slug, any version, were fun but don't work now).
I also fixed some wiring that got snagged and pulled loose during the move. So it should be good to go minus some of the ROMs. Some day I need to get updated anyway. I am on ROM set 0.128, and the current is 0.146... WAY out of date. It just has gotten so huge that people will sell you an external hard drive, and throw in the ROMs for "free", however they want $175 and up for the hard drive. They do come, usually, preconfigured with a LOT more than just MAME, but that is still a chunk. And even then, the front end (menu system) that people are using requires dual core CPU, at least 2 GB of RAM, and a powerful video card. Silly since MAME runs outstandingly well with 1 GB of RAM, a 5 year old single core CPU, and the most basic video card (because everything is emulated at the CPU level, not the GPU level).
I'm not ready to drop the cash right now when I have other things that are more important to me to spend my dollars on...
Anyway, here is a crummy picture of the area in progress. The doll house needs to move to some other place in the house. Not sure where yet. The foosball is in out family room. The air hockey and electronic darts are still in storage. Not sure if they will ever come out.
OH, the stuff under the pinball and doll house are the 2 other pachinko "Cells" that can be swapped into the machine on the wall. One is Star Wars and the other is Indiana Jones. The current one in there is called "Julie: The Pinball". Some goofy Japanese pop-star from the 60's and early 70's. Real name is Kenji Sawada Julie. Think Japanese Bee Gees sound... Goofy theme if you ask me, but a very "in demand" pachinko because of its playability and "fun factor"...
Insert a little soybeans, some cows/pigs, and you will be about right....
Fun fact, of the 3.06 million people in the state (I know, small numbers compared to a lot of other states), only 6.3% are farmers. So I guess that is a little more than 180,000 farmers, but 2.87 million people that aren't farmers. including me.
Actually, where we live there is a surprising amount of focus on the arts, so there is theater and music, plus all sorts of semi-pro sports stuff. Nothing super exciting, but enough to do. I just wish that we had better restaurants here. When we lived in the Des Moines area (largest metro in Iowa), we had all sorts of fun places to eat, and bigger production stuff to do.
As for day-to-day, how do you think that I've gotten done what I've gotten done. Sure, I could have been done sooner, but I did things at a pace (except for the April/May 2012 timeframe) that didn't kill me.
Insert a little soybeans, some cows/pigs, and you will be about right....
Fun fact, of the 3.06 million people in the state (I know, small numbers compared to a lot of other states), only 6.3% are farmers. So I guess that is a little more than 180,000 farmers, but 2.87 million people that aren't farmers. including me.
Finally ordered a meter to use for calibrating my projector. It should arrive tomorrow. It would be great if it showed up in the morning since we work "summer hours" at work and I am home by 1:30 in the afternoon on Fridays.
I better start reading the tutorial again and getting the software loaded on the laptop. I better update the projector firmware too I guess since there have been about 4 updates since I got it.
I never finished, but I got the "current state of things" logged.
I've got some tweaking to do. I've never done this before, so I am learning as I go.
Luminance - dashed line is target, the RGB lines show where each primary color differs from target, and the yellow is the average of the RGB.
Gamma - again, target is the straight dashed line.
RGB Levels - on the top, ideal is all three are together and on the 100% line. I am still trying to decipher what the bottom purple stuff means.
CIE - I've got a few that are out of spec quite a bit that I will try to dial in.
So I've got some tweaking to do. The good and bad of the JVC RS45 is that it doesn't have CMS (color management system), so I really can't dial in the colors without a 3rd party piece of hardware, so I will just do gain and grayscale. So less to tweak, so less time consumed in calibration, but less to be able to correct too. I've heard that people get great results with the grayscale and gain corrections with the JVC.
Tripod is holding the meter I just got. Nothing that a little painter's tape can't hold in place. I of course did everything with the lights off, door closed, and I put a light blanket over the laptop and my head to keep stray light out of the equation. Sort of like an olde time camera where the guy would put the black curtain over he head while he took the photo...
i did use the black curtain when in photography school; worse for someone who has never done it is seeing the image reversed on the camera's ground glass; up is down and left is right.
Dak, I only "started" the calibration process. I had a lot of monkeying around to do to even get to that point. I needed to re-download and burn the AVSHD709 blu-ray disc, I had to get the projector up to the latest firmware and update it (took a bit), I had to get through some errors in the software/meter combination. The instructions online are from an older version of the software, so it wouldn't even communicate with the meter despite the fact that Windows 7 saw it just fine.
Then there was the make-shift set up of the meter onto a tripod, the tinkering around with the prime location of the meter (you have to make small movements in direction (right-left-up-down) until the software reads the light fL of light. Funny thing that I got the best reading when I just happened to have it before moving it around. It was pure chance, but of course, I had to move it to make sure since I had no idea that it was "perfect".
I learned a lot about getting the readings, and I have some questions that I am going to research today before moving forward with actually adjusting things.
I was using the APL Patterns (like the one below) and I am concerned about the measurements. I mean, the meter is right in the middle of the screen, but the outer portion has all of the different grayscales, causing a LOT of ambient light... I am thinking that somewhere on the disc is a set of IRE patterns where the whole screen is the single IRE pattern, not a whole set of them at once.
I have this same disc, however, the patterns you are showing are not the ones you use for grayscale or any other type of calibration. Go in to the menu and bring up the windows and/or full screen patterns for either the Color HFCR(preferably) or Calman software applications. These will give you the same percentages in the IRE scale but one at a time in the center of the screen. You use windows patterns primarily for plasma and CRT and either windows or full screen patterns(your preference) for all other types of monitors.
Thanks Casey. That was exactly my thought too. The images didn't seem right, but I wasn't readily seeing the full screen ones. I went back and grabbed the documentation (if you can really call it that) for the AVSHD709 disc and saw that somewhere, buried in the menus, are the full screen patterns.
I was, interestingly enough, going through the Color HFCR menu and didn't see them, but then again, I heard that there are some menu issues depending on your blu-ray player. Maybe that is what I was hitting.
So I will see about getting the proper "before" scans done tonight and see what the difference is (just for documentation purposes).
For those that have never done this before, I was always seeing people post charts and graphs and I never had any clue as to what they showed until I actually was forced to create them for myself. They really aren't that bad to grasp, and the software generated all of the graphs (and then some) using the same 12-14 samples that it took.
I bought an i1 Display LT meter. About as cheap as you can go and still get decent results. I am using the free HFCR software. I found the meter basically on "close-out" from a photography place online and got one of their last couple meters for $110 shipped (new). The next closest I saw was on Amazon for $160. The "current model" is an i1 Display 3 which runs around the $200 mark. I am sure that it is pretty nice, but considering I can really only tune a few (key) settings on my projector, I was going for the lowest cost option.
So far, I really got bogged down and haven't done the calibration yet. I used went back and tuned the black level and white level, and then I got the "before" captures using the correct, full frame screens and found that the luminance was closer to being correct. Problem now is that I have inky blacks and bright whites, but I am missing a lot of detail which will come when I tune the grayscale and gamma. With vacation #2 coming up tomorrow, it will be a bit before I am home to get them done.
So after another month or so of waiting for a day that I had enough time, I took advantage of summer hours at work that had me home before 2:00 pm.
Several hours later, and my projector is calibrated. Blacks are darker, dark detail is there that was missing before, and bright components seem brighter. All mainly due to just adjusting the red and blue levels every 10 IRE steps (0,10,20,30,40,50,60,70,80,90,100) to get them in line with the green that is considered the baseline. By adjusting those after setting the black and white levels, and with a bunch of trial and error, I am very happy with what I am seeing.
There is one thing that I do notice now that I didn't before, and that is the black bars for wide movies (since I went with 1.78:1 screen format). I knew that I would have these, and with a 138" diagonal acoustically transparent screen, I had to make some compromises. Even so, the picture with these compromises is still light years better than the 104" screen setup I had previously.
Next up will be either the star ceiling, or if it ever goes on sale, crown molding... I am not in a rush, but will try to make some baby steps from time to time.
Nick, What was that video editing software that you used once? It was around $300 or so, but it had some pretty slick templates etc. I tried searching for the last 30 minutes w/o success!
Picked up some crown molding and get it a good first coat of paint last night. I think one more coat will do it, but then I need to get it installed which isn't something that I've done before. I know how to do the cuts correctly, and attaching the bottom is easy, but since it won't go up against the ceiling (it will be down do that the rope lighting can sit inside it, I need to create some small spacer that holds it securely at the top and yet allows for the rope light to be unobstructed.
Oh, and I picked up a Darbee Darblet too. Put it in-line with my system and while I won't post a full review, my results are mixed. I am not seeing the massive improvement to total picture quality that some others are, but definately an improvement in detail. Might be because my JVC does so well with blacks and has a great contrast ratio already. Other people report not only increased clarity, but also a "veil of gray" being "lifted" from the image. I don't see much gray "veil" or "film", so not much to "lift" I guess.
I'm a little late to this party, but I just wanted to say I love your room, looks like a labor of love. I've also been thinking about getting that Darbee as well. I JUST got a new Panasonic 60GT50 this past Monday. The picture is great, but I hear the Darbee greatly improves the PQ of 720 sat content. I'm on the waiting list for one from the AVS store.
I have a Darbee, my set is a LG LE8500 (full array, local dimming) I have also done a full calibration. My picture was already pretty awesome with my HTPC, I am using the best playback software, decoders and renderer available (to my knowledge) also I strictly use ripped Blurays (1080p/720p) with no compression.
The Darbee has made an improvement, the picture is noticeably sharper. I like it and it has become a permanent part of my home theater.
Hey Murph, it would be more of a "chocolate quarter". It is pretty small.
Vassillios, the core room is done and working great, it is the "wow factor" stuff that is taking the back seat to life in general. Things like the color changing LED rope light needs to go up in the yet to be installed crown molding. And I need to rework and install my fiber optic star ceiling panel. Every version of the theater that I've had has had some sort of "star ceiling" and thus was dubbed the "Starlight Theatre". I need to get a new, more modern looking sign to reflect that once it goes up.
However, things are now on hold for the crown molding.
The story, as I tell it, is that my wife went hunting 2 nights ago. She was hunting for deer... with the car.... She got one!
So I need to resolve some issues with the car to make it driveable while waiting on the body shop to fit it in to their schedule. So tomorrow will be a little bit of "body work" to get the driver door to open (they are replacing the front quarter panel, so I am good to do whatever to that), and the wheel bearing is shot. It was on its last legs and the guy said that it probably won't get covered due to it having some pre-existing issues. Then I am traveling next week. Harrison, NY and Denver, CO woohoo!
Boltron, I am still playing around with the Darbee. I think that I am going to buck the general consesnus for *most* people and try using Gaming mode instead of HD. It is amazing the clarity of the image though, so maybe I was just OVER-expecting greatness. I will say this, when watching something for about 2 minutes with the Darbee turned on, when you turn it off, you swear that someone messed with the focus or something. Crazy to think that without the Darbee, the "amazing" image I had before was that "fuzzy". LOL
PS. For someone wondering what the Darbee does, here are some screenshot examples.
You need to Mouse-Over them to get the alternate screen with the Darbee effect "on." In the examples, the GREEN #s are for the "HD" setting and the RED #s are for "Full Pop" mode.
Remember this is meant to bring clarity to the imageand reduce the "fuzziness." Imagine these kinds of adjustments on a 138" screen. It should be a big improvement, and is. I was just expecting even more.
Boltron, I am still playing around with the Darbee. I think that I am going to buck the general consesnus for *most* people and try using Gaming mode instead of HD. It is amazing the clarity of the image though, so maybe I was just OVER-expecting greatness. I will say this, when watching something for about 2 minutes with the Darbee turned on, when you turn it off, you swear that someone messed with the focus or something. Crazy to think that without the Darbee, the "amazing" image I had before was that "fuzzy". LOL
I agree, we need to things into perspective, it does definitely improve sharpness but some people go completely overboard with their comments though.
To me however, the improvement in sharpness with well worth the cost. I have spent an enormous amount of time and effort (and quite a bit of money) to get the best possible playback quality. This just makes it a bit better and every bit counts.
In fast moving action scenes, it won't be noticeable. In scenes that are panning at a slower rate it is noticeable. The detail it brings out in faces like eyes and stubble is quite good. Also scenes of forests, trees, grasses it is very noticeable.
You just need to take a little time to choose a setting that works for you. I choose HD mode at 50%.
OK. So do NOT watch "The Grey" with the Darblet turned on. SOOOOO much added film grain from the studio that it makes the image look like white and black sand is always flying, even when it isn't snowing in the movie.
I hate it when they add so much artificial grain to make a film "grittier."
i've never seen grain anywhere inside or outside, so i would love to see all movies without grain. grain lowers resolution .
you should try this to see how it comes out as regards fine image detail: play the resolution pattern from a video calibration disc, and look at what happens to fine details and lines. this may be the best way to set the controls on this Darblet.
i would be very interested to read your comments about this.
On a clean input (no grain crap added), the image is definitely clearer and more defined. I just need to watch a good flick instead of these grainy-crap ones.
One movie where you see a big improvement is in Avatar (extended) at about the 0:06:30 mark where you see the spaceship approaching Pandora. The detail of the spaceship just looks so much better. If you have the Darbee just turn it on and off as you watch the scene. Also if you happen to have the Bluray of Timescapes from Tom Lowe (look it up, it is mind boggling) the night skies (and everything else actually) look so much crisper. Basically, you need a good high quality source to get the best effect.
I can't say that I have watched a grainy movie since I installed it a few weeks back, I'll remember to take notice next time I watch one.
I have a calibration disk ripped so I may take a look at that but at the end of the day, I am sold on it and won't be removing it.
the way you describe it reminds me of a tool in Ps.
it's the midtone adjustment in "image-adjustments-shadows/highlights and you use the "midtone contrast" adjustment at the bottom. it does not change overall contrast, i.e. it will not alter the black or the white portions of an image, and using it with care will seem to sometimes lift a veil in large parts of an image, or seemingly increase contrast and detail in parts of an image where there are small details.
of course, what it does never increases detail (resolution) really, but it can give a very good impression.
Yea, that is where I really started learning about it. Although, depending on your settings at AVS, the number of pages varies... however, there are almost 3300 posts about the Darblet regardless of number of pages.
In video form. Sorry, it is a cell phone. When everything gets done, I will use the good camcorder for it. This video is only 51 seconds long. The music is, well, the first choice that YouTube gave me.
So 5+ months since the last update, but I spent some time this past week working on my fiber optic star ceiling. I needed to paint the frame around it from black to ceiling-matching color (took coats).
Then last night I was cutting a hole in my home theater ceiling and adding two outlets to the wiring that was already run there.
Tonight, I hooked up the other end to a wall switch tonight, and then measured and mounted the 4'x8' star ceiling panel.
Yay! My project list still has building a second subwoofer to match my SVS. If it would ever stop raining and warm up that would help so that I can work in the driveway/garage. I also need to get wall acoustical panels put together. I have all of the "parts" for the sub minus the MDF, so that will be next.
Of course, I am traveling 4 of the next 7 weeks, so it will be a while to get this done probably.
It's come a long way since this photo:
Now I could call it the Starlight Theatre again...
Yeah, yeah, yeah. I tried about a dozen times and I can't get a picture of the stars on my camera. At least not free-hand. I loaned my tripods (small and large) out to someone about a month ago and need to get them back for a long exposure still shot. I guess I could take a video on my phone and see what happens, but I need to finish packing and get to bed. I need to be up in less than 6 hours from now for my flight to Baltimore and I am nowhere near ready to go.
Crappy quality in all its glory. LOL. It was really hard to even get the fiber optic stars to show up with everything else turned off. They are MUCH brighter in real life vs. barely noticeable in the video.
Keep in mind that the rope lights are color changing LEDs. While I usually don't watch a movie with the rope light on at all, the other night my daughter and some friends watched a horror flick with the lights turn to a red color. I suppose you could watch the Matrix in green, and so forth, but I just turn them off when the movie starts so that the color representation on the screen is as pure as possible.
Just over a week ago, I was asked by my wife and kids what I wanted for Father's Day. The next day I gave them a printout of the following plus a shot of the exact 49" x 97" x 3/4" MDF panel at Home Depot.
I said, I would like that sheet of wood cut to these specs.
I am a couple of hours into the project. Which isn't as far as you would think, but I am getting good and using a sircle jig with my router. I will post more pictures in the near future.
In the mean time, yes, that is almost 4 cuft...
I am using the full 4" port from Parts Express:
The woofer is aDayton Audio RSS315HF-4 12" Reference HF
And the Amp is a BASH 320 amp from SVS (same as what is in my current SVS 20-39PCi). I had an amp issue back in 2004 with my SVS and they sent me a brand new one. They never asked for the old one back, and in the middle of the "we shipped it" process, someone at AVS had a solution to my problem. I don't recall the solution, but it fixed what was happening and I never did swap amps around. SVS was told of what happened, and never asked for the new amp back even then.
OK. As promised, here are some subwoofer build pictures with a few comments:
Here are the basic cuts after getting the 3/4" MDF cut from Home Depot thanks to my wife and kids.
Here is my first shot at using a circle jig with my router. It was AWESOME and turned out very well.
This is the center brace that holds the middle of the sub together and hold the bottom of the port tube.
Next up is the bottom that holds the woofer itself. I used two pieces of 3/4" MDF. The center holes are the same, but the outside piece is also routed a little wider to allow the woofer to be recessed.
Then I worked on getting the top routed to hold the top of the port tube. It is nicely recessed too.
Next is the whole thing with all of the center brace holes routed again to make the holes round to allow for better air flow inside the box.
A closeup of the rounded center brace holes.
And a second closeup of the rounded corners.
Tomorrow I will cut out the hole for the amp and then start gluing things together. Then I caulk the seams. When that is cured, I will add the dampening foam to the inside. After that, I will put the last side panel on, and continue the assembly. The steps that are taking the longest amount of my time are pretty much done. Everything else will go pretty quickly but just need longer cure times in-between steps.
Hmm... It has been over a year since I did the modeling and I had someone else on the DIYAudio forums run it too. I guess my memory is wrong. The SVS goes down to 20 Hz with a slightly smaller enclosure, but I am guessing that the port must be a different length to get the tune. Maybe that is where I am off.
Nick, what do you consider might be "wrong" about your recollection? The 17.6Hz number is in the 17-18Hz range you mentioned. Of course, if you measured the volume of your enclosure and it's significantly less than the 5.83 cu. ft. "ideal" for a maximally flat response curve, then the extension at -3dB would be less and there would be more of a peak in the response.
Hmm... It has been over a year since I did the modeling and I had someone else on the DIYAudio forums run it too. I guess my memory is wrong. The SVS goes down to 20 Hz with a slightly smaller enclosure, but I am guessing that the port must be a different length to get the tune. Maybe that is where I am off.
Nick, i would take the approach that as long as it plays low and loud, it's good... who cares about a few hz, as long as YOUR happy with the end result.. That's the whole point of a DIY anyhow right?
True. I am sure that it will be low and loud. Then again, the SVS was low and plenty loud for my 14'x24'x8' space. :-) I am temped to test this thing upstairs in the living room when it is assembled (before finishing the MDF)... Rattle the house since the theater was built to be "rattle free."
OK. Here are some pictures from the last 36 hours (trying to give glue/nails/clamps time before moving on to next pieces).
First up was getting two of the sides together. I used the woofer end piece and the port end piece to hold things square.
Then I put on another side. Love the glue drips. (not really)
I put on both ends, here showing the port end in place.
And then earlier this evening, I put in the center brace piece as shown here.
I've learned that on the outside it is better to wait for the glue to dry before scraping it off as it comes off nice and clean.
I am going to add a sealer to the inside yet tonight since it has been about 6 hours since the last piece was glued in and hope that it dries up nice by tomorrow when I can continue to work on it.
Oh, and no... My wife does NOT like that I am building this on the dining room table. I just don't want the MDF exposed to all of the humidity in the garage (it is getting bad out there).
Three best tools for this project for anyone wondering...
1) Router with circle jig. Homemade jig or something like the Jasper 200 makes cutting perfect circles piece of cake.
2) Air compressor and finishing nailer. So easy to pop in a couple of nails to hold things together before clamping and the glue makes the MDF slide around like it was wet ice.
3) Clamps, clamps, and more clamps. I am using 6 clamps but if I wanted to do more of the gluing at once, I would have needed more. Since that is what I had, I had to put one end on at a time and then the middle brace. With 8 clamps I could have done both ends and with 12 I could have done the ends and middle brace at once saving time on waiting for glue to cure.
It really isn't hard work, just takes time between steps. Of course the finishing work takes longer that the construction depending on the finish.
Nick, where did you find the plans? I don't know much about speaker building, but know that I could handle the actual fabrication and construction if I had a solid plan that didn't require me to figure out Q, tuning frequencies, attributes of drivers, etc.
Did you do this from scratch, or was it based upon a plan that said "Buy THIS particular driver, put it in an enclosure that's 3.9 cubic feet, and put a port of THIS width in THIS location", etc?
I was on the search to replicate the sound of my current SVS and I already had the amp and was given the port length info, box size, driver to use to get me really close. The construction part was up to me.
Side note, I had modeled this up years ago and came up with similar construction specs. I was using Win ISD software and sonosub software. I basically went for a box if instead of a tube and then just needed to make sure that it was tall enough for the 17" port and yet wide enough for the 12" woofer.
"Box" dimensions don't matter, it is volume, port size and length, woofer, and amp.
More pictures. From the other day, I did a test fit of the port tube. Fits great... Ignore the pooling glue. It did that over the course of a couple of hours. I decided (after this picture) to scrape most of it out before it really got hard. Not that it mattered much.
Next I test fit the woofer and the amp. The amp needed to be recessed a little more, so I did that last night. (it is flush now, but not in this picture)
Here is the water/glue mixture that I brushed on everything but the seams where the full strength glue was going. Put in on thick, let it start to dry, and then brushed it smooth. Here is it wet on the last side panel that was yet to be attached. Did this last night.
Tonight I did two things. I attached the final side panel, and I put a groove along each seam. Over time the seams will start to separate due to moisture, drying, or whatever. Seems like a major problem for a lot of people, and a "pro" had this trick that he came up with over the course of 6 months of testing and experimenting. Use your router to put a groove along each seam, then fill the groove with Bondo. It should never come apart or show a crack. I have a router... I have Bondo, so why not.
I did these in reverse order of what I typed and the pictures show. First up are the last things. The final glue, nail, clamp pictures.
And lastly, which actually happened before the clamping, here is the "groove" picture.
Tomorrow I obviously have to do the grooves for the final side panel since the glue is currently wet and it is clamped in place. Then I will put the Bondo on the seams. I will also do some very light hole filling tomorrow. With any luck I will be sanding on Thursday and getting ready for the first primer coat where I will be able to more easily see what needs to be filled/sanded still.
I would love to be putting on paint this weekend, but with the dry times, sanding, priming, and repeating process, it might be next week, but it is getting there.
In my rush to get glue/nail/clamping done tonight, I missed a step that would have been a LOT easier before the last panel went on. I didn't silicone caulk my seams. I was going to do everything but where the final panel went, but forgot. Oh well, the caulk gun will fit fine though the woofer hole and I can get a little messy with it on the other side of the center brace by applying it with my fingers. I was going to probably have to do that to some degree anyway. Once the acoustical foam panels go on the inside, you will never see the seams even with the woofer or amp removed anyway.
I hate Bondo. It smells bad, is messy, and hardens too quickly.
All that, and I still don't have all of the groves filled with the first round of Bondo. Going to let this stuff cure and then maybe one light sand tonight and then fill the last grove and call it an evening before doing a nice sand tomorrow and second coats on the grooves.
So I ran out of Bondo. I originally (before I was going to do the groove method on the seams) had a 1 pint can. I scrapped that idea and went with a 1 quart can instead. Well, I should have gotten the gallon size. I went through the full quart and still have about 1/2 of the box to cover (some grooves and whole surface). The pint costs about $6, the quart was about $9, and the gallon was $19. Lesson learned there.
I was also fighting the high humidity outside contrasting the blaring sun. The sun was drying things so fast, at least to a point, and then the humidity slowed down the last bit of drying. After the fumes settle down I will bring it back into the house so that it isn't fighting the humidity.
I picked up some filler today, not sure what I was thinking , I bought a 397g , no where near what I needed. Your right that stuff stinks. Good thing its out in the shop. Funny thing about bondo, seems I sand off 2/3 of what I apply. I really don't think the average person that buys speakers really understands what goes into making them. Simply amazing how cheap we can prebuilt speakers for. Have thank the Chinese for their cheap ass labor.
I had an "orbital palm sander" that you can use cut square pieces of sandpaper, but it isn't aggressive enough. The round orbital sander is MUCH better.
I sanded two big sides and the top smooth tonight, but the other two sides had Bondo that was not mixed with enough hardening agent. I was trying to do a full 30" x 17" side with one "batch" of mixed Bondo, and it kept getting hard before I had it applied, so I used less hardener. Found out that is a big no-no. It was never going to harden. I mean, it felt hard, but was tacky to the touch and easily dinged with a finger nail.
So I scraped those sides off and started over. I used 3 "batches" per side and it and made sure that it was nice and "salmon" colored.
There will still be another round of Bondo when these get sanded, but it will be for a few spots where there was a chunk on the Bondo putty "blade", etc. Those will be a lot easier. Then another sanding. Then I am going to go over it with Bondo Glazing and Spot Putty for the fine pin holes. Light sand that, and I am ready to prime.
We are doing "summer hours" at work, so that means I should be home around 1:45 pm Friday to give myself a good 3.5 hour jump start. My goal is to be pretty much ready to prime by Saturday, however I know better and it will be at least Sunday. :-)
You have ambitious plans for sure. Funny I picked myself up a round orbital sander the has hook and loop to hold the discs on.I looked at so many that when I bought it I did not realize it did not have speed control. But it works great. handly device for 25 bux. Throw some more pics up. I keep my smart ass phone in my pocket , that way I will have some pics as I go along. What bit did you use to cut the relief for your speaker ?
Yes, the hook and loop is going to be nice. That is what I got, but I sprung for a little more heavy duty than the $25 one that I almost bought first. Not sure how much better it is, but reviews were more solid. Crazy that some of them go for over $130. That is NOT what I bought. Your $25 one was probably a better one than the $25 one I saw though.
I have my phone with me too, but just didn't post pictures last night. I will take a "before sanded" and "after sanded" photo later today. I figured between our two threads, we should only post pictures in one of them each day to not spoil the other Axiomites with a lot of pictures all at once and then have them complain that they haven't seen anything in a while. J/K I was just in a rush last night to get to a certian spot before going to a local concert in the park type event with my wife.
The sander i bought came from canadian tire, on sale half price. Only a 2amp but it works decent. only wish is that it had speed control for starting out. once i apply pressure its works really well. May try starting it after its on the surface. In this day and age i think they all come from the same chinese factory,just built according to customer request.
Tom, I bought a Random Orbit Sander not long ago. After much research I bought this Bosch. Around the time I bought it, two different magazines did big head-to-head tests and the Bosch was the top pick in both.
This, despite me buying black/yellow stuff almost exclusively the last several years.
I should note, though, that the DeWalts are popular and well-reviewed. My note of the Bosch was to add another possible option, not to say it's better than the DeWalt!
Well, upon further review, apparently you can't/shouldn't use a random orbital sander designed for wood work to do anything like waxing your car. Something about the length of the throw/orbit. Which I doubt would matter TO ME, but now I've digested enough information to be confused into inaction.
Some quick pictures tonight. First some unsanded Bondo pics.
Then time to sand with the new Dewalt orbital sander.
When things don't sand so well, change out the sandpaper. New sandpaper disc with 3 used ones. Night and day performance difference.
And here are some sanded Bondo pictures. It feels VERY smooth and this is just with 80 grit paper. I still have some small spots to touch up with a little bit of Bondo, and then I will block sand it all with 100 grit (which makes it even smoother) before the final glazing putty/sand and then prime stage.
I was going to put that touchup Bondo, but it started raining (it is also 10:00 pm) and right then my wife and oldest said "let's watch a movie". So tomorrow I should have it done.
I am still not 100% sure that this is worth the effort. I think that the groove/Bondo thing on the seams is a good idea, but putting Bondo on the whole thing is probably overkill for someone not going to a black piano finish for an end result. Oh well, I am experimenting with something that I won't even see in the end, but will learn a lot along the way.
It is now 12:31am on Monday morning, and I haven't primed it yet.
We had a very nice day yesterday and again today, so we decided to work in the garage and attic storage spaces. We basically still had boxes and "bins" that went into the garage when we moved in just over 2 years ago that STILL were in the way of ever getting a 2nd car into our 3 car garage.
So I was cutting 4foot x 8 foot sheets of 3/4" plywood and making a "floor" up in the attic above the garage. Then I had to haul everything up there that we wanted. It took FOREVER, and we STILL can't get a 2nd car in the garage, but are about 3 hours away from getting the last few things handled. Then the 3rd car stall needs to be organized, as it is where my large workbench is, all of my tools, the lawn mower, snow blower, 4 bicycles, etc is all at. That will wait a little longer, but we are so close that we need to just finish a little more and get the second car in there.
I DID however get 3 of the long sides and the top ready to be primed. They feel so smooth after I went from 80 grit to 120 grit. The 4th long side and bottom probably could be sanded their final time right now, but I am too tired.
With the newly "expanded" usable garage space, I am going to make my own "spray booth" with some really wide (14 foot wide) plastic for the walls, and the floor will be the really large cloth dropcloth (I know, sounds like redundant when I say "cloth" dropcloth, but some people say dropcloth and mean a sheet of plastic.). I will do my final sanding of the last side and bottom with 120 tomorrow, then dust it off with the compressor and air nozzle attachment, and then wipe with a tack cloth. Then I will set up some sawhorses and spray the top and bottom, make and eat supper while it is drying, and then put it up on end and spray the sides. Let it dry hard overnight and continue the process on Tuesday.
My garage is full of empty Axiom, Velodyne, Sony & Denon boxes plus my retired speakers, but I'm still able to get 2 cars & my motorcycle in there - but it is getting tight, ha!!
I'd tell you the best technique1 for not letting your garage turn into a hellish hybrid between storage and The Land of Forgotten and/or Abandoned Projects, but I'm not sure it would do any good in your situations.
________ 1. The best technique is to avoid having a garage altogether.
My garage is full of empty Axiom, Velodyne, Sony & Denon boxes plus my retired speakers, but I'm still able to get 2 cars & my motorcycle in there - but it is getting tight, ha!!
TAM
Funny, my garage is full of empty Axiom speaker BOXES. Actually this is not so funny, 'cause we're moving
Not to be outdone by Nick, I spray painted a couple of 2X4's custom built cover for my Lilliput monitors. That would be 2" by 4" piece of metal LOL..
I like to fly simulators and purchased the Thrustmaster MFDs. Having the Lilliput 8" monitors as a "live" Multi Function Displays really makes the sim come alive.
I think I can safely save that quite a few of us are vicariously living through Nick's hard work.
I got home from work and wanted to look at my sub, and I should have sprayed it instead of rolling it. Despite what I was reading online, even a tight foam roller left a good orange peel in the primer. Ugh. I did some sanding, but too big of grit left scratches, too small was taking forever (I was using a sanding block).
So I may end up with a textured sub after all. Probably not a horrible thing since it will still be more fine than the truck bed liner stuff people put on sometimes.
Either that, or I will pick up some 240 grit or similar sanding discs for my orbital sander and sand it all that way.
So anyway, I put on the first coats of primer last night, sanded today like I said, filled in some minor spots that showed up once I had a uniform color of the primer on there (used the glazing putty and not the full Bondo), let that dry, sanded, wet sanded (just to see what would happen) with 400 grit, too much work but it was getting smoother, wiped it down, tack cloth, and then rolled more primer on.
We are heading out of town tomorrow afternoon (July 3) for an airshow and fireworks, but I *might* be able to get some more sanding done before I go. I have Thursday, Friday, Saturday, and Sunday off, so I hopefully will get this stinking thing done soon.
Here are some pictures.
Here it is with the first coat of primer on it. It isn't wavy like the picture makes it seem. The primer was drying making some spots more glossy or dull depending on how much was drying in that exact spot and it gives the illusion of waves.
And some minor touch-ups with the glazing putty:
Here is the back where the amp will mount. This is after the sanding of the glazing putty and the application of the primer again.
And here is the front after the same as above:
And lastly, the legs that are going to hold this bottom firing subwoofer off of the ground. These will be cut shorter before they get paint, but I had the primer out and they got a coat of it.
Oh, I also caulked the inside seams tonight. Should have been done a long time ago.
Lessons learned or things I would do different next time:
1) Caulk the inside before and just after adding the last side panel. This would have been a lot easier
2) Don't Bondo the entire surface, just the grooved seams and nail holes.
3) Use more clamps.
4) Use screws instead of nails (to pull the pieces tight, could possibly be solved with #3 more clamps).
5) Don't use a roller even for primer. Just suck up the cleaning process and use the HVLP sprayer or even possibly spray cans. The best roller still leaves a texture.
6) Do all cutting of MDF outside. I still have a LOT of MDF dust all over everything in the last 1/3 of the garage.
I am sure that there is more, but those are what I can think of right now.
This is the part where it's not fun anymore I realize you have to work with what you have, but spraying really is worth the trouble. 2k primer is high build and within 10 minutes of spraying you can sand it and it takes care of the imperfections without a lot of work. When I made my sub I sanded the wood to near perfection, filled minor holes and then hit it with the 2k the whole thing only took a few hours. What I found was once I had done it this way I was looking for all kinds of things to paint lol. I fixed more than a few dents in my kids cars and the primer makes you look like a pro.
Anyway keep at it, and take a break for a few days. Nothing worse than being unhappy with the final outcome and having to look at it every day.You have a really good start, keep your eye on the prize.
I picked up a 2 gun devilbis kit on ebay for $132 shipped and they have very little overspray. Worth every penny.
Yea, the sad thing is I have a HVLP 2 gun kit that I bought about 6 months ago. I think that since I had the Bondo on there, I should have skipped the BIN primer (which is designed as a sealer and primer, which would be better for plain MDF) and gone with the 2K or similar primer. The BIN stuff dries pretty quick, but usually my the time I get it rolled, I am done working on it for the night, so I just let it sit until the next day.
I love building and constructing things, the problem is I am too much of a perfectionist that it gets annoying some times. Not saying that everything I make is "perfect" but that I really desire it to be.
No pictures today, but after being gone for a couple of days, I managed to get the whole sub nice and smoooooth. It took a good amount of sanding and some filling with the glazing putty, but it is sanded to the point that it is ready for paint. I should be painting on Saturday! Yay! Of course, I need to buy my paint yet... I better figure that out tonight I guess.
Have you decided on a color or painting method yet. Glad to hear you had a break and were able to get it to your liking.
I went today and got some primer and activator. 88 bucks youch. I scored a full quart of Black Sapphire effect for free. They have stuff there that's ordered and not picked up so my buddy said come grab what ya want.
I have been reading up tonight and still have no clear answer to the finish. I want to use my HVLP sprayer, but I've only used it once before and it was with Rustoleum Enamel, but I have been reading to stay away from that. Automotive finishes scare me a bit, and the next options seem to be from Behr, Sherwin Williams, or something similar. I am thinking a satin black since it is a sub. If it was prominent speakers, I would probably go a little more towards gloss.
I think that I will have to spend a little time at Home Depot in the morning to see what the paint folks say. I know that I will have to thin it no matter what I do, but I am just at a loss as to a readily available product that is "easy" to spray, and will yield good results.
I need to find out if it is OK to use exterior paint on the sub. I know that the fumes are more toxic, but I am spraying it in the garage and can easily air it out (plus I have a decent respirator).
I understand your plight completely, this is why I end up using automotive finish. It is something I have done a few times before, on my car and my kids car so I can sorta do it lol. It is expensive though by the time you get the paint , the activator and the reducer plus laquer thinner to clean up with and that's without the clear which is even more. Maybe like you say the boys at the home depot can set you up. Ive seen some paint jobs on the net where guys thin out tremclad /rustoleum and roll it on a car , using lots and lots of thin coats.
I don't think I'd paint a car with something that wasn't catalyzed - I've used rustoleum from a pro spray gun and while it does give a nice finish, it isn't very solvent resistant. A so so HVLP gun can be had for <<$100 from harbor freight that would give a much better finish than a roller.
Looks cool for a cheap way to do a finish, but yeah for car repair, get the hvlp and if nothing else st least borrow a compressor to run it.
I used my hvlp to paint my 120 gallon saltwater fish tank's stand that I built. I used the Rustoleum oil based enamel (gloss) and it came out pretty nice. I can always fall back to that if need be, but was hoping for a satin, not gloss finish and heard that other products turn out so much nicer than the Rustoleum, especially when not doing a gloss finish.
Satin on a subwoofer should look sharp. I hope... Main speakers gloss or close to it would be impressive. Also, I am not 100% confident in how this will look after all of the different layers of material. Gloss will show every imperfection no matter how smooth and even it seems.
I went to Home Depot to get some Behr paint (one of the recommended brands for DIY speaker finishing), and I am thinking that I want an acrylic enamel.
I talked to two different paint people there. I told them what I was doing and that I wanted to use the HVLP sprayer that I bought from them. They both agreed that I did not want acrylic enamel, but instead would be much better off with latex enamel. It would spray nice, and be durable. Ha. Wrong.
The stuff sprayed just crap. I used Floetrol (which they also recommended) and water (per Behr's instructions) and thinned it down to the right consistency using a viscosity cup. I did some test spraying, and just couldn't get it the way I wanted no matter what I did. It turned into a runny/saggy mess, and that was with light coats that didn't even completely cover the primer underneath. I thought that maybe it would level out, but never did. It was starting to run. What they heck? It was such a light/fine coat. So I decided to get out a fresh roller and roll over it while I still had the chance. That was fine, but now I have a fine orange peel finish. Ugh.
So I wait about 10 hours (says it is "dry" in 1 hour, and can be recoated after 2 hours). I go out and do a light sanding with a 320 grit. This took off a few stray bugs that landed in the paint, and rubbed the paint off of the edges in spots. Ugh again.
So I skip the sprayer and just go with a new viscosity that is more for rolling on (basically it was full strength paint plus a touch of the Floetrol and a splash of water). that went on a lot nicer, but of course it will be a fine orange peel when done.
I think that all said and done, it will look OK, but durability will be zero. The primer coat was so smooth that it was possibly TOO smooth for the paint to stick to.
So then, I go back to some cheap ol' Rustoleum enamel paint that I used previously, and that stuff sprayed just fine on my test cardboard. So the Behr stuff that the two "experts" at Home Deport recommended clearly was the WRONG stuff. I went online and sure enough saw a lot of woodworkers saying to NOT use anything with latex for cabinets, bookshelves, or anything that might ever get bumped. The latex will always stay "soft" even though it is an enamel.
So we will see what it looks like tomorrow, but I have a feeling that this will be a disappointment in the end. Sure, I could sand it back down to primer and get different paint, but at this point, I just want to finish it. It will never be seen anyway, and I did learn a lot from this build anyway. I just need to move on to other things that my wife says have been getting neglected lately.
Here are a couple of shots of the wet and just rolled over 1st coat. They did dry a little better. I will take some additional pictures tomorrow when things are dry and I can get more natural light on it to get a better photo. So anyway, the 1st rolled coat photos:
OK. So it is 1am and I decided to take a couple of pictures with it more dry. This will still need another good coat yet and then I will bring it inside to get out of the humidity, but that will happen this afternoon after some sleep, church, and lunch...
So here are some "dry" 2nd roller coat photos. You can see in the 2nd picture in particular (with the cutout for the plate amp) that it really needs another coat. The rest of the sub doesn't have the primer showing through like that, but again, I wanted to go with some thinner coats instead of one or two heavy ones.
And here is a REALLY close picture of the texture. It actually looks a LOT worse in the photo since there is no sense of scale.
Oh, and the color is off too. It is definitely black.
OK. Today's update. I moved things back inside on the dining room table (my wife is not happy, but tolerating me at this point) so that the humid garage wouldn't hinder the curing process.
Anyway, I put the final coat on the bottom of the sub, let it dry, and then attached the feet and gave them a final coat as well. After letting that dry, I started adding the acoustical foam to the inside of the bottom half of the sub cabinet using 3M Super 77 spray adhesive. Worked great, although if anyone else does so, be aware that the second that the foam touched the Super 77 that was sprayed on the interior, it will stick...A LOT.
I also took some extra bolts and washers and then used some drops of wood glue on the T-Nuts, and used the bolts to pull the t-nuts into place. All I really need is for the t-nuts to stay put when it is time to attach the woofer.
Tomorrow I will add some paint to the rim around where the woofer will go as I am just noticing now (as I look at the pictures) that I think that some of the white primer will show. Then I will paint the rest of the cabinet with a final coat, and then add the foam to the other half. I will let things sit and cure for at least 2 days to make sure that everything is solid.
Then on Wednesday I will add the port tube, woofer, and amp. Woohoo. Getting close.
Anyway, a couple of pictures showing some of the progress from today.
Tonight I put on the final coat of paint on the sides and top. I also painted the center "rings" where the woofer and port tube will go just to make sure that the white primer doesn't show once they are installed.
So first up is the picture of the sub minus the amp, woofer, port tube, and top half of the inside's foam.
The different level of "shine" in the picture is because it is just starting to dry.
Here it is with the 17" long, 4" ID port tube.
I might take an inch or two off of the feet, but want to see how it looks once in its final spot. The funny thing is that they are pretty "stout" feet, but when you put them on the main sub box, they look tall and skinny. I may change them out altogether for something way thicker and shorter. I only paid $2 a piece and they just screw on to the bottom.
Maybe something like one of these:
This one is 4" tall
This one is 3.5" tall
The ones I have now are 6" tall.
Tomorrow I will put the foam in the top half, glue the port together in place, and mount the woofer.
Wednesday I will attach the port tube and connect and attach the plate amp with the special screws I ordered last night from Parts Express. I thought that I ordered them back when I bought the woofer and stuff, but I certainly couldn't find them, so I had to order them again. $2.75 for the screws, $10 for shipping to get them here by Wednesday.
Your sub is looking mighty fine. You know you done good when the only thing bothering you about the project is the size and length of the feet. Since the rest of the cabinet has no radiused angles, I think the second, truncated pyramid legs would look better than the curved first one.
I tend to agree that those would look like a better match.
Next opinion question for people. Port tube...
The port tube will be flush mounted on the top of the sub, however it just dawned on me that I will have 4 screws holding it in place that will be seen.
Should I just go with black silicone caulk for sealing it and the 4 black screws? Just use black silicone caulk and no screws? Or do which ever and then put a square speaker grill on top?
I already need the screws since I had to order black, extra deep thread button screws for the plate amp, so there is no cost for using the screws. I already have the black silicone caulk too.
I looked into a square black metal speaker grill, but it was about $55 shipped for one that covered the entire top.
Or should I just go "cheap" now and not worry about the screws since it won't be seen anyway?
Here is what the port tube looks like with the 4 screw holes:
I was thinking that too, however when factoring in that the sub will be behind my screen wall, nothing should fall in. If I had it out in the regular part of the theater, then I would just fork over the $55 and get the grill. I could get a cheaper pre-made grill for a lot less, but they are all round. I would have had to plan ahead for that one by routering out a recessed grove to make it look more "integrated" with the sub box.
For example, I could get something like this: They range in sizes from 5.25" (too small to cover the port tube flange) up to 15" which would be almost the whole top (the top of the sub box is about 17.5" x 16"). Costs are about $4.50 up to about $14 plus shipping.
I've used those before for my MAME arcade to cover the speaker holes. They are easy to use, but do stick out a bit.
Boooo.. I don't like that idea. Sure, I could fix all of the issues, but at this point I am so close to being done... Plus, this is meant to be a "simulation" of my SVS sub (only square instead of a cylinder) and the port is on top in order to get enough port length.
Sure thing. I will box it up and ship it to you. It will be expensive since this thing is super heavy. I am currently estimating about 99.5 pounds with everything in there.
I could ship it tomorrow and you could have it on Thursday using UPS overnight at just $252 for shipping. Of course I will need to get a box and packing materials, so we'll say another $50.
I know that UPS ground would be there in 1 day too, but I went for shock factor.
That is a phenomenal job! Nicely documented too. What do you think about adding a bottom "plate" to attach to the bottom of the feet? That would make it closer to the SVS look and you could move it around without risking breaking one of the feet off.
I was looking into the idea of the bottom plate, and research is showing that it won't impact performance at all. I thought that it would, but I guess it doesn't.
It does, as you elude to, help make the feet more "snag proof" in that there is a much decreased chance that a foot could be bent since each foot is supported by the other three feet via the bottom plate.
Even these taller, skinner feet are really solid. Shorter and fatter ones should work even better.
One stop at Lowes, and another at Home Depot (plus a shipment from Parts Express) and a lot of progress was made in a matter of 30 minutes.
Lowes had the new feet I was looking for, Home Depot had the cord caulk that was needed for sealing the woofer and amp, but still allowing for them to be removed later if need be. Parts Express was the source of my black deep thread screws.
Here is what I've got:
Caulked (last night) port tube on the top.
New feet (needs paint obviously):
Rope/cord caulk:
Woofer installed:
Inside look at the woofer:
Amp installed:
Front view with new (unpainted) feet, and a movie showing the size:
So tonight, besides cleaning up the dining room (again), I will get the new feet painted as long as they meet with approval, and I will move the sub down to the theater and see about a test run with it.
The feet look great. I also like the subtle texture of the finish on the box. You can see it well in the "inside look at the woofer" picture. Also, good call deciding not to use screws on the port.
Well, as life would have it, I didn't get a chance to give it a test run tonight. I put it all together, then went on a 4 mile walk with my wife and dog. Then came home and mowed the grass (it got dark, so I was using the outside flood lights to guide the way) and then I came inside painted the new feet, took a shower, and now my wife and oldest want to watch a movie. It is already after 10:00 pm, so no time to test things out and still get done with the movie before it is REALLY late/early. Tomorrow... No excuses.
FYI, it is 16.75" wide by 17.5" deep and 33" tall (with shorter feet).
What, may I ask, are the benefits of soffits, besides the obviously easy to run cables and lighting in them. I see them all the time in custom theater builds, is there a sonic benefit?
The soffits that I put in, and most soffits for that matter, don't do much if anything for the acoustics inside the room. There are too many flat/hard surfaces.
People use them to run wiring and lighting, as you mentioned, as well as a place to hide long HVAC runs of insulated flexible duct so that it has plenty of space to obsorb the sound waves traveling through it.
Now, there ARE people that have turned their soffits into large acoustical pannels/bass traps. They basically replace the bottom and sometimes the sides (with just enough structural support) with acoustical dampening material and then cover the soffit with acoustical fabric. That is a lot more work, but I am sure that there are great acoustical benefits to it since you are adding absorption to the entire "top of the walls" corners around the whole room.
You can still run gyour HVAC ducts, cabling, lighting, etc through that space as well.
For me, personally, it was a matter of time and money. It would have cost significantly more and taken a lot more time to do. I am not building an "all out, no holds barred" theater, but something that is more modest and still has a number of improvements over a basic theater space.
My 2nd sub goes in tonight, and I am already getting my wife convinced that it is time to build acoustical panels for the walls. For about $150 in materials and a little bit of build time, I should get a great improvement in sound. I really should have built those sooner since the "bang for your buck" value is so high.
This is by no means that "best theater build ever" and I've learned a number of things along the way. I am super happy with how the theater looks (in person when the camera colors aren't wonky) and sounds compared to any previous version of my theater (2 other houses, 3 other theaters).
Thanks for stopping by and if you have other questions, just fire away.
EDIT: Here is a link with someone asking about how to add acoustical material to a soffit. A user there, BIGmouthinDC links to an AWESOME theater (that by the way uses Axiom Speakers) that put acoustical material in the soffits and how it was done. He makes it sound so simple, but then again 'BIG' helps with installs as a living.
Ask any questions about sound proofing, acoustical treatments, etc. I get accused of obsessive research into this stuff, so I have a lot of (useless according to my wife) knowledge on stuff. I am all about learning and sharing and trying to save a buck when ever possible if possible.
Nick, I have always really appreciated the thoughtful and thorough way you share with this forum. I've learned a lot from you over the years, and I'm grateful.
And installed (obviously the screen, top black, and bottom black panels are removed).
I am thinking that I need to put some sort of "stand" under each sub actually. The 2x4 framing is blocking some of the free flow space for the LFE. Either that, or I would need to swap spots with the M60s, but I am afraid that the front sound field might not be "wide" enough.
So I will mess with that tomorrow as I didn't get to calibrate it at all tonight. I was helping a coworker who needed to quickly add and change some things in his home theater before the inspector comes tomorrow, and then the theater got overrun by my wife and two daughters who are watching some chick flick.
So calibration will be tomorrow. I can say this though, I did some A/B tests with a few music clips and a LFE demo blu-ray from AVS and I really couldn't tell the difference between the SVS 20-39PCi and my build. I am sure with a meter and some time I could, but I am really happy with that aspect.
Prepping for acoustical panels, so my daughter and I did the "mirror test" to try to find first reflection points for each of the seats. After a few seats, we noticed that to cover them all we would need to treat about the first 15 feet of the room on each side. Ugh. There has to be a better way. If I was just doing a single seat or two MAYBE this would work out, but with 8 seats, that is 24 locations on each wall (behind the speakers is already covered, and the back wall will be taken care of too. Nothing on the ceiling at this point.)
Here is a picture part way through the process of the tap markings. The black panel on the floor is for the front false wall. It goes under the screen.
Crap. If I don't post listening test results,then I am in trouble for not folllowing through, and if I do, then I get killed...
Short version, I spent about 2 hours over the weekend listening to demo material from some of my many demo blu-rays. Keep in mind that I wasn't going for louder bass, but to try to get reduce peaks and nulls. I first started with the new sub against the middle of the back wall, but it was "trapped" by the riser and seats, so it really didn't do much in my room. I then put it into the 1/4 position as shown in the pictures. I adjusted the SVS to match, and then re-ran Audyssey. I reduced the toe-in of the M60s as well as they were too focused on the front two seats.
While I had things torn apart, and before I put the screen back for the Audyssey calibration, I found the crazy first reflection points.
So, back to the test results... I had dramatically reduced all of the nulls, and most of the peaks. I am very happy. It should get better with acoustical panels if I build them like I want... Maybe next month.
Also, how far off the floor is the bottom edge of your screen? Is that measurement dependent upon viewing distance, or only seating height?
It is something like 18 inches off of the ground. I put the screen size, distance of seats, ceiling height, riser height for the second row into a program and it make some recommended heights for how far off the ground the screen should be. We just tweaked it so that people in the front row are not in the way for anyone in the back row. As is, there is only about 5 inches from the top of the screen to the ceiling.
It actually works out really well. No sore necks, and it is very immersive.
A couple of boxes showed up today. It isn't reflected well in the picture, but these boxes were BIG.
The one on the left is six 2" sheets of 2'x4' OC703 rigid insulation. The one on the left is a single 4" sheet of 2'x4' OC703.
Need to build frames for them, and get some fabric to wrap them with. The plans are for four 2'x3' panels for each of the side walls (total of eight 2" thick panels) and one 4" thick 2'x4' panel on the back wall. Should really help improve the sound.
Can I make a suggestion? I would make 4 4" panels and treat the first and second reflection points. Then I would use the rest to make corner traps 1'x4' and straddle the corners up front.
When I was treating my room I went slow and found in my situation that first and second reflections were more than enough. Treating the rear wall sucked too much energy out of the music I was testing with and made everything sound flat.
You are finally doing it! You will be happy I am sure. Detail, focus and localization of sounds are the biggest improvements we have enjoyed. I'm excited for you.
Also, looking at the 2" vs. the 4" for FRP (First Reflection Points for the others that aren't familiar with the term) knowing that the primary goal is the higher frequencies as a "must" and then the lower frequencies "if possible," you get the following performance as taken from Bob Gold's Absorption Coefficients (for those that don't know, a score of "1.00" is considered total absorption at the frequency. Anything above a 1.00 is not important really, and things like 0.17 means 17% absorption)
So the 2" panel actually performs better at the higher frequencies technically, but in real world are pretty darn close. The 4" bumps up the 250Hz a little, and really ups the 125Hz, but again, those aren't "as critical" when having to make some level of compromise to appease the wife.
As for the room becoming too dead, that is a possibility if I put the 4" panel on the back wall, but I need a little bass absorption and I can't do rear bass traps since the rear corners contain my equipment rack in one corner and media storage on the other corner. I guess that is some level of diffusion, but not helping in the LFE area.
If things become too dead, I can always add craft paper to the face of some of the panels and reflect more high frequencies (decrease the numbers from 250Hz up to 4000Hz) and actually boost the 125Hz bass absorption. I've heard of people doing that first before covering with fabric and getting results similar to using OC703 FRK vs. the regular OC703 like I have.
No matter what I do, I am going to build my frames first and make the panels WITHOUT the fabric cover. I will hang them and see how they sound. Too dead, then I get the graft paper out. Get them the way that I want them and then cover them.
Now if my room was just another foot wider, then I would do just four 4" panels on the sides and *maybe* the one in the back still. But I am fighting what seems like a little "narrow" when walking between the seats and the walls already, plus with 2 rows of seats, the first reflection points were ridiculous.
Here are pieces of take that I used to mark them on just one wall. I marked the FRP for the front left, right, and center for most of the seats before I just stopped and decided to focus on some key seats only. More compromises...
And no, that panel on the floor is not an acoustical panel. It is an AT panel that goes below my screen. I needed to put it somewhere (along with the screen) while I was getting the FRPs. And no again, my family hated the "racing stripe" idea of one long panel from front to back that covers all of the FRPs (sort of like if that WAS an acoustical panel and I just put it on the wall).
OK. I haven't posted an update in a while. Things are progressing slowly. I had to send off for some more printed fabric samples. I am trying two different types of fabric and getting 8"x8" samples showing 16 different potential color matches for the artwork. They still having shipped those yet, so they will probably not get here until next week. I am out traveling to Los Angeles and Denver next week.
As you see above, my OC703 is here.
Well, here are some pictures of the frames I built.
I used 1"x4" material (actual dimensions are .75" x 3.5") for the side wall frames and then 1"x6" material (actual dimensions of .75" x 5.5") to make the rear frame. This leaves a 1.5" gap between the OC703 and the wall, which enhances its performance quite a bit actually for the lower frequencies.
Frame for 2" OC703:
Frame for 4" OC703:
I ended up building 7 frames total. Three for each wall that are about 24"x48"x3.5" which will have 2" thick OC703 material and then the rear one is 24"x48"x5.5" for the 4" thick OC703 material.
I built the frames, glued and nailed the corners, glued and nailed a center brace, and then added 90 degree corner brackets for good measure.
Stack of frames:
Then I beveled the front edge all the way around.
This is a side shot of one of the frames showing the bezel on the top:
After that I added some cheap muslin fabric to the back to help hold in any insulation fibers/particles from coming out the back and into the room. This stuff is pretty dense and rigid, but no need to not take some precautions. I got 10 yard of the stuff for $15 tax included at a local fabric store using a 50% off coupon. Yeah, I went to a fabric store.
Here is one of the panels with the muslin stapled in place. It isn't pretty, but it won't be seen:
That brought me up to tonight where I needed to put the OC703 in. I knew that building the frames using lumber that was in 4 foot and 8 foot lengths, cutting this and making a frame would make one of the dimensions a touch short for the OC703 (2' and 4' lengths were cut, but that would give either an interior frame size of 22.5" x 48" or 24" x 46.5". Going with the second option meant less waste and more OC703 in use, so I did that.
So tonight I grabbed the trusty electric "turkey carving knife" and cut off the end of each OC703 sheet to get it to fit inside the panel.
You can see the right side over-hanging the top:
Then trimmed and set into place:
Here are the scraps (I know that there isn't any point of reference for size besides the electric knife):
So I have a good jump on the art for the panels, but I want to get the colors right as they print on the specific fabric before I go any further, so that piece is on hold. Tomorrow night I hope to get the panels hung on the wall for now. They will be removable so that wrapping the art printed on fabric fronts won't be a problem.
PS. My next project is a media server and then HTPC. Parts are already in route for the media server with its 18TB of hard disk space. Fun stuff for another time. HTPC will be in a couple of months once I actually have media ripped on to the server.
Aren't you worried about the frames giving you extra reflections? Sure you get one large surface of reflection absorption on the front, but you added four more surfaces to bounce stuff around!
Aren't you worried about the frames giving you extra reflections? Sure you get one large surface of reflection absorption on the front, but you added four more surfaces to bounce stuff around!
Oh crap. I am so screwed.
Oh wait, I'll just cause those parts "diffusion." Yeah. That sounds good.
Nick, in all of your internet hunting, have you found any sources for companies that sell coverings that will fit a 2x4, for ex., possibly with a zipper on one side. I can see where a person gets all the OC stuff, but doesn't want to hassle with a nice custom final product, like you and I did...
Our church is actually considering having me put some panels around the sanctuary, as it is pretty reflective. Was trying to find a source for coverings premade for panels...maybe some with custom designs.
I know that I saw some somewhere. They were for this place that made cnc cut metal frames. You put the frame together, then you stuff the insulation (OC703 or whatever) into this fabric "sock" and then you put that into the frame which was snug enough to hold everything in place. Let me see if I can find it.
At out church they have massive "cloud" panels hanging from the ceiling and huge panels on all of the side walls and the back wall. It would take a good number of 2x4 panels to put a big dent into it, but it would be worth trying.
Are church probably is much smaller, built back in the 60's or 80's. Packed house with standing room only is only about 300. That sock thing sounds right...will have to start googling. Not a bad idea Mark, that way if they want some artistic religious design it would fit right in.
Found what I was remembering. Not what you are thinking of for a "frameless" design, but here it is. They show it in the video part way through on this page as well.
Are church probably is much smaller, built back in the 60's or 80's. Packed house with standing room only is only about 300. That sock thing sounds right...will have to start googling. Not a bad idea Mark, that way if they want some artistic religious design it would fit right in.
Maybe they could make one of those felt/quilt like things to cover it.
Yeah, we are in a brand new building opened almost exactly 2 years ago. Already building an expansion. Seats 800 which is actually a lot bigger space than it might seam. The music sounds like a concert, just not quite as loud. The acoustics are REALLY good.
Mark might be right on the money. They could get some inexpensive muslin by the truckload in whatever color they want, and just sew up some monster "socks" for over them. Looks like a plastic bag helps a lot. Put the insulation in the plastic bag, put the bag and insulation inside the sock. Pull out the plastic bag.
FYI that the acoustical panels are mounted on the walls. STILL waiting on fabric samples with the 16 specific colors on them to be made and shipped to me. Looks like next week at this point.
My 14 year old still hasn't cleaned up the theater from this past weekend and I refuse to pick it up, so I haven't recalibrated yet.
So, until then, I am going to start on this:
My Media Server. Here are the specs. I paid a LOT less than this due to coupon codes and rebates. Plus I was given a $500 NewEgg gift card at work for outstanding service.
I paid a LOT less than those prices. Those are current prices from various vendors that the config site auto updates. I used so many NewEgg coupon codes (one code per order) that things shipped in 7 orders. Plus I had the previously mentioned $500 gift card from my boss.
For those afraid to click links: Current 4th gen Intel i5-4430 CPU ASRock Z87 Extreme4 mobo G.Skill 8GB DDR3 2400 RAM (will only be running it at 1600 as that is more than fast enough. Kingston HyperX 120GB SSD for O/S drive One Seagate 3TB 7200RPM drive Five Toshiba 3TB 7200RPM drives Corsair power supply with more juice than I need Rosewill case LG Blu-Ray reader/DVD writer Running Microsoft Home Server 2011 Will use FlexRAID for raiding and pooling of the six 3TB drives Oh, and 1 free Intel 4th Gen T-Shirt
That is way more power and storage than I need for a server, but it should last a long time. I wanted the option of transcoding ripped blu-ray movies (from my collection of purchased blu-rays of course) on the fly and streaming them to any wireless device in the house, or over the internet while traveling, etc. The transcoding will reduce the quality if the link isn't fast enough to handle the full HD stream (which unless hard wired, probably won't be) to save on bandwidth and to make sure that the viewing device gets enough data to not stop and buffer every 5 seconds. Plus, most portable devices need nowhere near full uncompressed HD quality.
Once I get it up and running and populated with media, I will look at building up a primary HTPC for the theater. Other parts of the house will probably get a small Raspberry Pi "HTPC" for about $70 each once I factor in a cheap wireless keyboard/mouse for each one.
That is about all I have to say (but you know me better).
Recalibrated the audio in the theater tonight now that the panels are up (still not custom artwork fabric samples, thus no custom artwork covering them) and OH... MY... GOSH...
Sounds great! ABSOLUTELY GREAT! Bass is more defined (even though these aren't bass traps), surround is much improved, and the front sound stage is amazing! Everything is so clear without sounding "high-frequency harsh" like Bose. I kept watching demo material over, and over. It was great! And now, I need to finish a few things on the Media Server and get to bed. Heading to Los Angeles in the morning.
Thanks for the encouragement, Nick. So glad to learn that your experience is more joyful now. Hard to believe that your wonderful, from-the-ground-up room can be improved so dramatically.
Well, a dedicated room, with sound dampening and such still echoed like a son of a gun. Carpet, seats, and front wall treatments made a big difference, but there was literally a high pitched "ring" that could be heard if doing a single loud clap in the room. Not any more. The room is far from "dead" but you don't want it to be. Everything sounds better as mentioned before. I kind of wish that I did some before and after measurements, but honestly I don't even care any more. If I feel, over time, that something needs tweaking or tuning, then some measurements may be in order.
Oh, and in addition to my above post, if you go back and watch a few of the first videos (boring as they are) there is one with just insulation up in the theater and I am talking. The sound was crazy dead. Then I put up the drywall, and it became the echo chamber. This is somewhere in the middle. Sort of....
No pictures until I get my artwork done to cover the panels. And that is being delayed by the media server I've built and am filling with movies, or the HTPC that has parts starting to ship today. I am hoping to get the artwork finalized this weekend and ordered on the fabric so that it ships sometime next week while I am traveling for work.
The media server has Windows Home Server 2011 on it. I picked up a new copy for about $45 and it does everything that I want without all of the Windows 7/8 "fluff" and it was cheap.
I then am using a product called FlexRAID to provide software RAID5 and device pooling so that I see everything as a single drive letter. That was about $60. Then, I can always split things up and still have 100% usable data on the drives if I want, (hardware RAID5 spreads things among all of the drives, which is faster for data access, but for a media server the drives send data faster than multiple machines could receive it anyway. Oh, and decent hardware RAID means an add-on card which means more $$$.
I am using MakeMKV to rip the discs (free), and Media Center Master to get all of the images, metadata, trailers, etc plus to do a decent rename of the folders and files to something meaningful. It is also free.
I am still looking at what software I want to run for my HTPC. I've been playing with basic Windows Media Center and Media Browser 3 and I really like MB3, but it is still in beta.
I haven't tried XBMC as it probably won't do what I need for my HTPC. It doesn't handle some of the advanced video processing that I want to do (which requires an add on video card and a decent CPU in the HTPC). However, XBMC is designed for the "quick and dirty, but looks cool with its interface, I sometimes download things via Torrent, and have "less than legal" stuff" kind of crowd. Not saying it is bad, just not geared towards a high end HTPC.
I need to check out J River more as well. Its interface is less desirable, but it is supposed to be fairly rock solid for features.
My first piece of the HTPC came today... The RAM... Can't do much with it.
The case, power supply, video card, and blu-ray drive come on Monday. I am traveling this week and will be picking up the motherboard, CPU, and SSD from Micro Center while I am gone.
I am doing something similar, mkv's from a windows 8 machine to my xbox 360's. Trouble is the main machine is in my bedroom. My plan was a WHS server in another room, but M$ requires the main client pc to be on even when streaming from the server so i am going to just run win7 on a separate machine and remote in unless i find a better solution. Would be so simple if WMC ran on WHS2011. I don't have enough smarts to run a VM so that is out. I really like the WMC interface running MB3 so i will be staying with that. I tried a ATV today but its hobbled at best, wont play mkv's and no AC3. My search continues. I am going to look at cetons extenders and WD tvlive as well.
So I *FINALLY* got around to ordering my custom fabric for my acoustical panels. I looked back and I started with some of the first rough designs of things back in June... Took long enough.
I only had time to put the fabric on one panel tonight as we are heading out of town early in the morning, but here are some pictures.
Rear wall's panel (25.5" tall x 48.25" wide x 5.5" deep) using 4" thick OC703 plus a 1.5" air gap behind it.
And with the fabric...
The side panels will mimic the metal artwork that will eventually go in the wet bar area right outside the theater.
I actually thought about that, but I don't have a good way to get power to it without tearing into the extra thick drywall. I don't think that I would need to poke through the fabric though. I would just have to line up the fiber optics with the actual printed stars and they would be subtle with the lights on and stand out with the lights off.
Me too. Maybe tomorrow as we are out of town today. Of course I could do one set of three, hang them on the left wall, take a picture, then hang them on the right wall and take another and nobody online would know any better. LOL
Fabric is on the panels, and they are hung. I did another quick video of the room. 1 minute 53 seconds
My wife likes the panels now where she hated that they were even there before, so it is a win-win... The room looks better and sounds better and everyone is happy.
The theater is now officially named (again). V4.0 of the 'Starlight Theatre'
Keep in mind that the side panels were done to mimic the metal artwork that will be behind the wetbar that will be built outside the theater. It looks like this:
So I get asked from time to time to point out key things in this thread, and maybe someday I will create an index or something, but for now, here are some of the videos, in order, from start to current status. FYI We didn't start anything in the basement until the beginning of June 2011:
I took a really excellent picture of an Android operating system cellphone on my iPhone once. Then I used a picture manager software kit app on my iPhone to create it look like the Android operating system cellphone was surrounded in fire.
I am in the drafting stages for my new room. I'm curios as to whether you pre-calculated the front speaker locations according to room modes and boundary effect in your space? I'm working the maths and began to wonder if it is worth eating into the room 4' to get my mains in their mathematically "ideal" location behind the screen wall. Thx.
Honestly? No. I just with a little over 2' deep behind the false wall and have the speakers as close to the screen/false wall as possible (which is about 4" behind the material itself). I couldn't see eating up 4' of room space, even with a 24' deep room.
The wall behind my false wall is treated and the side corners are floor to ceiling bass traps which help with some of the nodes, or if nothing else it changes them to some degree. The addition of a 2nd subwoofer up front (not as ideal as one in the back of the room) helped a lot with room nodes. Also, there are some math that points to the idea that the room itself more dictates the room node locations for the listening area more than the speaker locations, but it is there.
From some of my notes that I saved:
SEAT LOCATIONS: To avoid harmonic peaks and nulls in the room, seats should be placed at one (or more) of the following locations. WIDTH: .20, .32, .45, .55, .68, .80 of the width of the room LENGTH: .55, .68, .80 of the length of the room (away from the front solid wall)
Note that the notes mention nothing about where the speakers are, but where you listen in relation to the hard walls in the room. These were taken after a lot of research from "experts" including web sites and video interviews/discussions. Once I started seeing these numbers repeating, I figured that there must be some trust to these being accurate. NEVER was mention of where the front speakers should be as far as distance from the front wall. Not saying that there aren't some numbers somewhere, but I never read it or saw it when I was researching. There were numbers as to how far away things should be from side walls, but that was more for the subwoofers.
Thanks! Your numbers agree with mine. In a couple of books I have read these are tried and true target ratios for any rectangular room.
In a htgeeks vid #178 there is mention of avoiding peaks and nulls in loudspeaker placement so as not to influence low frequency output ie. <300Hz. My prior room didn't follow rules for speaker locations, but did for seating. I am designing my next room with fidelity as priority #1, as video is far less demanding planning wise to get optimum results... You must be glad you are finished. Oh wait, there is no such thing as finished!
Well, after what, like 2 years, I finally built my media storage shelves in the theater today. It took a while to drill the 260 "peg" holes. Yes, I used a jig for that, but it still took some time. Then getting the shelves cut nice and snug is always a "cut it a little to big, and then shave off a little at a time. I am thinking about maybe shifting everything up 1 peg hole or putting a filler piece at the very top. With the regular theater lighting it looks OK (not great) and certainly better than in a picture with flash turned on, but still...
Next up will be the equipment rack, but it is going to be a little more involved, so at my pace, I've got another 6 months to get it done. LOL
It looks great . I do agree that to really finish it a filler would look a bit better or like you say move everything up so the gap is on the floor. Looks like you need to start on part deux , that rack is already almost full.
1) Equipment Rack built (yay!) 2) Equipment exhaust fan put in (yay! - but see below) 3) HTPC rebuilt 2 more times as I play around with JRiver instead of MediaBrowser 3 (See below) 4) Added a PCS-MCE from SIMEREC to finally let me power ON my HTPC from my Harmony (yay!) 5) Screwed up my Audyssey settings (boo!) 6) Put in two 6" vent holes in the exterior wall of my house (yay?? See below)
For #2, I spent some good coin on a quiet 250mm fan and power supply to try to pull air up and away from the equipment rack. I thought that this would also work sort of like an air return to get hot air out, but no... It doesn't do enough.
For #3, MediaBrowser is really slick, but they are focused on more clients and features, and not on fixing a couple of critical issues. Subtitles don't work correctly for a number of people (I just want "forced" subtitles for when someone is speaking in another language, not for entire movies). They also still don't have MadVR working in exclusive mode. This allows for better video handling, but without exclusive mode, I have to use 3rd party playback software instead of the one built in to MediaBrowser. This makes it NOT a seemless experience. I have about $18 is all that is invested into MB, but I am on day 3 of what should be day 18 of my 30 day trial... I reinstalled Windows and thus my trial started over. I reinstalled due to chasing down an issue just to find that the support people were giving me was making things worse. It was a minor thing and I found out later that it is a known bug. Anyway. It isn't as slick, and is a bit more of a hassle to set some things up, but it works for subtitles, and it does MadVR. Cost is $50, plus about $28 for each upgrade... Yay and Boo at the same time.
#6 is related to #2. Before the arctic winter sets in (highs in a few days are going to be in the mid-30s) I wanted to come up with another solution to a hot home theater. For summer, I NEED a real "hot" air return. There is duct work running almost directly above my 250mm fan. It is just a "fresh air supply" line for my furnace and water heater. There is enough of the duct to tie into the air return and put a return above the equipment rack. However I need a new fresh air supply, so I am going to put in another run from another part of the basement. It required a new 6" hole and vent. It will also require me tearing into some drywall in a soffit in my "game room." I am not real happy about that, but I can fix the drywall. That solves summers.
For winter, I put in another 6" vent hole behind my screen wall. I didn't break through the drywall yet, but the vent is in. My Panasonic FV-20NLF1 in-line fan arrived today. I am waiting for a back flow damper to come later before I get too far into it. Without going into a ton of details, this will allow me to blow in cold winter air from outside, through a filter box, and into the front of the room. Part 2 of this will be taking that other piece of duct above my equipment rack that I tied into for a return, and putting an exhaust fan there to push heat outside. Not sure if that 250mm fan will do it or not. It is rated at 105CFM, which theoretically should be enough as I probably won't run the cold air fan at full 240 CFM. We will see.
A lot of messy work is ahead. I hope that it is worth it. The ducting alone is a lot more money than expected. Throw in a $150 fan, a $36 back flow damper, a $35 DIY filter box (better than the $90 pre-made), plus drywall work for the new fresh air vent for the furnace, adding another soffit to the front of the theater to hold the fan and try to keep its sound down.
It is adding up quick, but if it works, then I will be happy that I did it. The alternative was putting in a mini-split for at LEAST $1000 up to $1500 and then you have an odd looking system in the theater, distracting from the overall look.
I just bought 2 pairs (4 total for those who are mathematically challenged) On-Wall M3s...
My plan is to use them as QS8 replacements in preparation for Dolby Atmos that requires direct radiating surround speakers, but dang, if I stuck with the QS8s, these would work wonderfully as overhead Atmos speakers...
Are you planning on holding out on opening the ceiling till DTS is made official? I'm pondering cheating ATMOS wide to double for auro. This ATMOS craze is definitely putting my willpower to the test. Almost impulse bought twice now.... Sheesh.
I know what I *should* do, and that is replace the QS8S and sell them and my VP150 on ebay to cover the cost of the four on wall M3s. I had two of the "special email coupons" thanks to a friend that just bought Axioms last year. I also had a $60 referral coupon code that worked. Basically I got all four M3s for less than half price. Even if I just do "ok" on eBay, I will cover that and then Axiom doesn't have to deal with more old speakers from an upgrade. The 2nd big coupon really helped. This will also give me a chance to compare quad polar surrounds vs direct radiating.
Atmos 11.2 receivers are just way to expensive, and I want to see what DTS does in the coming year or so.
So I was watching the video below yesterday about how to set up a room and speakers for "immersive audio" like Dolby Atmos, and I was surprised by what I heard.
The guest was talking about how they are getting a much better benefit by filling in the "hole" between the front main speakers and your surrounds (on the side walls) than even going with overhead speakers.
Hmmm.... Dolby doesn't even really address this with Atmos. They focus on the overhead sound.
Then he was saying that he actually likes using dipole speakers for these new "super wides" mentioned above, the surrounds, and the rear speakers... Even for Atmos.
Hmmm.... Dolby states that they want monopole speakers.
So now I want a 9.2.4 setup. Something to fill in the gap between the front mains and the side surrounds, AND overhead speakers. If I had just a single row of seats, I could possibly do 9.2.2, but with 2 rows, I would do much better with 9.2.4... The problem? Receivers currently max out at a 9.2.2 or 7.2.4 setup. 11 total powered channels, not the 13 the I *want*. Even with 9.2.2 or 7.2.4, those receivers are pretty spendy to get the bells and whistles that I currently have such as Audyssey MultiEQ XTm etc. Plus I still want to see what DTS comes out with.
Sounds like (pun intended) I will be hanging on to my QS8s AND the new M3 on-walls for a while. I guess I can experiment with which I like better until then. Or setup a 5.1 setup in the family room right next to the theater... Oh wait, I would need another receiver for that.
Well, the Audyssey guys always said, go with Wides first because it'll have more impact than heights. I guess it's the same idea? But ultimately, I guess it'll be individual preference (mono vs multipole)
Isn't Grimani great? Very personable. His other vids are well worth a look too on geeks.
I'm now just starting to realise just how new and soft all the ATMOS specs for positioning are. Man, I'd love to do front wides. I just can't rationalise putting speakers at sidewall locations when the rest is behind a screen to hide them.
Ironic how in my room adding immersive speakers at wides will possibly erode some of the overall movie immersion.
I've always like Grimani's videos. I assume others do too which is why he is on the "show" several times.
I contacted Axiom the other day via their web contact form about the status of my second pair of on-wall M3s. The first set was ordered a few hours before the 2nd set and the first set is at the local FedEx sort facility today (not sure if it will deliver today or not), but the 2nd set hasn't shipped. I received no response. I called twice as well and was offered to leave a message, which I opted not to. It wasn't until I sent a couple of regular emails this morning that I got a response.
Makes me wonder if the order got "lost." I placed both orders the day that the $250 coupon came out, and while I am sure that some people put in orders like me, a lot of people are still trying to decide what to do with their coupon, so it shouldn't have been THAT many orders in a difference of about 4.5 hours between my 1st and 2nd order that would delay it this much to have the 2nd one "conveniently" set to ship out on the day that I finally get a response to my inquiry about it. (Wow, that was a long sentence.)
I'm not in a rush to get them, but since I need to provide a signature, I need to plan ahead to be home. I don't want FedEx leaving a door tag and coming back another day. That will many times mean that the speakers have more time to be tossed around in the truck, dropped, etc. I could set them up to be held at FedEx, but the location is about as far away from me as you can get and still be in the same city/town location... I'd say "metro area" but we are talking something like 180,000 people. Not a huge "metro" area.
On another interesting note, if you've stuck with me this long...
I just found out that my management responsibilities at work are expanding and I will need to get a passport now. Looks like I am going to add a Canadian to my IT support team. New (to me) location will be in Toronto. That is just a quick 2 hour 40 minute drive up to Dwight... I will have to plan a trip to the Axiom factory. This also opens up possibilities for travel to the big Axiom bash coming in 2015. YAY!
So here I am... At the in-laws for the U.S. Thanksgiving holiday. one pair of the on-wall M3s shipped this past Monday and seem to have gotten hung up in Memphis, TN. The other pair shipped Wednesday. All 4 were ready for delivery today. Since I am not going to be home today or tomorrow, I went on to FedEx's website and set them all to be held for pickup. The nice thing is that I was able to pick a FedEx location about 10 minutes from my house (instead of 30+ minutes to the main warehouse) and even better is that it is open on Sunday, so I will make a quick trip and pick them up.
M3s were picked up yesterday, but I didn't get a chance to un-box them until today.
I noticed that one set has serial numbers about 1000 lower than the other set, came in slightly different packaging (didn't have the 1/2" white styrofoam sheet on the top/bottom of the inside packaging end caps, and had been previously opened, re-stapled and re-taped shut. They look perfect, and if my receiver ever finishes updating its firmware, I will be able to try them out.
Oh, I also noticed that the logo on one of the "older" ones was messed up. The bottom looks "melted." Not a huge deal, but I did see it right away.
Anyhow, here are two of the M3s next to two of the QS8s that were replaced:
With the box being opened previously, I was thinking that someone possibly bought them, tried them out, and sent them back, but the boxes (which again were previously opened) had no signs of previous shipping labels besides the one for them to come to me.
Not the end of the world considering the price that I paid for them, and the blemished ones will go on the back wall anyway. Nobody goes to the back wall except to vacuum.
I got them all mounted on the walls, but I need to wipe out my Audessey settings to listen to things completely un-altered, and then run Audessey and see if I like the changes. I did play a scene from Oblivion last night and there seemed to be good (better) imaging of one of the probes near the beginning where it crashed in an old stadium. After Jack Harper, Tech 4-9 (LOL) fixes it, it shoots straight up and then zooms away. I was able to really hear it zipping past me, and the ambient sounds it made way in the distance were noticeable from the rear surrounds.
If after messing with the Audessey later today it gets even better, then I am going to pack up the QS8s until further notice. Around Christmas I might mess around with a pair of QS8s in a front "wide" configuration where they are on my side walls between the front speakers and the side speakers. If that yields minimal performance boost, then I will sell them all and be ready for more M3s for Atmos down the road.
In the early 90s when I purchased my AX2s from a store in Victoria, BC, I wasn't fond of the cosmetics of the new logo that Axiom tried at that time.
I sent a letter (remember those?) & they promptly sent me a pair of complementary logos that adorned the previous model - great service even way back then.
These logos look like they are glued to the grill material. I am guessing that they actually melt them on to the grill fabric, and the logo was offset just a little bit in the machine and it melted the face of it.
I am not overly concerned about it since they won't really be noticed by anyone but me, and I got a great price on 4 speakers. It was just odd is all that they were significantly older, had different packaging, the boxes were previously opened and resealed, and the logos were boogered up, but showed no signs of ever being shipped before. Oh well.
I remember gluing on my new logos with some silicone sealer directly onto the front baffle of the cabinet & they are still grimly hanging on after all these years; however, I didn't have to pry off the old ones from the fabric grill.
I suggest that you call Brent see what he thinks...
Speaking of logos, and this probably deserves a dedicated thread, but what is up with the "A" in Axiom? I've had Axiom's since 2003, and I swear to god there's not one person that has walked in my house that could figure out what the logo said. I've ordered a few speakers lately, all shipped to my office so the boxes are sitting next to my desk so I gladly show them off (of course) and I have had a chuckle or two with people trying to figure out how to say Axiom or even read the logo. I personally have never had an issue with the logo but its opened my eyes to how others view it - Odd.
I've heard everything from AX-EYE-UM. NEX-EEE-UM, AX-ZEE-UM, AXE-EYE-OM....lol
I've never had an issue with it, but I wonder if that is because I saw the name 'Axiom' before ever seeing the logo when I was researching speaker companies.
I see what you are saying. It is almost like a dot and a boomerang, even though I see it as a fat (bold) lowercase 'a'
Ran Audessey and I made similar changes that I made before. I increased the center channel a few db, and that was about it. So far, I really like it so far. Watching How to Train Your Dragon 2. I actually feel like I am getting better imaging of surround sound now. Before the surround effects were just a bit too muddled for my liking. Ever since going 7.1 I have been a tad bit curious about changing the rear surrounds for direct radiating speakers. Now that all four surrounds are direct, I like it a lot more. I will give it a few weeks to see if I continue to agree or not.
I have direct radiating cheapo Fisher's for surrounds in my bedroom along with axiom VP 100 and M2's and a pair of 8 inch Yamaha subs and I have to say I prefer the effect of the direct radiating speakers over the QS4's I have in my living room. I also just added M2's for rear surrounds for 7.1 and they are very impressive using PLiiX and I am now rethinking my QS4's and changing to some onwall speakers.
Yeah, I do want to say to anyone following this thread, I am by no means saying that the QS8s that I have had for over 10 years are bad speakers. They are truly quite amazing. We just finished How to Train Your Dragon 2, I I liked the speaker changes enough to mess around with a few scenes from some other movies... Need For Speed, Gravity, Oblivion, and Star Trek: Into Darkness to name a few. Everything sounds really good.
Tomorrow I will start watching some scenes from some demo discs that focus on surround sound and try sitting in different seats. My fear is that if I sit in one of the seats closer to the speakers themselves that I will not like the volume of the speakers with their proximity, but I don't know yet.
I need to also see what happens if I hook up a pair of the QS8s as front wides with my Onkyo TX-NR709 and see if it will drive them with my current setup. I have read mixed things about if it is possible or not. The receiver has front height and front wide connections on the back, but I don't think that you can connect more than 7 speakers to it as the amp only handles 7. Maybe I will have to temporarily disconnect the rear surrounds and try the QS8s as front wides in a different type of 7.2 setup. Then I will experience what the wides will sound like. If I like the sound, then I will be keeping a pair of QS8s for down the road to fill that spot, if not I will sell the QS8s and my VP150 and get more M3s for Atmos down the road.
One thing that I really like about the M3s is that they can really handle a lot of frequency range (full range speakers are nice). The QS8s do a great job too, but I am glad that I went with M3s instead of M2s just for that slightly extra capability. It still seems a bit crazy though that I am using "front main" speakers for surround sound.
That was about the sub that I built. I was wondering about a top "cap" over the port. I never went back and did anything with it, and don't plan to, so I AM happy with it.
M3s were picked up yesterday, but I didn't get a chance to un-box them until today.
I noticed that one set has serial numbers about 1000 lower than the other set, came in slightly different packaging (didn't have the 1/2" white styrofoam sheet on the top/bottom of the inside packaging end caps, and had been previously opened, re-stapled and re-taped shut. They look perfect, and if my receiver ever finishes updating its firmware, I will be able to try them out.
Oh, I also noticed that the logo on one of the "older" ones was messed up. The bottom looks "melted." Not a huge deal, but I did see it right away.
And here is a messed up one:
Without ever officially asking, Axiom sent me a note that they are going to send a replacement grill with correct logo.
Also, Ian believes that the odd mystery about the opened box is that it was opened in customs. The serial numbers being 1000 off from the other pair equals about a month worth of serial numbers, so that isn't so bad either. Slightly different stock, slightly different packaging, and the boxes were opened by customs... Makes a lot of sense. Customs much use the same box stapler and brown string reinforced paper packing tape since the staples and tape were the same, but whatever, the product works and I am happy with it. THAT is what matters.
Actually we count on DHL (Drop ,Hammer & Lob ) for that kind of service.
Even funnier, though i had DHL deliver my Tannoy Definition speakers to me from the US years back and they arrived in great condition, likely more due to the great seller packaging.
Also, Ian believes that the odd mystery about the opened box is that it was opened in customs.
This has happened to me before. However the box had a sticker tape over the top stating US customs or something like that which kind of indicated they opened the box but then resealed it. A reasonable thing to do for the eventual customer.
Bump for updates. (Didn't seem right this thread was 6 pages deep.)
Any thoughts on what/when you will be looking into immersive stuff? Are you going to try DTS:X with a standard layout first? Ie. No height channels immediately.
I'm on a dealers mailing list for in ceiling specials, but having finally heard Axioms the in ceiling M3s may be on the table. But gosh expensive!
Not sure that much has changed since my last post....
As far as DTS:X and Atmos, I've already started down that path to some degree.
Last year I swapped out my (4) QS8s with (4) on-wall M3s since Atmos really wants direct mono-pole surround and overhead speakers.
I still have the QS8s, but they are in boxes with my VP150. Kind of crazy when I think about how many speakers and subs I have. I could have a nice 7.1 setup in the theater, and still a pretty killer 5.1 setup somewhere else in the house.
But no. Both subs are staying in the theater, and I just need to get off my butt and do something with the QS8s and VP150. Maybe fund the 4 overhead speakers that will be needed??? I would love to find a way to use on-wall M3s for a smooth transitioning soundfield, but would need to be creative in mounting them to the ceiling. Using in-ceiling M3s makes me cringe a little bit to put such large holes in my soundproofed ceiling (the single surface of the theater with the absolute most soundproofing as our bedroom is right above the theater). Then again, a number of people are making DIY ceiling speakers that are considered "full range" to meet the Atmos specs, but small enough (and cheap enough) to surface mount and not break the bank.
I keep signing up to win a Onkyo TX-NR1030 at HomeTheaterForum and AVS, but so far have just one an Atmos blu-ray. That would get me even further down the road. It would need a separate 2 channel amp to get to the 7.2.4 setup that I would like, and may not get DTS:X, so maybe just a quick resale and wait.
Right now, I am excited to go to CEDIA this fall again, where I am sure that there will be a lot of DTS:X demos, and instead of spending about 8 hours on the show floor, I plan to have even more time for demos and such. Then when products start to flow for 2016, I will look more into a receiver upgrade. I would love to get 11 powered "channels" into a single receiver for a "reasonable" price. I know, if I start getting amps, then it gets a lot more flexible down the road... Just the upfront cost is a bit steep.
So I am excited about DTS:X. Hopefully I will be as blown away by the demos at CEDIA 2015 as I was about the Atmos demos last year.
So my latest project in the theater actually started last October... I bought all of the materials and put some holes in the side of my house... Then I did nothing with it until last weekend and then finished up phase 1 tonight.
In my theater it gets warm pretty easy if we don't start the room like an icebox before hand. Not hard in summer if we crank the A/C and freeze out the whole house, but it could be better, and with the theater in the basement, it is well insulated in winter and tends to get actually warmer faster with just 3-4 people, let alone if there are other people over. With no A/C in winter, it is just really uncomfortable.
So I could go with a $1500 ductless A/C unit, but those are ugly and pricey. So are second A/C units (that actually can work in winter). So I went a touch old-school.
I basically now can suck in outside air into the home theater and blow it straight out of the front false wall.
So now in winter, I can turn on the blower and blow below freezing air right into the room to chill it quickly.
I basically have the following starting from the outside: Exterior Vent (in a hole in the side of the house) Flexible Insulated Duct (about 6 feet of it) A Back Draft Damper (that shuts when the blower isn't on) A DIY filter box that holds a 10" x 20" HVAC filter Flexible Insulated Duct (about 2 feet) Panasonic FV-20NLF1 WhisperLine 240 CFM In-Line Fan Flexible Insulated Duct (about 11 feet) A 4" x 12" HVAC Boot With Built In Hangers (to attach it in place) A 4" x 12" Vent Cover (painted black, and I removed the sliding part that allows you to open/close it since it won't be needed.
It is installed on a shelf with the filter box and blower both up on rubber vibration dampening "feet". The shelf also has dampening material between the brackets and the shelf. I put a front piece of shelving on it to box it in like a soffit, but am using friction and industrial Velcro to hold it in place in case I need to do anything with it. I also stuffed both ends with insulation to keep sound in.
It is pretty quiet, and during most movies you would never hear it at full speed, but I wanted to be able to control it and make it quieter if need be. So I picked up a 3-speed fan controller. You know, the "old school" dial type that has Off, Low, Med, High... Cost me $12, plus a box and faceplate for safety. I added that tonight and currently have it set on Medium. When playing even soft music at a low level, you can't hear the blower at all. This is attached to the side of the blower, so to change it I will have to take down the screen and the front face of the "soffit" to adjust it, but it should be a "Set it and forget it" type of thing.
I also added a remote controlled (RF) power outlet, so I can turn it on/off without having a physical switch visible. That works slick. I wish that it was IR so that I could use it with my Harmony One, but this won't get used THAT much, so for those few times it will be fine to have a separate remote.
So that is Phase 1.
Phase 2 is to run a new "fresh air" (passive this time) duct to my furnace room so that I can do Phase 3.
Phase 3 is to take the ducting from the current passive "fresh air supply" for the furnace room and turn it into an air return in the back of the home theater. Right now I have a really REALLY large computer fan up in a hole in the ceiling just blowing air up, along the gap between the joists/basement ceiling/upstairs floor over to the furnace room. I would rather have an actual air return so that in summer I can pull warm air out with the A/C pumping in. As it currently exists, the fan isn't a whole lot better (but it is better) than when I had nothing to relieve incoming air pressure.
Phase 4 (and I hope that I don't need to do this) would be to install an "exhaust duct" that blows air outdoors from the room (opposite of what I did for phase 1. My fear is that if I pump in a lot of outside air I will end up with positive pressure elsewhere in the house and just make everything "wonky."
Anyway, here are some pictures.
Here is a picture in the midst of the project. Nice and messy. You can see my DIY filter box up on the shelf.
Everything tidy and put away. I might add some acoustically absorptive material to this new "soffit" but have to see how the audio sounds first to see if it needs it.
If I understand, there was never a return air HVAC line from the room? Just a supply?
Our code states an exhaust fan 300cfm or greater requires a make up air system. Not sure about a supply though being that high. Either way you are under 300.
You could have used the blower as an exhaust out of the room at the rear and had a motorized damper interlocked so it opens when the fan comes on to let outside air in. This is how parkades are exhausted. Then run the fan off a close on rise thermostat. (A/C t-stat) This way your HT will heat the rest of the basement and you dont have to open any drywall outside the room. You can still do this, just put another blower in the rear of the room and have them run off the same thermostat in parallel. Is there space above your equipment rack to hide it all?
Man, it sucks you have to revisit this in a finished space. But it must be terrible enough to make you do it. Hope it all works out!
Just looked up fan. No provisions for control in unit. Just direct power. My bad. Controlling with tstats not really a good option without a lot more work.
These fans look pretty good. Might get one for my upstairs bath and let it run full time for ventillation.
So my latest project in the theater actually started last October... I bought all of the materials and put some holes in the side of my house... Then I did nothing with it until last weekend and then finished up phase 1 tonight...
Hmm, so I have another couple of months before I have to get back to my modest HT reno? Thanks man.
If I understand, there was never a return air HVAC line from the room? Just a supply?
Our code states an exhaust fan 300cfm or greater requires a make up air system. Not sure about a supply though being that high. Either way you are under 300.
You could have used the blower as an exhaust out of the room at the rear and had a motorized damper interlocked so it opens when the fan comes on to let outside air in. This is how parkades are exhausted. Then run the fan off a close on rise thermostat. (A/C t-stat) This way your HT will heat the rest of the basement and you dont have to open any drywall outside the room. You can still do this, just put another blower in the rear of the room and have them run off the same thermostat in parallel. Is there space above your equipment rack to hide it all?
Man, it sucks you have to revisit this in a finished space. But it must be terrible enough to make you do it. Hope it all works out!
Yeah, this is part of the reason that it took me until now to do this. I was afraid to pull the trigger on the tearing into more finished space as well as wanting to get it right (for the price point that I am at).
After going over the plans several times over at AVS, the consensus was exactly what I laid out. "Suck" air in with the blower, and let it force its way out using the existing large fan at the back of the room. Then work on the air return which is actually Phase 3 (which of course means a new fresh air supply that i mention is Phase 2 above). Those 2 phases get me added benefit that will be helpful even if I never did Phase 1. There are zero returns in the basement, and that needs to change. I will be adding a second return after talking to a former HVAC guy at work. That will go in the opposite end of the basement.
So Phase 2 and 3 were happening anyway, Phase 1 was highly recommended as I was told that I would get more cool air in faster by putting the blower near the source and not the exhaust.
I am hoping to skip Phase 4 (powered exhaust to the outside) but we'll see.
The only hole that I made in the drywall is in the front most part of the ceiling and it is just enough to get to the vent in the side of the house. I do have a hole in the rear of the theater where I put in that really large fan in the ceiling. When I get to putting in the air return, I will definately be running some wires for ceiling speakers. You are right, once you start messing with drywall, you might as well finish.
Yes. The QS8s have been sitting in boxes since December 2014...
With Atmos on my horizon (more "distant" horizon) I need to also adjust the speaker locations a bit. I want to put the rear two as wide as possible in the back, and take the side surrounds, move then a tad down, and actually about 2-3 feet towards the front. Then angle them a touch towards the seating area. Move the seats forward a foot as well (both rows) to make more distance from the rear for the rear overheads...
At some point I am also going to change up the wall panels. Keeping the same 3 on each side, but putting them centered under the 3 wall sconce lights, and then adding a 4th (maybe 5th) to each side that is something more plain. I will take the acoustical insulation out of the "middle" one on each side and put it in the new one that goes up front. The treatments make the room sound good already, so I want to keep the insulation where it is at. Maybe do some DIY diffusion behind the other 2 panels on each side...
Anyway, the last photos were pretty plain looking.
So I started bringing some tools into the theater for a project that I will work on for about 4 hours yet tonight and will continue tomorrow until it is all done...
Here are the first things that I took into the theater...
So.... I decided to move my false wall 13.5" closer to the seating area. That meant full tear down of the frame work, moving it, cutting existing crown molding that was in place, disconnecting a LOT of wiring for the led light strips in the crown molding (half of the wiring was attached to the frame work of the false wall to get to the other side and to use the least amount of wiring at the time.
Why would someone do this you might ask? Well, there was a primary goal, but at least two other benefits as well.
First up is my primary left and right channel speakers were really too narrow up front. They were right at the outer edge of my screen area because, well, it seemed to make sense at the time. What I am finding out after talking to a number of industry experts is that it is totally OK to put the front left and right speakers outside of the screen area, just like if it wasn't an AT screen... My problem was that in order to do that, which would give me a much wider soundstage, I would have to move the wall as my M60s were already as wide as they could go due to the corner bass traps up front. The bass traps went to within a couple of inches of the back of the false wall.
So here is the backer board on the one wall that the right black panel rests against compared to the main framing that holds the screen that has not been relocated yet. 13.5" further forward:
Why 13.5" you ask? Well, really I could pick any number, but this allowed me to position the M60s where I wanted to, giving them just a touch of breathing room, but without going any further than I needed to.
The old setup looked like this. Everything crammed behind the 138" screen.
And here is what I could do with moving the wall forward more:
The room gets a little cramped when you have to store the screen somewhere, plus all of the black panels... Oh, the left panel is physically attached to my fresh air system that I installed just a little while back, so it was a bit trickier to move.
And fast forward a couple of hours and I started putting things back together. You can see how much more room there is to spread things out a bit. There were other audio benefits in doing this as well that I will touch on later.
And here is what the front wall looked like BEFORE the project:
And here is AFTER moving it 13.5":
It doesn't look a whole lot different in the pictures, but you can see that there is less space between the wall and the acoustical panels. I actually don't have to move these at all because they still get first reflection points due to the speakers moving closer to the wall while also moving forward.
So then I put all of the various tools away (I used a lot of different tools, but thought that the Sawzall might make people wonder. I used that with a fine cut blade to cut the crown molding that was up on the soffit.
And of course I ran an Audyssey calibration too.
So what benefits did I get?
1) The soundstage is obviously wider, and it makes the audio sound much smoother when objects pan left and right, but most importantly, when they go from the front speakers to the side surrounds. That was a primary goal in preparation for Atmos and DTS:X at some point. I want to reduce that audio "gap" as much as possible. 2) The bass is a little smoother throughout the room. I think that this is because I could slightly move the subwoofers away from each other. 3) Dialog is actually less muddled, not that I noticed it as muddled at all before, but I do notice that it is a bit clearer. Could be that the left and right speakers are further away, or it could be something with the Audyssey calibration. 4) The screen provides a noticeably larger image. It went from "big" before, to "IMAX like" (but widescreen LOL). Maybe not "science center/zoo documentary IMAX" but movie theater IMAX. 5) The screen image has more POP now that it is closer to the projector. As good as it is, I was really kind of just past the limit of what the JVC can do with an effectively matte white AT screen, and now it has a lot more pop, and much better black level detail.
There is at least 1 downfall. I planned to move my seats forward about a foot to make space behind the rear row of seats for Atmos speakers overhead. As it currently sits, the back of the 2nd row of seats lines up with the front of the soffit on the rear wall. I want to put the ceiling speakers slightly behind the 2nd row, and thus I wanted to bump all of the seats forward, but I really don't think that would be a good idea. I am already probably impacting the 2nd row of people from being able to see the bottom of movies due to 1st row seats/heads. Plus my wife will say that the screen is too big (it does have a "really big" feel to it now). So I will probably leave the seats where they are, and just focus on Atmos speaker placement being good for the front row (which gets used the most anyway) and good, but not great overhead effects for the 2nd row.
So tomorrow I am thinking about widening my rear surrounds and putting them on a slight angle. I will have to fabricate some sort of angled shim or something and run some speaker wire extensions. I might mess with the side surrounds too, but that just depends on when my family gets home from the various things that they are doing out of town tonight and tomorrow.
I am also going to see about ordering some more fabric for 2 more acoustical panels and some to (finally) cover my star ceiling. I want it to look cool when the lights are on too. I have a 4 day weekend coming up in a week, so I will have some time to play around with more of this as well.
Yeah, I was full of energy last night. Probably could have kept going, but didn't want to tally screw up my sleep schedule. I made the above post at 2am. Morning came a bit early. Not that I wasn't (and still am) tired, but my mind was just racing about how to make the angled "shims" for the on-wall M3s. I was hoping to use a single piece of material, but I don't know if I will get enough angle. Obviously wood is the easiest to work with, but I am going to have to think about other options a bit.
I think first up will just moving the speaker wire so that I can fill previous holes with enough time for the mud to dry so I can sand, texture, and painot yet this weekend.
Quick update. I didn't get as far as I wanted, but I did get the surround speakers relocated. I got pretty lucky with not hitting any studs....until.... my last speaker, But, I worked around it OK.
Anyway, here are the rear speakers. The left one is in the new position, and the right one is at the original location. I also made wood mounts to put these speakers at a slight angle as well. Each of these moved 10 inches wider and 4 inches down (still easily clears the rear seats).
Here are the rear brackets mounted and the first round of mud filling the holes. I've gotten pretty good at hiding drywall repairs over the years, so this will look perfect when done...
And just for fun, here they are, both mounted in their final locations. Disregard the slight drywall dust thumbprint on the top of the right one...
OK. For the sides, I moved them to be right at the mid point between the two wall sconce lights. This just happened to be exactly 12 inches forward. I also dropped them 6 inches in anticipation of Dolby Atmos and DTS:X in the future so that I have a bit more separation from the main "bed" speakers and the overheads. I originally had my side surrounds a bit higher because I had QS8s in these positions when I wired this up originally. Now I am focusing on front row sound as the priority, and this is where it should mathematically make sense.
And with the M3 in place....
So since there were some good sized 2+ inch by 2+ inch holes that I used to fish the wire, so the mud is taking a long time to cure. I put a heater in the room for about 5 hours today after it sat overnight. That really helped, but I am waiting until I get back from my work travel this week before rough sanding, wet sponge sanding, filling whatever needs touchup, more wet sponge sanding, texture, and paint. While I was at it, I did some touch ups elsewhere on the walls, plus filled finishing nail holes around the door frame and crown molding (that I *could* paint, but the Super Bowl starts in an hour and I am on dinner duty). I've got a nice 4 day weekend coming up at the end of this week. Not that I get all 4 days to do whatever I want, but it should be enough time to get this done and painted.
Nice work there, when installing my atmos in-ceiling I ran into 2 issues.. perhaps this might help out if you plan to buy the axiom's atmos speakers
1st I have 1/2 inch drywall and when fixing the speaker in place the little legs don't quite make it because the drywall is not thick enough & had to build up the thickness from inside ceiling ( I used paint mixing sticks cut in 4 for each speaker & duck taped them to where the installation peg would sit
2nd is the grills.. hard to remove without damaging them (used axiom paper clip suggestion)
Thanks JBG for the tips. I won't be going with in-ceiling speakers mainly because my room is sound isolated (new term for soundproofed). I have 2 layers of 5/8" drywall, attached to hat channel, isolation clips, and then to the ceiling joists.
1) I would probably end up cutting through the drywall and right into a piece of hat channel, or in line with a ceiling joist.
2) I am not too eager to put 4 holes into my ceiling for sound isolation reasons.
So for me, I am looking at somehow surface mounting on-wall M3s on to the ceiling. It will be a while yet before I get to that point, but I am just prepping now while I had some time home by myself.
I'm using the same stuff but just the single pair version. Good wire. It is amazing how much time and effort was and will be spent to just move the wires about 16 inches tops.
For the record, I soldered and added heat shrink to each connection for maximum effectiveness. I not only put shrink wrap on each individual wire, but then a larger piece over the entire section, including the white outer casing on both ends. Should be good for as long as we own this house and beyond.
I should also mention that I have not yet leveled the side speakers, and the acoustical panel will be moved at a later date when I add 2 more panels to the room. The current 3 panels on each side will end up being centered under each of the 3 wall sconces on each side. The new panels will go up front next to the screen wall (the current wall panels are a specific design, so when I add to that design, I will put it up front.)
Short answer, yes... I went to CEDIA 2014 where they formally announced Atmos and had several demos set up. I specifically asked about surround speakers, and was told several times, including right from Dolby reps, that monopole speakers are what Atmos was designed to use since it provides the best pin-point imaging. Not that you can't use bi/di/quad-pole speakers, but you won't get the full effect...
That was September 11, 2014 that I was there. 2 months later, Axiom had a killer sale, and I bought the on-wall M3s.
I will have the QS8s and even my older VP150 center channel. Just need to decide what to do with them. I want to use whatever proceeds from the sale or trade-in towards the ceiling speakers. I really want to get 4 more on-wall M3s and turn them in to on-ceiling, but haven't thought up a good mounting option for that yet (haven't really put much thought into it either). If I don't do that, then I will probably go with something like the Volt-6 in one of its configurations from the DIY Sound Group.
Just got off the horn with Debbie @ axiom... wow they really can customize speaker for ya... on the M3 on wall they can put binding posts on them & have the full metal bracket screw for the back even have them horizontally oriented .... give Debbie a call i'm sure they can find a solution for you, having a matched ceiling speaker would seem a must... they have me convinced they can do almost anything
Oh, I know that they can customize it. I visited the Axiom shop in person almost exactly 1 year ago. GREAT experience. We talked about "un-skinned" on-wall M3s so that I could paint them to match the ceiling (I believe that this is a standard option anyway, but was good to talk about). I don't want to use found FMBs for a couple of reasons, 1) they would make the speaker hang down too low. I actually have a FMB from way back in 2004 when I have my VP150 mounted above my projector screen that I had at the time. Too much bulk for this application. (I want just a slight angle on them, but as close to the ceiling as possible.) 2) At $44 a pop, they start to add up.
Again, I just need to think of the design that can work with whatever Axiom can create for me for a back plate. I could create an angled piece of wood at the correct angle, but then I would have to be able to mount that to the ceiling (not hard) and somehow get the on-wall M3 to mount to that piece of wood in a manner that would hold it in place.
Enter the Axiom "Power Bracket"...
Really, the big question comes down to if the Power Bracket can hold up an M3 that is facing downward instead of facing into a room. If it can, without a doubt, do that, then all it would take to prevent it from coming off of that bracket and crashing to the floor would be a couple of pieces of Velcro. Then it would mount really flush, but not come off of the bracket. I just know that it is a lot more stress on that bracket as it not only has a downward force that is different than designed, but since it is closer to the top of the speaker, there is a twisting force as well due to the "bottom" of the speaker not being supported.
I guess that I could always ask for a 2nd power bracket per speaker, and a 2nd set of connection "ears" on the bottom part of the speaker that wouldn't actually connect to anything. Then I would have something that holds up both the normal "top" and "bottom" to provide more strength. Then again just couple of strategically placed pieces of Velcro would prevent it from ever working its way off.
See, now you have be thinking through it all.
The only other advantage to the DIY speakers would be cost. They are 1/2 the cost of the M3s, which at Qty 4, is a not-so-negligible $500. Knowing me, I will go that route anyway. I am sort of a "do it right" person whenever possible.
I am open to other suggestions for mounting. The way I look at it, the front overheads will nee to be flush on one side, and the other side will be something like 2 inches (I haven't done the calculations yet). I was planning on having them so that the tweeters for each pair (front pair and rear pair) point towards each other, and thus towards the middle of the room, vs having them closer to the front or back of the room, but that too is up for debate.
I was reading about dipoles in a sound & vision artical ....
this is quoted from that artical;
Dipoles have NEVER been the right speakers for surround sound systems with 5.1 or 7.1 discrete channels except for ONE case...
If your room is on the smaller side and you can't place the side or rear surround speakers more than 5 feet from the main seat(s), you don't necessarily want "normal" speakers. When you are that close (5 feet or less) to the side or rear speakers, you want to use speakers that don't project directly at the listening position, so dipoles would be good to use in that case. For every other case, you WANT directional speakers in the side and rear (and height for newer surround modes). Reason being, discrete surround can and will place specific sounds in specific locations. For example, there might be a scene where a sound like dropped keys happens in the right rear. The "image" of those keys dropping will be specific with directional speakers. With dipoles in medium to large rooms, you'll get a huge, out of proportion and not well-localized "image" of the sound of the keys dropping.
Dipoles for surround sound were the right thing to use way way way back in the days of Dolby Surround were there were no discrete sounds in surround channels, you only would get ambience in the surround channels (wind, crickets, etc.). In those days there was never any "imaging" of sounds in the surround channels. Dipoles helped spread out that ambient sound. Dolby Surround (and other surround options from that time period) extracted surround sound from stereo mixes. When 5.1 and 7.1 came into existence with Dolby Digital 5.1 and DTS 5.1, each channel could be encoded uniquely with very specific information from ambience to very localized sound. Dipoles will eliminate the ability of the system to localize sounds in medium to large rooms, but in small rooms, dipoles avoid the problems you have if the speakers are too close to the listener(s).
And... there is a convention for describing the channels in home theaters with height speakers... they are listed like this "ground level" channels.subwoofers.height channels. I have 7.2.5 using that naming convention. So 7.2 isn't a Dolby Atmos configuration and won't benefit from using Dolby Atmos. You have to at least have 7.1.2 for Dolby Atmos, though Pro Logic IIz and DTS Neo:X will do 7.1.2 also so, again, 7.1.2 isn't "much" of a system for Atmos... you really want at least 7.1.4 to get into Atmos. This may be referred to as 11.1 in home theater AVR-speak.
Go back and find my posts here about Atmos. I actually know more about it than most, even though I don't have it installed yet. Ha!
With that said, I will say this. With a 7.1 system (there is no such thing as a 7.2, 7.3, 7.4, etc, the naming designates how many LFE channels are in the sound mix, and not the number of subwoofers, and that is also true with Atmos as clarified many times at CEDIA 2015 whever someone would be in a demo room and ask about a 7.4.4 or similar configuration and they would get corrected by that company's rep), 5.1.2, 5.1.4, 7.1.2, 7.1.4, etc, although I understand why so many people mention it) or I guess I could say with my "7.2" system, LOL, when I had a temporary Atmos capable receiver, when playing Atmos content, you could hear a nice difference over the regular TrueHD 7.1 soundtrack and that was without height speakers.
No, not the full "Atmos experience," but definitely a better soundfield all around. It was a fun experiment and just refueled my push for a full Atmos, DTS:X setup with 4 overheads.
So I absolutely must disagree that a 7.1 (or 7.2 as you mention it) setup doesn't benefit from a Dolby Atmos capable receiver and media. I experienced it first hand just after Christmas 2015 and it WAS a better experience. I had my wife and one daughter compare the TrueHD vs Atmos soundtrack of a couple of movie clips without telling them which was which, and even they could hear an improvement with the Atmos capable playback.
Again, I've reported all of this here somewhere already. Have to use the Google search feature that is in the Water Cooler section I believe to find it all.
Lastly, Anthony Grimani (a highly respected audio speaker, room configuration, calibration guru) actually believes that a 9.1.2 setup is almost always superior to a 7.1.4 setup. It is more about "filling the gaps" than anything, and most people have a big gap (I did) between their front mains and their side surrounds. That is why I changed my setup and layout this past weekend. So that I wouldn't need to incorporate wide speakers in a 9.1.2 setup and could go 7.1.4 so that I get the best layout possible.
"If you don't have a solid bed layer, then the overheads aren't going to be as effective." - Anthony Grimani
I also posted that here somewhere. LOL
Lastly, I posted a few diagrams of a standard Dolby Atmos layout vs. Anthony's "real world" best layout. That was in a different thread than the others I believe. At the time I was going to look at going 9.1.2, but have sense decided against it. The diagrams are still valid though.
So yeah, I've been a huge fan, researching the snot out of Atmos since 2014 and my first demo at CEDIA. I asked a lot of questions then, and even more (once I had a much better set of knowledge on it) at CEDIA 2015. I also dug more into Auro 3D, and DTS:X at that time. Auro isn't anywhere near established, except with a few "international" titles, and DTS:X will use, in theory, any speaker layout that you have. There is a bug with the current firmware installation of DTS:X that prevents overhead speakers from working correctly and you have to simply set them as front and rear "height" speakers vs. front and rear "overhead" speakers, and it does not currently support wides so no 9.1.2 configuration. I am sure that both of these will be resolved at some point, but just go to show why I am waiting for then 2nd gen DTS:X capable receivers.
Thank you tough for spending the time to look that up and share. It is very much appreciated that you want to make sure that someone else is educated on the subject and doesn't make an error. That was very thoughtful of you, and will go to possibly help someone else reading this thread.
So far from what seen the best overall atmos/dts-x packaged avr receiver taken into account the price, room correction, features & options.. in my opinion is the Denon X7200wa or the Marantz SR7010
Both are really nice and have been a popular choice for the people at AVS who participate in the Atmos topic.
I am still hoping that the next round will yield a full 11.1 amplified system (no need for an external amp) that does Atmos and gen2 DTS:X and doesn't cost $2000+
You can get into Atmos for less than that, even with a 7.1.4 setup, but usually you need a separate amp. I guess if the pricing difference was big enough (external amp setup potentially cheaper) then I would look into that again just as a cost savings, but depending on the amp make and model, it doesn't seem like it would be.
Yeah, I waited for a demo at the Anthem booth at CEDIA, and due to their lack of organization (OK, it was really the lady there who was more interested in chatting with some people she knew about where they should go for dinner than actually working the booth) and I missed the demo 3 times. I spent so much time waiting that I gave up as the day was winding down and I had a special demo for select AVS members at the Epson projector booth that I had to get to.
Outside of that one lady messing things up, I've heard great things about Anthem products and would look close at their 1120 product. Still $3500, but has 11 channels of amplification built in.
Right, ARC is one of the main reasons I wanted to hear their product. So many people talk about the loss of Audyssey with some of the current generation receivers and processors, and while some companies have improved their own room analysis a bit (Yamaha, Pioneer, Onkyo, and a few others) they are still inferior to what Audyssey can/could do. It is companies like Anthem, Steinway Lyngdorf ($$$$), and others that have been developing really top notch room correction technology for years that many consider to be superior to Audyssey in many ways. Alas, like I said, I never got to hear the Anthem Room Correction. (I did hear Steinway Lyndorf's though, which was damn impressive.) If ARC is somewhere between Audyssey and the SL correction, that would be utterly amazing I am sure.
I have the mrx500 and previously denon avr4802 really like the arc over compared to the other room corrections out there... other room correction seem to focus the sweet-spot in a small seating area with arc the sweet-spot area seems quite big, actually almost the whole room the only downside (in arc gen 1) seems correcting the subs... but the newer gens seems have over come this issue.
(looks like the mrx500 & xpa-5 will be up for sale soon)
I just came across someone who people are claiming can give a really good deal on a new MRX-1120. Probably still too rich for my blood, but I am tempted to ask... Authorized reseller who is active on some Facebook groups.
I started playing around with putting an on-wall M3 on to my ceiling. To get it at a reasonable angle on my 7'9" ceiling, it really hung down a lot more than I would care for aesthetics reasons.
So I starting thinking more about what to do... A cleaner look would be in-ceiling of course, but 1) I am concerned about how I would put them in the ceiling without hitting some hat channel or ceiling joist, and 2) I am not eager to cut 4 good sized holes into my soundproofed ceiling (the one part of the room that I spent the most money on soundproofing as well) and stuffing 4 speakers into those holes, 3) putting in-ceiling speakers wouldn't let me angle the speakers towards the listening area as suggested.
I sent some questions to Axiom, and Debbie responded today with a suggestion on how to get an on-wall M3 to mount to the ceiling, and also confirmed that the in-ceiling M3s have been coming with aimable tweeters for a while now.
So, I also figured out a way to find where my ceiling joists are in the theater room. I also have some notes buried around here somewhere that have my plan for where I would have put the hat channel.
Then is just comes down to (for the in-ceiling speakers) finding the openings for where the speakers could go, see if they should go there (proper location for Atmos/DTS:X), determining how much sound will leak into the room above, and lastly, figuring out if aimable tweeters is "good enough" or if the full speaker needs to angle towards the listening area.
Yeah, I thought about that and even posted it someone on here. In talking to Debbie, she mentioned using the included power T bracket and then removing the driver and putting a screw through the back and into a stud.
For me, I would measure and drill a nice hole first, and use a toggle bolt so that I wasn't attached to a stud, but was attached to my double 5/8" thick drywalled ceiling (1.25" total thickness) which is more than enough.
I've had my four QS8s and my VP150 in boxes for a while now and I just filled out the Trade-Up information and placed an order for four more on-wall M3s that I will mount to my ceiling for Atmos/DTS:X duty.
Why did I go with on-wall M3s?
Well, I really had 3 choices.
1) On-wall M2s (smaller, still has a woofer and tweeter that my mains and center have) 2) On-wall M3s (just like my four on-wall M3s that I am using for surround channels, also has a woofer and tweeter that is the same as what my mains and center have) 3) In-ceiling M3 (same as the on-wall M3 for speaker components, aimable tweeter, and a flush/clean look in the room)
I eliminated the M2s pretty quickly. I felt that the larger woofers in the M3s would match better with the M3s already covering half of the room.
I really thought that I was going to end up with in-ceiling M3s. I love the nice and clean look, and the aimable tweeter is very helpful, however as I starting trying to map out where my ceiling joists were, I quickly found that there was a joist running just behind my rear row of seats and there wasn't any room to put the rear overhead in-ceiling speakers between the rear row and the soffit thanks to this joist. I never bothered to even see if the hat channel was in the way as it didn't matter any more. (For note, the joists in front of the first row were perfect for those speakers.) Also, I still wasn't very fond (nor was my wife) about the speakers being cut into the soundproofed ceiling.
So we did some tests. I sat in "my seat" and had my wife stand on a chair with an on-wall M3 wired up and no other speakers on. I had her mess around with mounting it flat on the ceiling vs. angled, and put it into a few different locations to see what the sound was like. Definitely needs to be angled as the sound is much cleaner.
The 2nd test was just with me holding the speaker in different locations (all 4 possible locations) and at an angle just so my wife and then my 17 year old daughter could give their opinions on how it would look with the speaker being down below the ceiling. Surprisingly they both though that it looked fine... even at an angle. This is where I thought that my wife was going to jump in and say "that is ugly. I don't want to see them." but she didn't.
So this morning I made the order. Now I am just waiting to find out how I get my shipping labels to send the 5 boxes back to Axiom. Not sure if they mail those to me, or send me the labels electronically for me to print out and put on the boxes.
Congrats Should look great having them all visibly match around your theater. I've been using a pair of the M3 for my heights for the last year, really enjoy the full sound they have.
I should note that I went with a paintable "finish" on them so that I can paint them to match the ceiling. While the classic "boston cherry" that the rest of the speakers are finished in didn't look bad next to a dark brown ceiling, having the speakers match the ceiling will be better.
It is also coming from Canada and with the USD being stronger than the CAD, the pricing works out nicely in my favor (cheaper, even with duty tax and shipping, than if I bought it in the US) and it comes from an authorized installer so it will have a warranty.
This should be a big jump up in quality over my 5 year old Onkyo TX-NR709
Nice Nick, you will be enjoying your speakers all over again. At least that's what I found with the Yamaha over the Onkyo. Thanks for buying Canadian, we need it!
It is also coming from Canada and with the USD being stronger than the CAD, the pricing works out nicely in my favor (cheaper, even with duty tax and shipping, than if I bought it in the US) and it comes from an authorized installer so it will have a warranty.
This should be a big jump up in quality over my 5 year old Onkyo TX-NR709
I didn't think there was duty tax. Product is made in Canada and with free trade ........ Well, I'm not in America but, if I buy something that is Made in USA I don't pay duty
That is 3500$ CAD, so you paid about what I would have paid because I have never paid full retail on stereo equipment. He may have meant the state taxes if any.
Nick the mrx1120 is made in Vietnam so you will pay duty on it... for the price I guess that selling to some one in the US that perhaps there is a price threshold that might get him in trouble (min price)
and dont forget that on the price paid .. there was shipping & tax & fees for using my CC
After some initial testing with some M3’s vs Qs8’s as surrounds in an atmos setup..came to the following conclusions mind you I’m no expert or pretending to be also all my testing done in my specific Ht room and realize that different rooms can yield different results… that said I have to say we all know these are very different speakers, the qs8’s diffuse more and and the m3’s have a more direct and precise sound (without knowing exact dispersion angle). The test I did was using DTS Atmos 2015 demo disc, must say that in some tracks the qs8 shined vs m3 in other cases m3 was better than the qs8. The tracks where wide dispersion sound was present in the surrounds like Phil harmonic or a crowd clapping the qs8 were better as well as the track with Enrique Billando. Where track needed to pinpoint a certain sound like broken glass where sound field was very precise the m3’s were better. I will also point out my side walls very close to my seating area and the rear speakers (side & back surrounds and rear in-ceiling) are in a tight pattern, the qs8 in this situation help out to disperse the sound more in this tight area, all in all both speakers had their own advantages and both worked well but was there a night & day difference… no, in the end I did prefer the qs8’s being that wide field is a little more present than the precise content that I listen to. I also did a test with the in-ceiling speakers and and found the qs8’s did not work good at all in a ceiling situation for atmos.
Early this morning, after listening to an avs video I decided to do a little more trials which involves mixing up different speakers for side and rears surrounds (m3's with qs's in the surrounds) and with my room dynamics and calibrated every-time each setup with the ARC, and Yahtzee, this what works the best for me of all the different combos I tried since yesterday
fronts & center (with ARC set as full range speakers) front subs the sides qs8,s ( ARC set at 80 ) back m3's ( ARC set at 80 ) in-ceiling's with tweeters angled towards seating area ( ARC set at 80 )
the sound is crazy good and precise. from all the speaker combos this sounds the best I tried in my HT room ..I am really happy I did those tests, this will be my setup for a long long time!!!!
only thing for aesthetic looks I need to buy M3-on wall positioned horizontally for rear surrounds instead of m3 bookshelves. will return a pair of qs8 to axiom or go the canuck mart route
So today I arrive in Denver for work, and tomorrow late afternoon I head to Los Angeles, and then I don't get home until after 5pm on Thursday...
Guess what arrived from Canada today?
Heavy box of something (my wife isn't good at describing anything), but it is the Antehm MRX-1120.. Crap. I can't play with it until Thursday (although that is better than it showing up on Thursday as nobody would have been home at the time that they dropped it off as it required a signature and I would have had to wait until Friday.
Now I wonder when my Axiom "custom finish" on-wall M3s will ship. They got my four QS8s and VP150 last Friday afternoon. Haven't heard a word about any part of the trade up process.
Hey, just FYI that I was asked to have all talk about pricing removed from this forum. Without naming names, someone complained to the reseller that I was posting prices here, even though it never referenced the reseller themselves. Anyway, I can't wait to get the unit, but can no longer discuss pricing myself or even comment about your comments.
So I finally got the Onkyo removed and the MRX-1120 put in place. It has been a horribly slow process due to it being spring break and my oldest doing a lot of wedding planning, plus some unexpected "projects"... Yes, the wedding planning requests have consumed most of my day yesterday, and continued into today, plus I had to show my future son-in-law how to avoid a $900 bill at a dealership for something that took me 20 minutes and $150 in OEM parts to fix. Unfortunately, this took 3.5 hours yesterday due to having to buy parts, and then drive an hour each way to get to the car.
Then last night, my same daughter found out that she was referred by her college and a state-wide talent agency that she hasn't used in a few years to audition for (wait for it) Disney's High School Musical 4... Yeah, #4... Anyway, they only do video auditions for round 1, so we had to set up a make shift recording room in he house, tweak lighting, etc. She has everything recorded, but we (I mean *I*) now have to go and do some trim work and weed through the dozens of audition pieces with her to find the best looking and sounding ones and then splice them all together into a deliverable package. Call backs will be later this coming week.
But, the MRX-1120 is connected, and it does play audio. That is as far as I have gotten.
One thing that I didn't notice before is that I lost the component video connections when going to the Anthem receiver.
I used the HDMI *AND* Component video plus optical audio outputs on my Dish receiver to feed the signal to the home theater (Component video/Optical audio) and the family room just outside the theater (HDMI)...
So no TV in the home theater for a while. Not sure about a HDMI splitter type deal or not. I will have to look that up later.
Hopefully, I can run ARC (I am hoping to install the firmware on the receiver and get ARC software on my laptop in the next hour) yet today... It is already 4:15, so we'll see.
So I just finished running ARC. Wow. What cool software. I will have to post some screenshots sometime, but the link below is to a 6 page report (mostly pictures for those that don't like to read) showing just how much it is able to tune and tweak my Axioms to my room. SOOOO impressed as to how close to the target it gets with the speakers.
Now I am off to listen to a couple of demo clips before dinner, and hopefully get a chunk of a movie in later.
Outstanding result. Your measured response before EQ was quite good above the room transition frequency. Now just wow!
Does the software use sweeps or chirps? Looks like 1/3 octave measurements in the graphs. Any option to increase resolution? What a great result. Congrats Nick.
I went on-wall instead. Just couldn't bring myself to put the holes in the ceiling, plus after some tests with my existing on-wall M3s, I noticed that sound coverage was noticeably better if the woofer could be angled, and not just the tweeter like the in-ceilings.
I need to get myself in-gear, get the wires run, and make some ceiling mounts at the correct angle for the speakers (front pair will be angled more than the "rear" pair.
Also, people are finally starting to publish information about best speaker locations for multiple rows of seats.
Isn't DSPeaker only for stereo (they have a separate subwoofer unit too)?
ARC, at least in the MRX-1120, does all 11 speaker channels, plus the dual sub outputs.
Also, have you seen my report from my 7.1 setup? There is a link a couple of posts back about my ARC correction. Pretty amazing. Not sure how much better another product would be, at least for my setup and my room so I haven't looked into anything else.
I wasn't expecting the new box style for the M3's I thought that these boxes were reserved for the AxiomAir.
Heck, the M3s came in fabric bags too. Nice touch.
They are currently white (primer) with black grills. I am hoping to get some time to test them, tear them down, and then put some paint on them tonight yet.
So, I got 4 "paintable" on-wall M3s to use as ceiling speakers for Atmos and DTS:X. I wasn't sure what to expect as there is very little documented here about these, so I figured that I would add some photos.
First off, they are in primer white.
Without grill:
The back states not to remove the brackets when painting, but it will be tricky to get a nice finish with these still on there. I will probably take them off.
Here is everything disassembled:
Close up of the empty cabinets:
And a close up of the tweeters, woofers, and ports:
I will say this about the finish. It is fairly smooth, but definitely had a slight texture to them. I took a 320 grit sanding sponge over them VERY lightly (pretty much a light back-forth-back-forth and that was it and they are SMOOOOOOOTH...
Still debating if I want to use a foam roller for these, or spray them with my HVLP sprayer. The sprayer works really nicely, but I've only used it once so I am no expert at using it.
Yeah, I am thinking the same thing. Really, it isn't hard to do the spraying, I have a tricky time getting the paint thinned just right for the sprayer, but I've got plenty of cardboard to practice on.
I need to make some sort of "hanging hook" system in the garage so that I can spray all sides of each cabinet and leave them hanging to dry and respray. I'm thinking that I will hang them from the garage door "tracks" and then unplug the garage door opener to prevent accidental opening.
HVLP is rather simple if you get the consistency of the paint right and spray at the right speed and distance.. OK.. it takes some practice.
1. the HVLP came with what looks like a small cup with a hole in the bottom. (Hope you didn't throw it out.) Use that with a stop watch to get the right consistency for your paint. It is really the only way to get it right.
2. if when spraying you can see your finish pooling and blowing around the surface, then you are way too close.
3. if you are getting a speckle or orange peel like coverage on the surface, then you are spraying too fast and too far away.
take some more photo's of the process. this is very interesting,
Nick , I took off those brackets on my QS 8's the thing I missed was the little nuts on the inside and I broke one of the screws off. Mine were double nutted and the wires from the crosser were connected.
I can't help but wonder about the new packaging....were they shipped in a clamshell design foam?
The box was a couple different pieces.
You can see from the pictures that they are a box middle, and two larger "end cap" box pieces. Both "end caps" come off, and then you have the inside foam padded box ends that fit inside the outside "middle" section to hold the speaker from moving around. You remove that and there is the speaker, inside a cloth bag.
The inside, foam padded ends seem a little "universal" in that they were square, and not specific to the M3s. My QS8s that I bought even a few years back had angled foam inside the inside pieces to match and snuggly fit with the angles of the QS8 itself.
HVLP is rather simple if you get the consistency of the paint right and spray at the right speed and distance.. OK.. it takes some practice.
1. the HVLP came with what looks like a small cup with a hole in the bottom. (Hope you didn't throw it out.) Use that with a stop watch to get the right consistency for your paint. It is really the only way to get it right.
2. if when spraying you can see your finish pooling and blowing around the surface, then you are way too close.
3. if you are getting a speckle or orange peel like coverage on the surface, then you are spraying too fast and too far away.
take some more photo's of the process. this is very interesting,
Yeah, the last time I used it was a couple of years ago when I was painting a large piece of furniture and it turned out fine, but I don't think that I was doing it quite right because it took a lot longer than it should with a sprayer (based off of videos I saw online). I will give it another shot today, if my wife stops giving me work to do. Ugh. I feel like taking a vacation day next week when she and the girls are back in school just to get going on this stuff. (They all are home for spring break this last week and yet somehow they don't have enough time to get their own stuff done and it prevents me from doing what I need to do...)
Nick , I took off those brackets on my QS 8's the thing I missed was the little nuts on the inside and I broke one of the screws off. Mine were double nutted and the wires from the crosser were connected.
Yeah, with the tweeters (and woofers) removed, they are easy enough to get to. I am actually tempted to not use the T bracket at all because I want to ceiling mount these anyway, and I think that the T bracket will just be in the way, plus it isn't secure enough anyway and I need to use a different mount. However I don't want to permanently attach the speaker wire making it difficult to ever take these down in the future (if we were to move).
I am thinking about replacing the T brackets with small wire "pig tails" and putting connectors on them like these:
If I do it right, I won't be damaging the original speaker box design and could re-attach the T brackets down the road if I ever needed to.
HVLP is rather simple if you get the consistency of the paint right and spray at the right speed and distance.. OK.. it takes some practice.
1. the HVLP came with what looks like a small cup with a hole in the bottom. (Hope you didn't throw it out.) Use that with a stop watch to get the right consistency for your paint. It is really the only way to get it right.
2. if when spraying you can see your finish pooling and blowing around the surface, then you are way too close.
3. if you are getting a speckle or orange peel like coverage on the surface, then you are spraying too fast and too far away.
take some more photo's of the process. this is very interesting,
So I was looking at how to thin the paint. It is the same latex that we have on our ceiling. A flat paint called "Fudge Truffle". Anyway, it says on the can and online to thin just with water. 1/2 cup of water per gallon. Well, I have a 28.5 oz size that I bought recently to do some touch up, so I had to do some math since that isn't a pint or quart or anything.
Looks like it is .22 of a gallon, or 3.54 cups. So very odd amounts to try to do a water conversion.
However, if I just take 2 cups of the paint, then I just need .0625 of a cup (or 1/16 cup, or 1 Tablespoon) of water.
Doesn't seem like much water, but we will see.
There was no cup included to time the thickness of the paint. It just says that if it flows easily through the included paint strainer, that it should be good.
I would have thought that it would have at least come with a paint viscosity stick or something.
So anyway, I've got my quick and dirty hangers ready for hanging the speakers while painting, and the spray gun is clean and ready to go, but I have more on my "honey do" list before we have a surprise birthday party for someone tonight. I feel like the only time that I am not doing other things and can focus on my projects is in the middle of the night. I hope the neighbors don't get annoyed with my compressor running tonight while I spray. LOL
I better get a heater going in the garage soon too in order to get the temps up a little bit. Otherwise it is going to take forever to dry.
I have heard bad things with trying to thin out latex paint with water to get it to work with a decent HVLP. To get the right constancy I am told that you need to use floetrol
As you atomize the latex with water it breaks apart and you get globs of paint rather than a mist. I have never tried to do latex. What size needle do you have in your gun? I have a .75mm, 1mm and a 1.5mm. but I have again heard from some that trying with less than a 2mm can get funky results unless you can really thin out the latex.
I forgot about Floetrol. I should have some at home from the last time, but what I recall is that you still need to thin latex with water, as Floetrol isn't a thinner...
oh, and I just have $100 "Husky" branded sprayer from Home Depot or Lowe's or something.
be sure to shake the gun lots while spraying, looking forward to your results . How is the humidity there right now, the drier and warmer the better and lots of thin light coats.
I've had 3 heaters running just to warm it up out there, and it is pretty arid, so that should help. Should be right at about 70F when I finally get around to shooting. It is already 11pm, but hopefully before midnight I will be going to town with the paint.
Well, it is now 11:45 and I still need to take the rear brackets off of 3 of the speakers, so a quick 320grit sand of those areas, wipe them down with a tack cloth, and hang them so that I can get started on the paint.
My wife has me working on some Photoshop stuff for a bridal shower out of town tomorrow for my oldest....
Well, it took even longer than anticipated to get things done for tonight. It is 2:05am as I am beginning to type this, but I have the spray gun cleaned, and my mess tidied up for the night. The paint can says to wait at least 4 hours before recoating, so it will be after I wake up before I get another coat on there.
So here is a run down (with some fresh pictures: First up was getting the rear brackets off (yeah, I ignored the note from Axiom).
The top bolt comes off with the same allen wrench that the tweeter and woofer use.
The bottom bolt also uses the same allen wrench on the outside, but you must remove the nuts on the inside that hold the wires that go from the bolt to the crossover on the inside of the speaker. These nuts are just a bit wider than the tweeter opening, so I used a ratchet to loosen them, and then a small (mini) breaker bar just to basically give me a grip on the socket. Pretty easy, but again, must be done. The red circles mark where the nuts and the wires connected to the bottom bolt when looking at the inside of the speaker cabinet.
I quickly sanded around the holes in the back as there was a bit of "something" there from the bracket.
Then I stuffed the inside with crumpled up newspaper, and went around the speaker openings with a variety of tape.
I tried blue painters first, and it was fine for the woofer opening, but didn't want to curve enough around the tweeter one. Next I tried "Frog Tape" and it was terrible. After about 2 inches, I pulled it up and moved on. Then I tried regular taupe colored masking tape that was a little narrower and it worked ok. Not as good as the blue on the woofer, but better than the blue on the tweeter. Then I tried green painters tape and BINGO. That worked the best for making the curves and sticking pretty well.
We will see how they handle paint as I wasn't going to go back and redo the others, but I did go over the tweeter area from the blue tape speaker.
Here is a speaker stuffed and taped.
And here is the brand of the green tape.
Next, I prepped the garage with drop cloths, and my "hangers." I moved the heaters around a little bit, and filled up the compressor. I connected the HVLP gun and tweaked the air flow to be around the 40 psi max just so that I knew where the top end was and could turn it down if need be.
Then I was almost ready to hang the speakers. Since I had crumpled up newspaper, the cabinets had "newspaper fingerprints" on them. I planned to clean down the outer surface anyway and wipe it with tack cloth, so that is what I did. Right, wrong, or indifferent, I just used Windex sprayed on to a paper towel. This is fairly high in alcohol it seems, and dries quickly. A few quick scrubs and the cabinets were clean again. Oh, I should mention that I washed my hands a LOT from right before this until I was done. I didn't want anything contaminating the surface.
So they were cleaned, dried, and wiped down with the tack cloth and then put on the "hangers."
After setting them up, I went inside and got the paint ready. I mixed 2 cups of paint and 1 tablespoon of water. After they were nicely mixed, I added 2 tablespoons of Floetrol and mixed it in. I had some left from my previous project, but it was all separated and had gotten a bit chunky, so I had to buy some new. I used so little compared to what comes in the $6.50 jug. LOL
After mixing that up, it still didn't seem thin enough, so I added a 1/2 tablespoon of water, mixed, and said "Heck, I don't know. Looks good to me I guess."
I poured it into the cup of the sprayer (through a filter funnel of course), and headed outside.
I grabbed some cardboard and fired things off. I had it set to pretty much maximum air and maximum paint in a fan pattern. The problem was that I had to get somewhat close to get good coverage, although I know that it will take a couple of coats to be nice and even. I probably needed to dial in the settings a bit for either a less wide pattern, or maybe less air, but it was working so I just went with it.
I sprayed the bottoms first. I don't know why, I just did. Then I went to the top, then the back, followed by each side, and then the front face. Repeat, repeat, and repeat. No runs. No splatter. Fairly even coat.
These will hang here overnight, but I just checked on them since it has been about an hour since I finished spraying, and they seem dry already. There is a slight texture to them when you touch them, but definitely smaller than orange peel, and I just don't know if that is because this is flat laytex and thus naturally feels a bit "scratchy."
I will let them hang, like I said, until morning, and then probably given them a super light sand with the 320 grit to see if that does anything positive. I will also mess around with the sprayer settings a bit more as I got nervous when testing tonight thinking that I was going through a lot of paint and I only had a little over 3.5 cups to use (2 cups were in the sprayer). After I was done I had about 1.8 cups left in the sprayer. I completely forgot how much coverage you get with so little actual paint when spraying. I have PLENTY left to use tomorrow and to tune it in a bit.
So anyway, it is now 2:35am and I am heading to bed. Oh, and yes, I saw that the one greenish drop cloth that I put up on the garage door was falling down and I had the heater under it. I have since taken down the drop cloth.
Oh, last thing... I love how little overspray there is with HVLP. I am sure that there is some underneath the speakers, but I was worried about it being all over the place, and it really wasn't. The paint that you see on the drop cloth is from other projects, not this one.
There is a slight texture to them when you touch them, but definitely smaller than orange peel, and I just don't know if that is because this is flat laytex and thus naturally feels a bit "scratchy."
Slow down the movement on your spray pass. That will help deposit a bit more paint so that the micro droplets have a chance to bond to each other. it feels wrong but will give you the results that you are looking for.
Reality is with HVLP spaying that you are putting on so little paint that it will have tack dried within seconds of you painting, and cured within 1/2 an hour enough that your can recover with a second coat. As you are sanding, waiting that extra time is probably a good idea as it gives extra time for it to bond and the next coat will have a similar molecular structure to bond to.
Thanks for the tips. I will slow down a little and also mess with the adjustments a bit too (sounds like I also need to turn down the amount of air per the instructions). It was really starting to show itself as "dry" for the most part just after 30 minutes, so the amount of paint on there was probably about right, but just too fine coming out that it was, per what i was reading this morning, almost drying mid-air and thus the super fine texture.
Nick, I found that if the gun inlet pressure is too high it will actually dry the paint as it sprays. I use a pressure gauge inline that I set with the trigger wide open to about 8 psi if memory serves. Painting is a real art, balancing pressure vs tip size vs needle movement. Some texture is unavoidable, look at the paint on your car, under the clear the paint has some texture to it. Clear is about the only thing that you can put on really smooth without sanding and buffing. Since they are on the ceiling I see no reason to get real fussy, no runs is a huge bonus
I think that they are looking really good. I lightly sanded and put on the 2nd coat late this morning, and they look really good. they are still "hanging" and I waited several hour before turning the heaters on so that the Floetrol could do its thing. I connected up a few shop lights while spraying this time, and I *think* that I didn't miss anything, but I am not 100% certain.
I then spent a huge part of my day trying to use fish tape to fish some string in my theater ceiling for pulling speaker wires. WHAT A PAIN! I have to run the wires into the crown molding, which seems like a good idea, except the fact that cutting down below the line of sight so that they wires aren't visible has proven very difficult. I will be doing some touchup on the crown molding, and then one of my drill bits slipped a little bit and chewed into my LED lighting. Dang it. I will have to fix that another day. When I moved my screen wall forward a little more than a foot, I left the extra LED lights still connected, so I will just have to cut out the damaged section and solder the strip back together. Easy enough, but will still be about a 60 minute job.
So now I have 4 holes in my ceiling, and 2 in my soffit. I need to cut one more hole into the soffit, and then another hole back by the equipment rack to put the connector plate (which doesn't arrive until Wednesday).
Everything is so full of drywall dust. I hate drywall dust. SOOO much cleanup, and that was with me taking a lot of things out of the room (equipment, acoustic panels, etc) and using drop cloths. It just gets everywhere...
Well, I should get back to it. I would love to get the wires at least roughed in and if possible get the speakers in the house from the garage. I am nervous about them because of the flat paint being prone to scratches, but I think that I have a plan... Put the ports back in to the bottom and just stand them up on a clean work table in the basement. That will work until I get my "pigtails" for the speakers put together another day and then I can put them completely back together.
I also need to make my ceiling mounts yet. I have the angles sorted out, but it is always more complicated than it looks and of course the mounts WILL scuff the paint on the back. I was very temped early on to just mask off the back and then put black enamel paint on it, but oh well.
Oh, and here is a great one...
I asked my wife about a month ago about the speakers for the ceiling. When I held up one of my existing Boston Cherry ones, I asked her how it looked. She thought that I was asking about speakers on the ceiling, and I was asking about the color.
Anyway, she wasn't keen on the idea and gave me sort of a "meh" response. So I took that to mean, "no, I don't like the cherry against the dark brown ceiling" so I got paintable speakers.
I found out yesterday that she actually LIKED the Boston Cherry look. Ugh. I could have saved a lot of headaches had I just gotten more in the B.C. finish.
Oh well, it isn't worth the $120 to ship them back and swap out, so I painted them as originally planned.
I HATE DRYWALL DUST! So dirty, and it gets EVERYWHERE...
OK, I knew that going into the running of the wires today, but even with precautions such as drop cloths under areas that I was cutting in to, it still gets everywhere.
So after putting on the second coat of paint, I decided to start on the wiring. The trouble is getting from the middle of the room, to the sides into the soffit, and then down and out of the soffit and into the area behind the crown molding.
I know, I already mentioned this before, but wow, I never expected it to be so tricky.
Anyway, there was a lot of me looking back at old construction videos and photos to figure out the best spots to try to get through the drywall. The problem is that I needed to make pretty good sized holes just to be able to get to the fish tape at various spots along the way.
So without any more details about that, I got the front 2 wires ran, and was about to tackle the rear 2 when I thought that I better see how I was doing on speaker wire... I was short a couple of feet for the longer run of the two, and there is no reason to snake the shorter one through without the longer one with it. More speaker wire is on the way, and last time it took 2 days to get here, this time it is taking 6 business days and won't get here until Wednesday (When I figured out that I would need more anyway, I ordered it thinking that it would be here before the weekend. WRONG!)
So the rear speaker wires are not run yet.
I decided that since the fronts were run that I would start round 1 of the drywall patch. I am actually really good at hiding patch work, so I know how the steps to fixing it. I basically put 2 screws into the chunk that I took out of the soffit, this is just to get a grip, and then I put silicone caulk in the seam using a fine tip so that I could get it to the inside. This stuff added just enough tension to really hold the piece in place on its own. I let it sit for about 20 minutes, and then came back and put some mud over the area. I always recess the inserted piece just a little bit since it needs to be retextured and such anyway, so it is really just there to be mass.
For the ceiling, I put a thin piece of wood on to the back of the piece of cut out drywall. I then put this up into the ceiling with a little more silicone caulk on the bottom side of the piece of wood. This does 2 things. It will hold the piece in place easier than trying to screw through the regular ceiling and into that piece of wood, and it also puts a small layer between that board and the top side of the ceiling drywall, effectively recessing the cutout piece as well. I put some silicone caulk up around that too, and then 20 minutes later, applied the first coat of mud. The idea of the first coat of mud and the silicone is more to solidify all of the pieces so that additional coats of mud are easier to apply.
After that, I decided that it would be nice to have the garage back. It had been about 8.5 hours since I finished spraying the speakers, so I carefully took them down, one by one, and checked them over in a bright light. I then removed the tape and the newspaper, and took them one by one to the basement where I attached the bottom ports so that they could stand on their own without the paint touching anything.
All in all, they turned out really good. The finished surface feels significantly smoother than the primer finish right from Axiom, and it wasn't bad at all. I am still worried a bit about the speakers getting paint "dings" due to it being flat paint and being handled. I know that the paint in the theater is pretty solid for flat paint (on the ceiling) but it has cured for a few years.
Anyway, here they are:
I am going to take a tiny brush and get the inside "vertical" edges around the speaker cutouts with a tiny bit of paint. I just want to make sure that you don't see any white at all. The inside flat surface (with the bolt holes) will stay white since it will be hidden.
I think that next on my list will be getting the speaker mounts made up. Going old school and just using wood. I will need to drill mounting holes into each speaker so that I can put some screws through before putting the woofers in. I will also be putting some counter sunk holes into the blocks of wood to toggle bolt them to the ceiling. I was looking for a pair of reasonably priced speaker mounts, but the cheaper ones get mixed reviews, and everything else seems pricey. I thought about buying another Axiom "full metal bracket" since I have 1 already, but I don't think that it will give me the extension that I need to angle my front speakers (rear speakers will have a really small angle, so they will definitely be just wood blocks.
I HATE DRYWALL DUST! So dirty, and it gets EVERYWHERE!
Nick, for <$250, that never has to happen again. I have a 5hp, 5G vacuum. It has a bag, and that is the necessary addition. The hose diameter fits all DeWalts in all styles and I always keep a $30 Ryobi mouse as well. To get the mouse to fit tightly, I wrap it's end with a couple of rounds of duct tape.
The amount of airborne dust I would make with a 2" repair is about 95% more that I would make with a vac system. It captures so well, I have left (other people's) furniture uncovered. What it doesn't get falls to the floor in a little white line, like a line of cocaine. Seriously, that's what it looks like. Ew! Putting stuff up your nose! Ew!
Yeah, I keep thinking that I need to just put something together that provides suction at the point of the mess, but I only have a really large shop vac with a massive hose. Even if I get an attachment to make the hose easier to attach to whatever tool I am using, it still is a lot of bulk flopping around, but again, it really is probably worth it to make something work, or to buy something.
As for a speaker mount, I am 99% sure that I am going to just get another Axiom FMB for the front. I started mocking up some wood mounts, and they just look clunky. I have 1 FMB already in white and would just need a repaint to black. And since I have to drill holes in the back of the speaker anyway, I can mount the speaker on to the FMB as needed to not hit the ceiling, and yet with the FMB I get "teeth" to hold the speaker at the exact angle I want. Most of the ones online just use friction, and people talk about the speakers "drooping" because there isn't anything holding it right where you want it.
Tonight, I will have to go find the white FMB and do some tests with it to see if it really will work or not. I know that it is strong enough too as I used to use it to mount my previous VP150 to the ceiling at one point, and a wall at another location.
I had to run home over lunch for something completely unrelated, but dug out the old (white) FMB and sure enough, it will do the angles I need. So I ordered a second one.
I still might add a little bit more mass to the "foot" of the bracket as I remember it starting to embed itself into the drywall when I hung the VP150 from it.
I wonder how soon it will make it here. Not that I have the speaker wire order from Monoprice, or my receiver, or even the room put back together enough to mount anything anyway... Although.... I just need the front 2 to have the FMBs, and that is where I have the wiring run and in place... Who knows. Just hard to have the theater out of commission for so long and I'm antsy to get things buttoned up.
So tonight I made the "pig tails" to go on to the M3s so that I can forego the t-brackets since I am going to use Axiom FMBs for the front pair making the t-brackets not stay in place, and for the rear pair, the t-brackets would just be in the way.
I also reconnected the internal primary wires, and connected up the tweeter. The woofers won't go in until I play around a little more with the FMBs to make sure that I get the holes for the mount exactly where I want them.
So the wires are run, and the multiple layers of drywall mud have been placed, sanded, and smoothed out. Texture added, and paint applied. There will be just a tiny bit of touch-up paint on Saturday.
I also marked the 2 front M3s for where I need to drill the holes for the mounting bolts to attach the speakers to the Axiom Full Metal Brackets (FMBs). I plan on getting those drilled and mounted to the FMBs tomorrow as well.
With any luck, I will be putting the front 2 speakers up. I still need to make a "wedge" to slightly angle the rear 2 overheads just a little bit, but that shouldn't be too tough. Hopefully I will be able to make something quick, easy, and that can be hidden fairly easily as well.
We are going to be helping some relatives move into their house tomorrow as well, so I doubt that I will get any further than that.
What I have left after that is:
Clean the entire room from dust. 1) Put shelves back up. 2) Put equipment back on the shelves. 3) Clean up our game room that has been my temporary work area. 4) Put other M3s back on the walls. 5) Put acoustical panels back up. 6) Fix the damaged LED lighting (probably will take as long as the previous 5 items combined). 7) Install Anthem MRX-1120 receiver when it arrives from being replaced (ships from Canada on Monday).
The M3's? There is a crossover inside them. It is behind the bottom half of the tweeter. If you need it, I could remove a tweeter and take some close-up photos. Just let me know.
I will take a closer picture tomorrow for comparison as these are the V4 speakers. It is 1:45am and I need to stop messing around online and go to bed. LOL
Here is the crossover on the M3s... Copyrighted 2010 on the board anyway.
I got a bit done today, even though I spent about 5 hours helping my cousin-in-law move... Ok, everything was unloaded, but I was mounting TVs, setting up their bedroom and their daughter's room, etc.
Anyway, here are today's updates... The good, and the bad...
First up, is a photo of me marking the back of two of the M3s for where the FMB will go. I basically put this dead senter from side-to-side, but a little off center from the normal top to bottom since I will be rotating the speakers 90 degrees and the center of gravity was a little closer to the center of the woofer obviously.
I drilled the holes, and put the bolts (with washers) through from the inside since I knew that the woofer sat REALLY close to the back of the inside of the M3 cabinet. Then I attached the one end of the FMB.
Then we were gone for several hours...
When I got home, I then went into the theater and mounted the other half of the FMB with some really large toggle bolts.
Then it was time to put up one of the M3s at the "recommended" angle towards the listening area. Wow did these things stick down more than I imagined, but they were lined up exactly with where they were recommended for optimal Atmos/DTS:X and for having 2 rows of seats.
And with the front grill (Axiom logo moved to the long end)...
Then I started thinking... Hmmmm.... Those really do hang down pretty low. I wonder if they will be in the way of the projected image on the screen...
Yup. REALLY in the way.
Dang it... Now I need to relocate the FMBs, and move the speaker wire so that it stays behind the speakers (and not just the front 2, I had to move the back to speaker wires out as well). I ended up moving them 3.5" towards the outside, and then tested again, and I am now clearing the projector image by a solid half inch, however, I now am waiting for drywall mud to dry, and then my 2.5 day patch/texture/paint process to hide it.
I think that I will put a small heater in the room again tonight, and then get up a little early before we head out of town for Easter and do a light sanding, and a 2nd lighter layer of drywall mud so that tomorrow night I can hopefully wet sand, texture, and maybe even paint. Then the front speakers can go back up as I already remounted the FMBs.
Tonight, I also cut my wood blocks for the rear 2 speakers. These just needed a small, 15 degree angle to them, so I cut a piece of 2x4 to the correct angle, and pre-drilled for the toggle bolts already (with the heads of the bolts recessed into the block). I also painted the sides of these angled blocks, and tomorrow night, if there is time, I will lightly sand the top and bottom so that I am not putting uncured flat paint against more flat paint (cured on the ceiling, uncured on the speakers). Sure, there will be some slight cosmetic touch-ups on the speakers should the day come that we move out and take the speakers with us, but I would like to minimize it a bit.
The rear 2 speakers will have the wood blocks, as mentioned, toggle-bolted to the ceiling, and then using regular screws, I will screw the M3s to the wood blocks. All holes predrilled to prevent any splitting, to keep the M3's looking as nice as possible, and to control exactly where the speakers mount to keep them accurately lined up once the wood blocks are mounted in their measured and correct positions.
I got a bit done today, even though I spent about 5 hours helping my cousin-in-law move... Ok, everything was unloaded, but I was mounting TVs, setting up their bedroom and their daughter's room, etc.
Cousin-in-law? I feel like maybe I could convince you to come to Washington and help me with stuff. Nick, I don't know where you get your energy, but I'm thinking Starkiller Base would be eyeing you as a fuel source.
So this morning I got up early, did a touch of sanding, and another light coat of drywall mud before heading out of town to visit family for Easter.
Just got home, and things were ready for texture. Sprayed the texture, and now just waiting for it to dry really well before paint, but we are going out for dinner and then talking with my daughter and her fiance about wedding stuff (just a couple of months away and we need to finalize a few things) so I probably won't get around to paint until tomorrow...
I should get all ceiling speakers mounted by the end of the day, and hopefully have all of the drywall dust and misc tools and "junk" (masking tape, string for fishing wires, etc) all cleaned up. I don't know if I will get the other equipment back into the rack (probably not as that takes a chunk of time), but we'll see.
Ceiling work was painted this morning before leaving for work. We will see what tonight brings for time to get things done. I just found out that I have to do an interview for an opening on my team at 4:30 today offsite. Considering that I normally work until 4:00, this will set me back a solid 90 minutes tonight and I have something else to go to from 7:00-8:30... Feel like I am loosing a ton of my evening now. Oh well. I should be able to get the speakers up, and maybe even tested (I never even plugged them in when I got them to just make sure that they work... I sure hope so, LOL...
So the overhead speakers are (finally) up and the layout looks "scientifically" correct. I am still not a huge fan of how far down the front speakers hang in order to get the angles correct for 2 rows of seats, but at least they are no longer blocking the image (doh).
I got them all up last night, and then decided that I should test them out, which I should have done when the speakers first arrived.
I plugged in one of my "patch cables" from my Onkyo into the overhead wall panel, which the wiring also had never been tested either. Right off the bat, something was wrong with the first speaker. All highs, no lows, thought for a minute that it must be Bose... Ok, so let me try another... Same thing. OK, let me try one of my regular surrounds, and they sounded fine. OK. I knew already what the problem was...
Upon reassembly, I connected the woofer to the tweeter connections and the tweeter was connected to the woofer wiring inside the speakers. I knew that I should have 1) noted which color wires went to which (tweeter vs woofer), 2) when I wasn't sure, I should have looked at the labels on the crossover itself (which is labeled) instead of trusting which wires happened to be closer to the tweeter hole and which were closer to the woofer hole, which obviously got jostled around during the painting process.
Anyway, it wasn't difficult, but it was a pain to swap the wiring around a bit just due to needing an extra set of hands (one to hold the woofer, and the other set to make the connections), but about 40 minutes later, everything was connected as it should be.
Fired up the Onkyo again, and sure enough, 1000% better. All 4 speakers and their wiring worked wonderfully.
So tonight starts out with a massive cleaning of the room. Most of the tools have been removed, but the drywall dust will take a while. I am going to grab the shop vac so suck up as much as possible, then use my air compressor and a nozzle and blow air along the ceiling, walls, and work my way down. Let things settle a bit, and vacuum the floor a few times depending on how much gets kicked up. The last thing will be wiping down surfaces... Dry wiping of the walls, and probably a wet wipe down of the seats, which will take a few times to get all of the dust as that stuff gets everywhere, and when it gets wet it just smears around.
Anyway, here is a snapshot from about midnight last night just to show the side surrounds and overheads. It is a slight panoramic image, so there is obviously some distortion. Oh, and yes, I should have removed the popcorn machine before working in there. That will be fun to clean too.
Lastly, the Anthem MRX-1120 should FINALLY make it back to me from Canada. A replacement was supposed to be picked up from the Anthem/Paradigm factory last Thursday, but there was an ice storm which caused them to lose power and they were closed because of it, they were also closed for Good Friday, it was picked up yesterday only to find out that the Canadian postal service is closed for "Easter Monday." But today should be the day that it heads my way. Hopefully I will have it by Friday.
Everything has been cleaned in the room, from top to bottom.
All speakers are up.
Acoustical panels are back up too.
Tomorrow I start putting the equipment rack back together.
If there is enough time, I will also pick up all of the mess in the game room and get it set back up. Just leaving the LED lights to fix, and then putting the Anthem MRX-1120 in place when it arrives.... Although, I was told that it would ship today, but I never got a "hey, it shipped" email, so we'll see.
And I am (finally) back in business. What a crappy set of issues that slowed me down for a while.
Outside of the Anthem receiver taking forever to get to Anthem and for them to send me a replacement, which I got on Monday, April 4th, I was heading out of town on Tuesday, April 5th for work.
I didn't have much time to do anything but hook up the MRX-1120, listen to about 5 minutes of uncalibrated audio, run the firmware update, run ARC (room correction) and listen to about 5 more minutes of audio.
The Anthem, out of the box, was much cleaner audio than the Onkyo, that is at least how it sounded. Precise, and revitalizing on my Axioms. After ARC it was utterly amazing.
Best part, no power-down (or other) receiver issue. YAY.
I am about to show my wife and youngest daughter a couple of movie demos, and I go to movie selections and notice a whole chunk of movies are missing. Wait, what? Yup, the media server crapped a drive. Thanks to RAID5, I am not dead in the water, but I might as well be. I need to get a replacement drive before I want to use the server any more. I file a warranty claim with Toshiba for a new drive, and they basically say that they are going to send me a debit card for $150. OK. Fine. I look up hard drive prices at Micro Center (since I am going to be near one on my work trip). They have the exact same drive for $70. I plan on picking up 2. One replacement, and one for more storage... I get there on Tuesday and end up buying 3 of them for that price.
Then when I got back later in the week, it was busy, busy, busy... My kids (LOL, kids... They are 17 and 22) had stuff going on that brought family in to town. I stayed up really late Friday night after getting back from some late family stuff, and was running some system updates on the HTPC and starting the RAID5 repair on with the new hard drive in the server. The server was humming along fine, but the HTPC was giving me a couple of (minor) issues. No big deal, I would let it sit until morning.
Saturday morning rolls around, the server rebuilt the drive perfectly fine. I power it off as I plan to add the other 2 drives later, and I kick off the updates again on the HTPC, and seriously 30 seconds later, BOOM. I hear this sound, and power goes out in the house. I find out it is the entire neighborhood. Some backhoe hit a power line somewhere nearby. No big deal, I will finish later.
Well, later comes and.... The HTPC is stuck in a reboot loop claiming that an update failed to install one reboot, and then that Windows files are corrupt. Darn power outage. I try repairing, and tinkering around for a couple of minutes, and then the relatives show up. I guess no demo on Saturday. Then we are out of town Sunday all day, and Monday we head out of town right after work to buy a new (to me) car that was 2 hours away. That took all night. Through in some more "to do" items for my daughter's upcoming wedding Tuesday night. I do, somehow, manage to get the other 2 drives added to the server and kick off the RAID5 update process (which took about 11 hours).
Wednesday, I look at the HTPC again, and start getting some life back into it, but have a new problem. I can't get it to display on the projector. It displays on a monitor and even the TV in the room next door, but not the projector. I monkey around with driver uninstalls and reinstalls, and no luck as soon as I put the driver back on. I end up using VNC to remotely connect to the HTPC when it is connected to the projector and for some reason the resolution is set to something that the projector can't display. I blame the driver install/power outage because I didn't change it. After a few hours, I just quit for the night.
On Thursday I decide to just reinstall Windows and my apps on the HTPC as it will probably be faster than repairing anything at this point as I am still having app issues, like Atmos not working. Yay, reinstall finishes, video works, playback software tuned and tweaked for video, but no audio above "Multi-PCM" on the receiver. I just start messing with settings and, POP (and I mean, bolt of lightning right behind me kind of pop)... I turn around, and smell this nasty burnt smell and the projector has error lights blinking. Crap. 1500 hours on the bulb and it blew...
I happen to have a spare (thank you JVC bulb warranty for sending me a spare back in December 2012) that is 2 revisions newer in design. I put it in, and hope for the best. I got the best. The picture, in low lamp mode, is SO much brighter than when I was in high lamp mode on the original bulb due to dimming. Yeah... And bed time.
Now brings me to today. I finally get some time to work on things again, and just simply missed 1 setting that was preventing proper audio (DTS-HD MA, TrueHD, and Atmos) from being played back. It was a simply issue that dawned on me at work today... The Windows audio playback device setting was set to stereo. I changed it to 7.1 in Windows, and made sure that I had JRiver set to bitstream audio (which it did) and woohoo, full audio again, including Atmos.
So it was a crazy journey, but I am finally back in business. Now I am just tweaking my Harmony One to control the Anthem receiver. It is working, but I want to adjust some of the touchscreen buttons.
So it has been a tough few weeks. 1) Anthem receiver has an out of the box issue and takes over 3 weeks from reporting the problem until I have a replacement in hand. 2) Running speaker wires, painting the M3s, getting things mounted, and other room setup just took a long time, but was fairly problem free (minus me cutting part of my LED lighting which I still need to fix). 3) Media server crapping a hard drive. 4) HTPC needing a full reinstall. 5) Projector bulb blowing. 6) Needing to reprogram the Harmony One remote 7) Other setup issues along the way.
I hope to enjoy a movie either later tonight or tomorrow.
And that my friend is why I have a whole wack of UPS's to protect and power all my computer devices.
As for your RAID. have you considered setting up as RAID6, or even if your RAID5 can have a hot standby?
Did you put on the 044 firmware onto your Anthem? I don't know what is different between the 039 that I had, but hope it fixes something more that i didn't know i had.
I did replace my older Zotac HTPC's with a newer Intel NUC.
I ended up buying two of them. I got one of the cheeper 5CPYH that is the celeron 2 core unit, that is about the same processing power as my older AtomD2700 but the integrated graphics can do 4k and has hardware h264 & h265. With version of OpenELEC all my videos look much better now on my 4K screen as they are being unpressed to 4k. Well, the older SD stuff looks pretty bad, but everything from 720 and 1080 looks great. And it supports DTS-MA and Dolby TrueHD with Atmos.
I also grabbed on of the 5PGYH pentium 4 core units. it comes pre-installed with a 32gb eMM with Win10 loaded on it. I pulled the 2gb ram that comes with the unit and put that into the celeron and bought an 8gb stick for it. Am running my FooBar, BeyondTV and the Anthem ARC software.
Just a thought if you HTPC is getting a bit long in tooth.
I am on v39 of the firmware, which is still greater than the v35 that is STILL on their website. Not sure why they haven't released a newer version for the general population.
As for the HTPC getting a bit old, it is actually the most powerful computer I have in the house (which is saying quite a bit). I spent a good chunk of money on it. My 3 most powerful computers, in order, in the house are: #1 - HTPC #2 - Media Server (way overpowered for what it does) #3 - My primary desktop where I do photo and some video editing
So, my oldest got married a week ago, and my wife and youngest are in Mexico for a week helping to build houses for 3 families.....time to work on the theater again...
So a few days ago, I ordered up some more custom printed fabric for 2 more acoustical panels and to put a large star (Milky Way) image on my fiber optic star ceiling. I made 2 more frames, and then go down to business tonight...
I took the existing panels out of the room, removed the four M3s from the wall, and took down the 2 rear overhead M3s for Atmos.
I wasn't super happy with the results I was getting by trying a fairly new concept in placement for the rear overhead speakers to get them working well for 2 rows, so I said that heck with it, and am going to adjust them for primary 1st row coverage, and the back row will be a little less effective.
So that meant pulling out and re-running the rear speaker wires to move them back another 3 feet from where I had them before. This now falls within the official Dolby Atmos spec too. I also had to make new angled "blocks" for them to mount to in order to get a better angle on them as well. Not quite enough of an angle to justify ordering 2 more Axiom FMBs. The rear overheads will now pretty much be aligned with the middle of the side surrounds and the rear surrounds to "fill the gap" so to speak.
All initial drywall patching has been completed and I have a big box fan blowing air at the ceiling to try to speed up the first coat drying time since it is the thickest. Last time I put in a heater, but since it is summer, I don't want to be heating the inside of the house if at all possible.
I am also relocating the acoustical panels to make them a bit more aesthetic. Now with 4 panels per side, I will still have one at the front most FRP, but the 3 along the back of the side walls will line up under each wall sconce light. I think that this will look a lot cleaner, and I am still able to get good placement where it is needed. The 2 sheets of 2" OC703 should arrive tomorrow and I will get the insulation inside the frames, and the fabric attached to get them complete.
I also, as mentioned, needed to rip down my 4ft x 8ft fiber optic ceiling panel. Keep in mind that I had this back when very few people had any sort of star ceiling, so the more economical way to do it back then was to make a "window" to the stars. I did a test with some fabric and as long as I clip off the ends of the fiber optic strands (as they had a light coat of blue paint on them to "dull" them down a bit) to make them bright again, you can see them great through the printed fabric image. Also, the panel was made out of somewhat rough 2" styrofoam insulation, and the fiber optics were held in place with small globs of hot glue. You could see all of this before and it annoyed me for many years. Now that all gets covered up and you really can't see the texture at all due to the printed fabric. I am hoping that I can just wrap the styrofoam and have friction hold the fabric tight enough, but if not, a few light sprays with 3M 77 glue spray will do the trick. Tearing this sucker down by myself was a bit of a challenge as I used 3" long finishing nails shot in with my air gun at angles to, well, hold it securely. Good thing that the panel itself is light. It did make a bunch of spots that need a little bit of touch-up on the ceiling, but that is easy enough. I plan to put the star ceiling perpendicular to the way it was before, and parallel with the seats, positioned just in front of the first row.
Anyway, here are some pictures.
Wires in back pushed 3 feet rearward, star ceiling down.
Side wall panel hooks moved, or in the process of moving to be centered under the 3 wall sconce lights:
The other side. Notice the patch work on the closest wall sconce area showing where the panel used to be aligned with, and if you look closely, you will see two "nubs" lined up under the sconce edges to reflect how far I am moving that one. Maybe 8-10 inches forward:
And here is the Milky Way image draped over the 4ft x 8ft fiber optic panel when I was testing it. I didn't take a picture with the lights off, but you can easily see the fiber optics, trust me. Oh, and the printed image looks better than the photo depicts. The photo looks a little "washed out" but it isn't in person.
Specifically this layout as it deals with my room height (ok, I have a little more than 7.5 feet of height) but attacks the 2 row problem.
I had pushed the front overheads closer to the screen to try to adapt better to some of the DTS:X recommendations that I've seen and that plan was confirmed with a resounding "YES" from a number of people at AVS. By the rear overheads just seemed to not even be noticeable like that. They are just too close to overhead and changing them on the receiver from Top Middle to Top Rear didn't make any real difference.
So screw the second row. They will still get some good overhead sound as part of the Atmos experience, but I want to the front to sound the best since that is where I sit. Instead I am getting mediocre sound in both rows so it was time for a change.
I checked on my drywall patch work this morning, and everything was ready for a second coat, so I did that quick before leaving for work and left the fan blowing. With any luck, it will be ready for wet sponge sanding, texturing, and painting by the time I get home from work. My target goal is to get the room put back together, including wall panels and even the star ceiling finished, although I am not 100% sure how I am going to get that hung up on the ceiling again by myself, but I am pretty crafty and will come up with a way. Maybe even a set of 2x4s in a "T" configuration to help prop it up while I put some finishing nails in again.
I will work up a modified version of the image above to better reflect the "before" and what will be the new "after"...
Great graphics. Very helpful and quick. I think my backer boxes are somewhere between what you have going on. Front heights are about 5' ahead of the listener plane. Rear heights are about 3 1/2' behind the listener plane. I hope it works. Thoughts? We hosted some friends I previously designed a room for. He is built and into the buying gear stage and is going 11ch ATMOS right away. The envy....
I will probably end up going angled for the front heights and down firing for the rears as they are a little closer to the listener plane. Thoughts?
My overheads are around 5ft in front and 5ft behind the first row MLP. That is a bit further out than most people are doing Atmos, but I've angled my speakers to compensate for the distance and the lower ceiling. Plus, DTS:X (whenever I actually get the update) likes the speakers a bit further out, heck even directly above the front and rear main speakers, so this is the compromise that I've come up with and again, seems to get the blessing of several snooty "know-it-alls" on AVS.
If you have reasonable ceiling height (especially around the 9ft or more range) then straight down will work well. It is when you are around 8.5 feet or lower that angling becomes more important, with relationship to the distance away from the MLP of course. A lot of in-ceiling speakers designed for Atmos are angled at 30* (fixed angle), so there is something to be said about angled speakers if possible.
So I just finished the initial wet sponge sanding, and a touch of light block sanding (done this way keeps the dust to almost zero).
I had just some super light skim coasts for the larger repair jobs that should be dry within an hour with the fan (finished that about 30 minutes ago, so another 60 minutes). I already textured the area around where the relocated acoustical wall panels are going, and where the frame of the star ceiling was repaired.
I then assessed my paint supply... Looks like I am off to get a little more ceiling paint as I will be close, but probably short a little bit. Plus the finish never looks right is you "smoosh" out every last drop of paint from the roller. It typically ends up looking really dull, so I would rather error on the side of "more than enough"... I better check the wall paint supply too I guess, even though I don't need much at all...
Good progress was made tonight despite being delayed by other errands that I had to run.
Here is a shot with the first layer of texture on the patched areas (minus the larger patch area in the back left). I to one layer of texture right over the primary areas, let that dry, and then do a wider "blending" texture spraying. Unfortunately, I forgot to photograph that.
After two coats of texture spray, I ran some errands to make sure that the stuff was fully dry before painting...
And here is it with the 1st coat of paint still partially wet.
While that was drying, I started working on my 2 additional acoustical panels. Simple construction like before and using 2" OC703 insulation.
The back gets covered in cheap fabric (thank you Walmart $4.98 twin bed sheet) to keep insulation fibers from getting airborne. They really never should, but this stuff comes with a warning label, and for $5 it is worth being safe than breathing this stuff into your lungs.
And OC703 insulation added:
And the one fabric image just laying on top of it:
After I got about this far, I went back to the theater room, noticed that a few textured spots could use a touch more texture. Gave them a zap, put a fan on the bigger spot, and ate a late dinner before putting a 1st coat of paint on those areas.
I put on a second coat inbetween working on the 1st and 2nd panel, and then got into a long set of phone calls with family while it dried and while I worked on stapling the 2nd panel.
A little while later and I am back to a 7.2.2 setup (the 2 rear Atmos speakers still need to be mounted, but I wanted to make sure that the ceiling paint was REALLY dry, so that will be for tomorrow and should go rather quickly.
Here is one side:
And the other:
And looking straight back with some still wet paint (the 1st coat ended up being me painting about 75% of the entire ceiling to paint over the "blend" texture, but it is worth it in the end to look like nothing was ever needing touched up... Again, this is with paint still wet over the primary patch areas:
That is enough for tonight. It is 12:25am and I need to be up for work in a few hours.
Tomorrow I plan on getting the fabric attached to the star ceiling, mount the rear overhead Atmos speakers, re-run ARC (Anthem Room Correction), and then start on my next project... Running a new fresh air duct from outside the house to our furnace room. More drywall work to do. The area is right above my pinball and arcade machine, so I've already moved them out of the way and located the screws in that part of the ceiling. Once that is done it will allow me (some other time) to turn the current fresh air duct into an air return for the theater (finally) as it runs almost directly over the equipment rack. If only I knew that I was going to need to do this 5 years ago, I would have done it all before framing and drywall back then. Thursday night is "take the dog to the vet" night, and then a buddy from work (another Axiom owner) is coming over to watch '13 Hours: The Secret Soldiers of Benghazi' in Atmos, so I probably won't do any project work that night.
So yesterday's project list included a few things non-home theater related, so I didn't get a ton done, but I did make progress.
I got the fabric on the old star ceiling. Here is the old one. Notice how ugly the surface is with all sorts of hot glue bumps, and the "ripple" across the entire styrofoam surface. In my V3 of my theater when I built this, you could never see that because of where it was positioned in relationship to the lights in the room. You could definitely see in in V4 as the wall sconces would cast light that caused those big imperfections to be noticeable.
Ignore the "white" spots. Those happened while trying to separate the styrofoam from the brown wood border.
Here is it with the fabric being "tucked" in the newly created separation between the styrofoam and wood border:
And here is the final trimmed and final tucked version. NOTE: As expected, I did have to use a little 3M Super 77 spray to get it to stick and not sag when turned upside down.
I did also get my rear overheads mounted and tried out some Atmos demo material. About an hour later of pure enjoyment, I decided that I should go to bed (about 12:30am again) and forgot to take a picture. I still need to mount the star ceiling, but doing it by myself is going to be a challenge just due to the awkwardness of the size of the panel, and needing at least 3 hands and arms to hold the panel and use my finishing nail gun to secure it to the ceiling.
I will do that today and post an updated photo. I do need to clean a bunch of the house as I have some guests coming over to watch a movie tonight, so that will be the only update for today.
UPDATE: I just noticed that the pictures make the frame look "bowed" in the middle, but that was just due to a lens setting on my phone camera.
I got the room put back together, and including putting up the star ceiling. I cleaned up everything too, and then remembered that my LED light strip around the soffit got damaged when I installed my front Atmos speakers a couple of months ago. Managed to get that fixed too.
Then last night a work buddy (again, the one who I got to buy Axiom speakers for his home theater) came over at 9:30 with 13 Hours: The Secret Soldiers of Benghazi to watch.
The movie has an Atmos mix, and WOW was it good. The audio was amazingly good, and who knew that Michael Bay could make an actually good movie.
I will get an updated photo today. I did try to take some last night, but I wanted to make it a panoramic photo, and the start and end points never lined up. It was after midnight on another long day, so I gave up after 3 tries is all. LOL
So I haven't posted anything here in over 2 years, and unfortunately it looks like I may be losing my web hosting.
The company that I have been using for about 14 years is now saying that I can no longer "store" images on their system unless it is tied directly to a website. Well, most of my photos here are just stored on that web hosting and not a part of the "ht.buol.us" website, if you even want to call it that.
So they are making me clean house. I have a ton of movie poster images that I've worked up for people to do custom print acoustical panels. Those all had to go. I am losing about 99% of what I use the space for, and I pay about $120 a year for their hosting and the registration of buol.us. Not worth it.
Since my build thread is mainly from about 7 years ago, and I haven't posted a recent image even in 2 years, I think that it is time to let this go.
I am going to ask them to cancel my service and refund any unused portion of what I've paid (people are required to pre-pay for their hosting). I will take my $120 and use it to upgrade my google drive or dropbox storage if need be and save a ton each year.
That means that almost every photo in this entire thread will vanish soon.
I have saved everything locally, but don't see a reason really to every put any of it back up at this point. I hate dead links in discussions, but even if I decided to keep things going, the value for the money isn't there, and using any free hosting/storage would mean most likely changing the URL for each image and thus they wouldn't work anyway.
If someone ever comes across this thread and wants to see a particular photo, let me know. I am here almost every day, so I will respond quickly.
Hey Nick, When you were changing your Theater over to Atmos you decided on M-3 OW. Did you consider the M-2 OW at all? If you did what was it that won the M-3 over for you? Thanks, Jeff
Easy. Lower frequency capability of the 6.5" driver vs. the 5.25" driver.
Too often people think that Atmos works OK with tiny little overhead speakers. That isn't the case. You actually want some good sized speakers (within reason) to be able to handle as much of that mid-range frequency as well.
I was at CEDIA several years in a row (starting with the last one before Dolby announced Atmos for the home), and each year after the Dolby announcement, more and more refinement of proper setup techniques and hardware usage would happen.
Outside of that first year being blown away by it, it was 2 years later that I experienced a Denon and Marantz demo where they were using overhead speakers with 10" woofers in them. Holy crap was the impact (pun intended) amazing. In big action sequences, having that sound energy able to come from overhead was quite noticeable. You are getting into some pretty low frequencies that normally would be handled by a sub, but being able to still be high enough that you can tell the direction it was coming from.
As such, I wanted to use the Axiom speaker with the biggest woofer that I could mount on my ceiling. Thus the M3 (M5HP would be nice, but didn't exist at the time, and at nearly 2x the price of the M3s, wouldn't have been in the budget. I mean, I was replacing (4) QS8s with M3 onwalls and adding 4 more for the ceiling. That was almost a $2000 sticker price on the M3s alone just to add Atmos plus the price for the Anthem MRX-1120 to drive them all. My wife would kill me today if she really knew how much has been spent on the home theater over the years.
Nick is correct with regard to the bass content in the surround channels. I discovered this for myself when I moved to QS10s for 5.1. I was also very surprised with how the quality and quantity of bass changed when I used 500s with the front A-LFR channels and routed just the .1 and below 40Hz from the surrounds to my 800.
So Nick may very well be justified in saying the M3OW may be better than M2OW for bass but justified only by a 10Hz extension to 70Hz instead of 80Hz for the M2. Does +/- 5Hz around 75Hz really matter?
Also consider this. I have the M3 bookshelves, M2 bookshelves and M2OW. The M2 bookshelves and OW are more accurate, mids and highs are more dispersive and over-all, the M2 is cleaner-sounding without being surgical. The M2s with a sub sound like M5s. I like the bass from M2s better than the bass from M3s and the mid-range is excellent and simply cannot be compared to the M3 mid-range. I can relax to both M2s and M3s but I feel I am really missing stuff with the M3s.
If I was doing Atmos, I would go with M2s for height and M5HPOW for surrounds. The only reason I wouldn't do M5s for height is because I'd be concerned about proper driver integration from the 3 drivers.
Mojo, I think Nick is indicating that these are heights and tops ... we are not doing critical listening here ...we are just trying to get it into the ball park. An M3 does that with much better than an M2.
I would love to jump to 4K or even faux-k just for the improved picture quality more-so that the higher resolution. Just can't seem to get to that point financially and it is one of those "I still really like my old JVC" type of situations. I do know that if I upgraded to something newer it would NEED to have those deep yet detailed blacks of the JVC, but I would certainly know that I would be happy with the upgrade if the finances allowed. While I like the RS46, the tech has come a long way and it would be enjoyed greatly. Maybe 2021 if the world has recovered from COVID-19 by then and our taxes are through the roof to pay for all of the "stimulus" help...
I've seen many really nice setups at CEDIA and even a local integrator/installer shop, but it is tough to justify to my accountant (wife) some of these expenses. Heck, she loves watching movies in the theater room, but more and more just wants to sit on the couch in the living room and watch on a cheap 65" TV with just the built in speakers. Sad times...
(The following is just more of my ramblings, you can ignore the rest of this. LOL)
Just did a massive remodel of most of our upstairs last summer (still have a small but somewhat time consuming punch list left for that, but those things are all paid for) throw in that my one daughter got married a couple of years ago and went "all out" on the wedding. His family paid about half, but we also got socked with about $35,000 in student loans (the part we agreed to pay of her $160K education bill) at the same time all leaving me still paying for those still. Now my other daughter thinks that she needs to get married this August. It will be less expensive overall, but his family isn't helping pay for much. Her student loans are less because she went to a state school, but we will still have a chunk there in about 9 months to start paying off.
If I just could have talked them both into small weddings I could have paid off the student loans by now and be set for more fun stuff like a new projector.
Not sure if you use disc media, but we noticed 4K discs looked better than burays on a 1080p projector with a new player.
We picked up a panasonic 820 and it was a noticable difference with 4k discs over blurays with an oppo. The 820 even made normal blurays look better than the oppo with the HDR scaler.
Might be an upgrade option ahead of a PJ for you.
This hobby is nasty on bank accounts. Hear you there!
Interesting. I wonder if it is just the increase in data rates or less compression maybe?
I have everything ripped in 100% 1:1 copies of the movie and audio (strip out menus, extras, etc, but the movies are 100%) on my media server.
I just start switching some things to 4K discs. The movie file sizes are a bit larger, but I am planning for the future. I started doing this recently just with "movies that matter" (subjective movie choices for sure) when I discovered that the blu-ray drive in my former HTPC that I now use as a desktop computer happened to have a compatible drive for use ripping purchased 4K blu-rays.
Another benefit was more Atmos titles too, and my media server is plenty beefy enough to transcode 4K on-the-fly down to something smaller for transmitting over the internet to my daughters who don't live at home and don't care if it is max bit rates.
Honestly though, I have no real comparison to non-4K vs 4K for the same movie to see how things compare and doing non-identical movies is more of an apples to oranges comparison "scientifically" so I don't know if I would have a good test to use.
I should also note though that I do have a Darbee box that helps to improve the image quality a lot for 1080p content. They are kind of going belly-up as 4K hit the market a few years ago making their products less critical for image quality. With the Darbee in-line it really helps to crisp things up too. I was a very vocal skeptic of the original Darbee product several years ago until I tried one out. Now it just stays ON all of the time and I never think about it. I do notice when we have a (rare) power outage and it isn't turned on. I wonder if that is similar to the impact of 4K source on a 1080p display?
I might have to turn off the Darbee and try some video clips from the internet in 1080p and 4k of the same scene and see if I notice a difference, and then turn the Darbee on and see what is different...
I’m pretty sure to notice the difference the title has to be mastered in 4K HDR start to finish or have a playback chain that supports dynamic tone mapping.
A good test would be a legacy movie like Alien or Predator in 4K vs the 1080 bluray original release.
They now master to wider brightness and color limits and this translates to a punchier picture regardless of resolution. The benefit the 820 adds may be similar to the darbee. The 820 expands the brightness and color of SDR to simulated HDR if you enable it. (Similar to dynamic tone mapping in highend displays.) The cheaper 450 also does this. We have a decent collection of blurays and they found new and impressive life with tone mapping to HDR and 1000nit output applied.
All the vids on youtube I have found for comparison don’t seem to understand this and poo poo 4K HDR. The vid either shoots in 4K HDR and scales down to 1080 (which looks great and close to the same on non HDR playback displays) or shoots in 1080 SDR and scales up to 4K without dynamic tone mapping and looks identical....
I'll have to do some digging into a library. I have so many "demo" discs and can grab full quality clips that I could probably find some items that are in 4K and 1080p if I can't find sources for them elsewhere online via MKV downloads or my own library...
I'm about to mount my M3OW's. Maybe tomorrow. I'm finishing up my "ceiling boxes" for the M3 ceiling speakers today. What height would you suggest I mount the M3's? The surrounds will be slightly forward (12") of the seating. The rears are about 4' behind the seats.
You want as much separation in height between the surrounds and the overheads. So ideally, you have surrounds at a couple of inches above seated ear level (so that one person's head isn't blocking all of the sound from a surround or rear speaker), but still low enough to give some distance between those and the overheads.
Then for the overheads, either mount them on the ceiling or at least up against the ceiling.
I pushed my side surrounds slightly forward of my front row seats when I lowered them for Atmos and love the way that they sound. Seems so much more enveloping, so I like what you did there too.
You can google angles, if doing 7.1.2 you want the speakers 60 - 100 degrees front or back of the main listening position.
For 7.1.4, you want the front overheads 35 - 60 degrees in front of the front row of seats, and the rear overheads 35-60 degree behind the rear row of seats. A lot of people will use a spot between the rows of seats for measurement and just make sure that the angles meet the requirements for both rows (using a lower angle).
I am using 4, M3 Ceiling speakers for the ceiling. I did not want to cut holes in my ceiling or try and rout wires through all the floor joists, so I built some boxes the speakers mount to. The boxes are attached to the ceiling. Roughly 8.5" height. I was limited to where I could actually place them in relation to the seats. The back row is directly overhead. The front row is 52" forward the back set, and at an angle towards the seats. The M3C's do have tweeters that can be "aimed" as well. I'll play around with that some if needed. That part of this Atmos project is done.
I'm using On-wall M3s for the surround and surround back channels. I have a door that's in line with the seats, so I have no choice but to mount that speaker forward. I'm happy to hear that will not be a problem.
As a couple of these wall mounts will be prone to being bumped by folks walking in/out of this room, I will most likely need to remove the driver and add a second attachment point. IE: screw though the speaker, into the wall......
I sure hope all this is worth it. Atmos really changes all the rules on speaker placement, and type.
Micheal, looks like your too far along to change this now but I think mounting M3ow on the ceiling would be a lot less work and sound better. I've listened to both these speakers and I believe the M3ow are almost as good as an M3 while the M3c are a bit of a compromise. Another observations between the M3c and a FMB mounted M3ow is that the on-walls are more amiable. The M3c's tweeter only has a few degrees of aim before it hits the grill. Further, In theory, you want your all the speakers to image well with each other so that objects (sounds) can be placed exactly in 3d space. The on-walls will do that better the the in-ceilings.
Now, I have not heard either of these guys in an ATMOS setup and suspect that when you in the middle of a movie I doubt the differences will be extreme. Bottom line ... bet both setups will sound awesome.