So, the moving truck came and went today and were almost moved across country. Our new place has a completely unfinished basement that I have already made rough plans for. They are not exact dimensions but a good scale based on the dimensions from our homes main floor dimensions. The space is roughly 15'6" x23'.
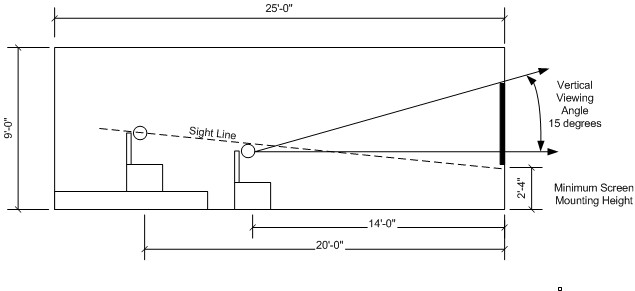
There will be a 112" screen about 14' from the viewing locations. The AT screen wall is 4' into the room.
If anyone has any feedback on how the space sould be lit, or a better idea for an A/V rack workaround I'd be greatful. So far I am thinking a soffit with rope accent with sconces at the midpoint of the top of each acoustic panel. The panel config and types are still tbd.
There will be cabinets on the backside of the left wall that will act as a cheater av cupboard, beer fridge, blankets etc.
Nice looking dedicated Home Theater space i'm envious. May I ask slightly off topic what equipment your gonna be using in that gem? Or link me to another post if you've already talked about this...
Admittedly, I am going a little OCD with the planning. I went through so many iterations in my last space that I lost track. Learned a lot from it and now I'm ready to create a proper space for the fam that looks a little less mad scientist......
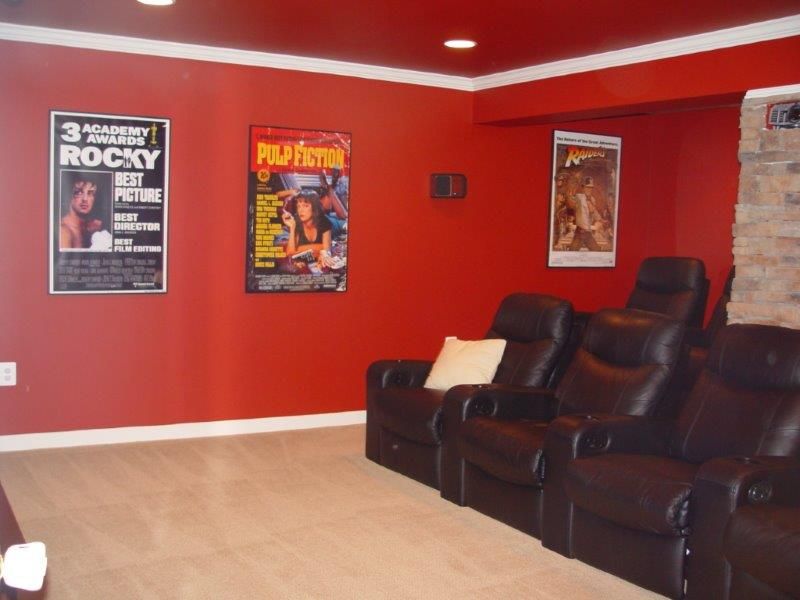
I know many people have gone with the less expensive pot lights, but we opted for on wall sconces in our room. We had a difficult spot for lighting on an angled wall but a friend who was a lighting wholesalesman found us something that worked perfect. All are dimmable of course.
Your lights are great, i like how you mixed spots with diffuse lighting in the same space. Those spots would look great if i wanted to light the media stand at the rear of the room.
Noted!
On a frustrating note, our sectional was delivered yesterday and wouldn't go down the stairs..... We bought it pre constuction to take advantage of a great sale. Looking for seating now too..... That can come later though.
The room was setup to deliver 7.x surround sound in two directions so yes, some pre-wiring indeed. I never did add in an ethernet line though as i figured wireless options would become available by the time i cared much about providing a net based application in the room.
We still have yet to add the other 2 rear surrounds. I partly stopped b/c i had contemplated adding surrounds in the newer wood veneers but then if i did that, it would start a cascade effect for having to replace the rest of the Axiom system with the same wood veneers. That and the fact i have an older AVR which only does 6.1 at the moment.
The room is slated for some updating but not until we finish reno in the kitchen and focus on a newer family vehicle.
The on wall sconces are really nice, but I was one of the many that just opted for the cheaper pot lights. With drop ceiling they are super easy to wire and mount too.
One of these days I will sit down when I have some time and write a nice long reply. For lights, I went with small can lights around the soffit (you could do the same along the edge of the ceiling, or even go with ones spread throughout the room). We then added 3 wall sconces (don't get those cheapo "paintable" kind. Spend $10+ more and get something with some metal, or glass, or both.
Biggest thing is getting them on dimmers... Notice, that is plural. Set up at LEAST 2 zones in the theater. In my V3.0, we had can lights throughout the room, but the half closest to the screen was on a different dimmer than the back half where we sat. Then we could eat dinner and see what we were eating, and not have lights on right above the screen (even if they were only at 25% thanks to the dimmer).
In my current space, since the wall sconces are in the back half of the theater, but the small can lights go all along the side and back walls (in the soffits), they are on their own dimmer. Then, if we are eating in the theater, I turn the can lights all the way off, and the wall sconces to about 25% and it works perfect.
Get remote controlled dimmers too. I went with two Lutron IR dimmers. Press the paddle up once and it goes to whatever pre-set lighting level you want, press it twice and it is on at 100%, press it up a third time and it is back to the pre-set dimmer level, press it down and it is off (all with a nice slow fade). On my remote I have 1 preset for eating (it is the default preset on the dimmers themselves. One I set to the sconces slightly on, and on the other dimmer it is at like 1% (as close to off as possible). Then the remote just sends the signal to put both dimmers to their preset, and it is perfect for eating. I have another preset on my remote that goes to the "eating" level, and then does a +2 on both, this is more for having a dim space, but not fully dark for when waiting for the wife and kids to come into the room.
Works great, and allows to good lighting control.
Oh, and we don't eat dinner down there THAT much, but we do use the presets a lot.
EDIT: Put at least 1 CAT6 cable drop into the room. There are some devices that can connect to the internet wirelessly, but if you want to stream video either from the internet or from a media server/computer in the house, you will want/need a wired connection. I know, you may not have plans for that now, but I didn't plan on having a HTPC in my room either when I dropped the CAT6 cables in. One all the way back to my internet connection point in my house. This was just for being able to do firmware updates originally for all of my equipment. I am glad I did, otherwise I would have had a really hard time adding it later so that I can stream my 72GB Lord of the Rings: Fellowship of the Rings, or the even larger sequels. Even smaller file size movies would choke at even high quality across wireless, and I ended up wanting exact same playback (or better) with my HTPC, so that means no compression at all.
monoprice.com will hook you up with cheap network cable. Buy longer than you need...
I have been looking into the lutron maestro IR dimmers. Are these the ones you have? I have a harmony remote I would use them with.
I know sconces are happening for sure, but cant decide on soffit pots or just two overhead lights for cleaning up in the space etc. Pots are cheap and eat up no headroom so that might be an option.
This is the kind of lighting my better half prefers:
I like the idea of having sconces and overheads on seperate dimmers for sure. I would likely put the rope lights on the same dimmer as the sconces. I'd wire it so all neutrals started at the switch box to have flexibility later I guess.
I will likely run cat6 to the a/v rack into a switch and split from there I guess. They are cheap nowadays. I'm planning on a 1 1/4 conduit run to the center of the front wall for feeding speakers behind the screen wall. I'll pull straight to the terminals and bypass wall plates wherever I can. The surrounds may also be piped, havent decided yet. Projector for sure with 1 1/4.
I am using the Harmony One with mine without issues.
Note, I would control the rope light differently. Separate switch/dimmer...
Here is why: When you want the cool effect of the rope light, but super dim, you are still going to have light directly above your screen (even with a soffit, etc). This can either wash out the image or mess with the contrast a lot as you eyes now have another light emitting into your eyes. Dark scenes in movies will either be washed out a little or in contrast to the rope light (even on dim) lose dark detail.
An extra dimmer is cheap in the scheme of things, and really the rope light is best left off anyway for during a movie.
My color changing LED rope light doesn't even go over the screen (it goes down the side soffits and across the back) and I never leave it on for during a movie.
Is there a dip switch or something on the lutron units to give them different IR codes. Ie command individually? 3 gang box sounds like where I'll end up. Sconces, ropes and overheads/pots controlled individually.
The soffit will be "8" shaped to conceal a beam in the center if the room. The front of the soffit will be behind the screen wall when done. I will likely go with a yellow or warm light if I can find some dimmable leds that dont need a transformer for every 20' or so. Maybe incandescent otherwise.
Many thanks btw for your input all. Appreciated!
None of that I know of.. I have two lutron switches because of the 2 pot lights banks.. they are controlled simultaneously from the harmony remote, when I turn on an activity they come all on then go to the fav preset of the lutron switch... one is set on half dim and the other off.. so I belive it would work for the application you are looking for... the only problem I have is to have the lights turn on when I ask the harmony to turn everything off..
Yeah, if your remote send a "full on" signal to one, then they all get it. If you send the "preset" signal, then they all go to their preset (which CAN be set different per switch), but not independently controlled.
I can't remember if it was Lutron or another brand, but someone makes an additional unit that allows you to set up a number of "scenes" and you can connect multiple dimmers to it.
I could stand the overheads on a manual dimmer for entry/exit and general use. 2 lutron units could be used as scene lighting during movies as you have mentioned with preset dim levels. Pretty slick and user friendly.
Also
There will be a smart relay controlling a room exhaust fan off of my AVR trigger, so likely I can program it to open the main overhead lighting when BD input is selected. Makeshift automation, but works.
So, come in room, turn on main light switch.
Hit all on in harmony and sconces and ropes come on with gear.
Select watch movie (BD) and mains lights turn off (relay trigger) and lutrons dim down.
I'd set it up so "play" dims to off and "pause" or "stop" dims to preset.
Turning all off would return the relay to N/C state and main overheads would come back on. Sconces and ropes off.
NOTE: Do yourself a huge favor and have a spot for your remote (with power for charging) close to the light switches!!!
I wish REALLY BADLY that I had done this. Instead, I have to walk to the back of the room by my equipment rack, grab the remote (and now I am standing where I can't hit the "Watch a Movie" button and have everything turn on), then walk to my seat, sit down, point the remote at the screen (to bounce the signal) and turn things on.
Had the remote had a little cubby shelf near the door/light switches, I could grab it and hit the button immediately upon entering the room.
Had the remote had a little cubby shelf near the door/light switches, I could grab it and hit the button immediately upon entering the room.
Or you could do something crazy like just turning on the light switch with your finger at the door. A ridiculous idea, i know.
You may have missed my point. I DO hit the light switch, but to turn on the gear in the room, I have to walk to the back of the room, literally the furthest spot away from the door. That is why I would want it need the door/light switch area. HE was saying that he wanted to turn everything on (including the lights) from the remote.
Hey Nick, you ever think of a cool looking frame with velcro and putting a velcro sticker on the back of your remote? I guess that doesnt solve the charging situation though.
I opted for the 650 after I found out a friend had issues with the batts after a year with his harmony one.
Had the remote had a little cubby shelf near the door/light switches, I could grab it and hit the button immediately upon entering the room.
Or you could do something crazy like just turning on the light switch with your finger at the door. A ridiculous idea, i know.
hahahaha good one!
None of you saw my post BEFORE the above quoted posts? Here is what I put....
Originally Posted By: nickbuol
You may have missed my point. I DO hit the light switch, but to turn on the gear in the room, I have to walk to the back of the room, literally the furthest spot away from the door. That is why I would want it need the door/light switch area. HE was saying that he wanted to turn everything on (including the lights) from the remote. wink
Its a great touch to have lighting on a remote. When lighting commands are integrated with gear commands it is really a wowing affect. A cheap way to make an install feel professional.
The units mentioned in this thread can be retrofitted to any exising installation. You just have to watch for 2 wire or 3 wire requirements for install. The lutron units are affordable at $50 or so. Great value I think.
I like the idea of an RF remote, especially for locating gear out of sight. I can look at one down the road when all the other tweaks are exhausted.
A little ingenuity keeps the hobby fresh and fun command recliners interlocked with lighting would really be boss! but not gonna happen in my space.
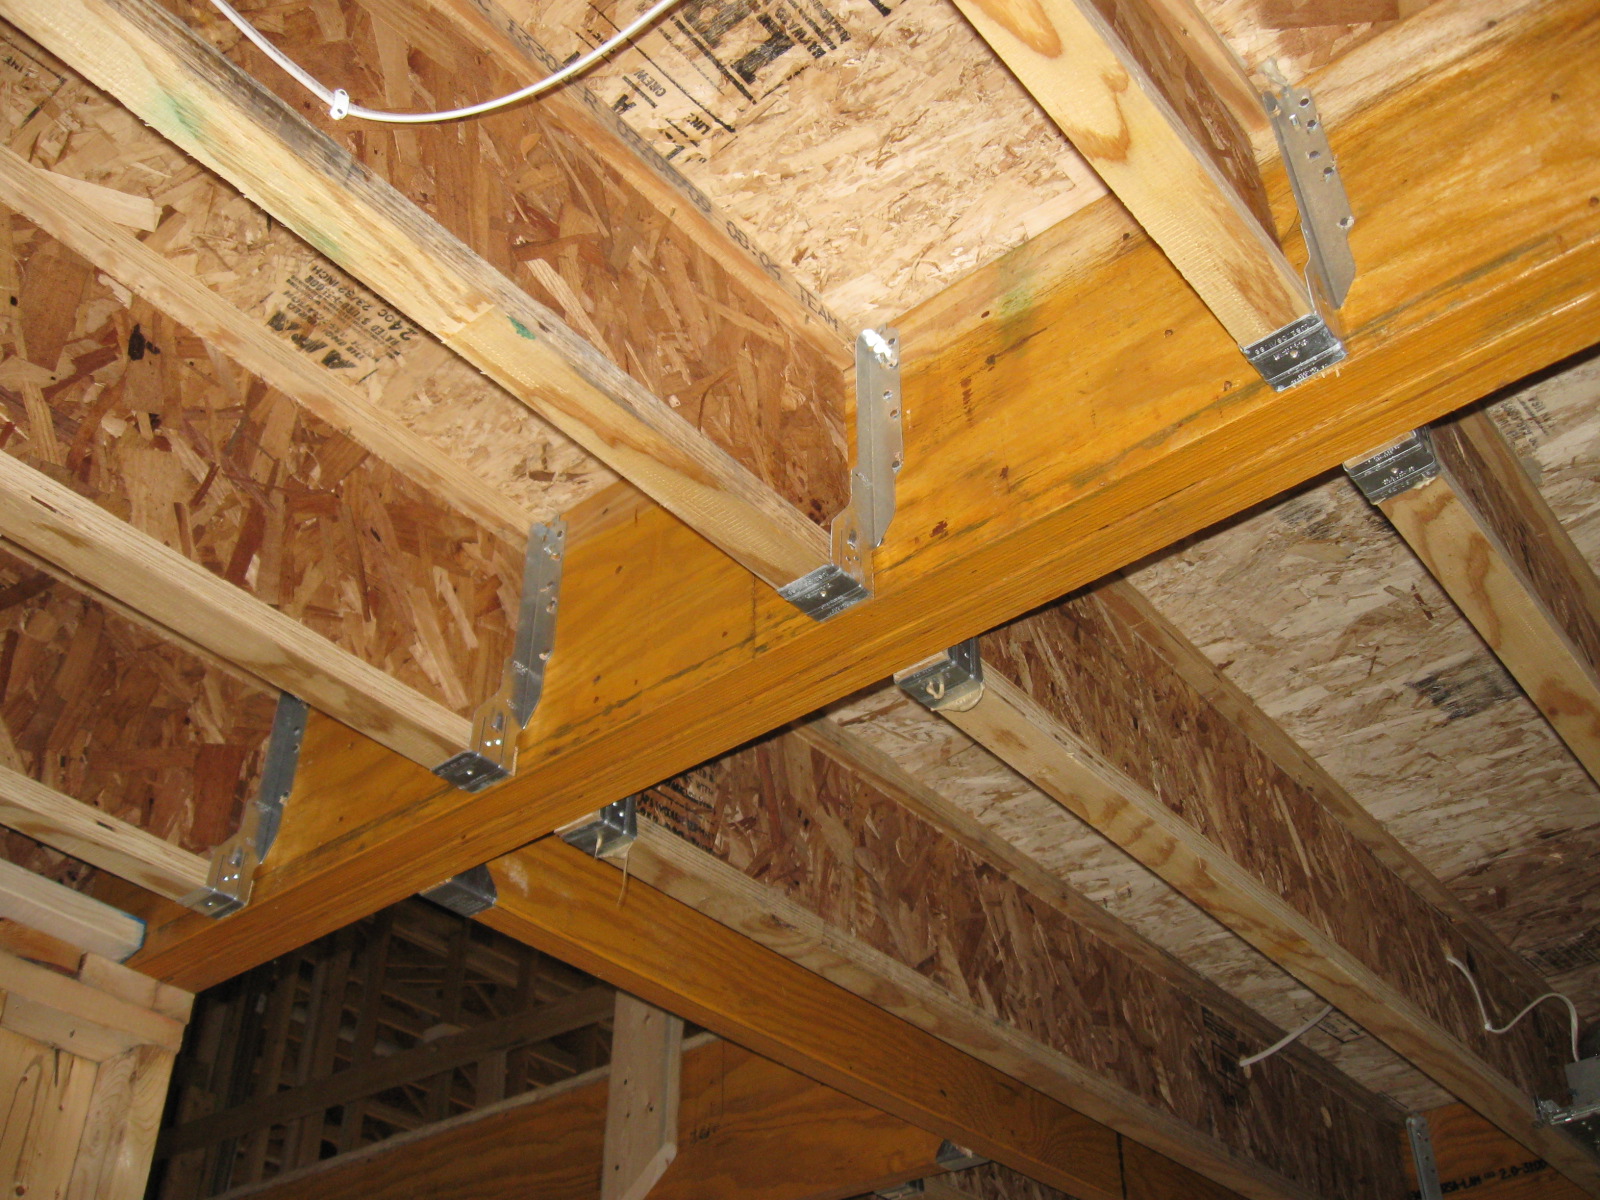
Here in our place now. Stuff arrived safe and sound. The space will actally be a little smaller than originally thought, but still a healthy 14.5 x 22 x 8 estimated when complete. Have to alter drawings and consult with an engineer to remove a support post. Then relocate a heating oil tank to the garage. Work ahead just to get to the framing stages! The post on the partially demoed wall corner is the make or break. Fingers crossed. Oh well. So far:
Here in our place now. Stuff arrived safe and sound. The space will actally be a little smaller than originally thought, but still a healthy 14.5 x 22 x 8 estimated when complete. Have to alter drawings and consult with an engineer to remove a support post. Then relocate a heating oil tank to the garage. Work ahead just to get to the framing stages! The post on the partially demoed wall corner is the make or break. Fingers crossed. Oh well. So far:
If you bring in a structural engineer they will say "No. You cannot just remove that post." I have heard of people trying to add more to an existing beam to make it beefier, but there are horror stories about that too if not done exactly right. The best recommendation for reducing/eliminating some posts is replacing the beam with a steel one. This is no minor undertaking.
Your best bet is to bring in an expert as you planned, and tell them what you are trying to accomplish. They will give you the best advice on how to make it happy. It probably won't be cheap though. Just saying that now so that your expectations are set.
An engineer will determine how to accomplish this. My preference is to sink an LVL into the floor space to eliminate the protruding beam altogether. We are also facing the likelihood of beefing up the neighboring footing.
We bought this house with the basement space as a requirement. This post would be dead center in the room. Maybe military invisible paint?
Hmmm.... Interesting... How would the LVL beam go up into the floor joists without compromising the structural integrity of the joist system? I've never heard of something like that, and it certainly would have been awesome for some of the basements I've finished in the past.
Wow. I wondered if that is what you were looking into. Those aren't up to code here. I think that it is just a city code though. They are sticklers about a lot of stuff where i live. Here, the floor joists must have a beam *under* them.
I've heard that pretty much everywhere allows you to do this for ceilings in main living areas where there is just an attic above it. For most homes though, that isn't needed since the roof trusses are also the ceiling "joists" anymore.
A lot of work is involved to do go this route. You would need to support each and every floor joist on both sides of where the current beam is, and then you would need to cut out (as precisely as possible) where you want the beam to go up in to. Then put the beam up, attach the hangers, and remove the temporary supports.
If you can somehow live with a beam (or end up having to live with one for code requirements), you could put a metal beam right next to the current beam, get it supported with poles (obviously a lot further apart than your current ones and would need new footings), and then remove the current poles and beam. Would solve the pole issue probably, be less work, and probably less cost that all of the materials and labor to do it the other way.
I moved a 12 foot beam in my current house to accomplish what you are thinking with the joist hangers. I didn't want it right above where my wet bar was supposed to go. I ended up turning my home theater wall into a load bearing wall that was about 3 feet to one side of the beam. I made another temp wall (with studs right under the each floor joist), and then moved my wall beam over 3 feet away from the theater. There is duct work right in that area, so now it just became a part of that framing. Obviously I built up supports for each end, but they ended up inside what were to become walls and thus never be seen.
For the other beam in the basement that ran about 20-25 feet, I just lined up a wall with it to be a part of our office and bathroom.
I love the look you are going for without a visible beam, but unfortunately for you your beam is right in the middle of the basement.
I have no idea if I'll be able to swing it here either. I dont even know what day garbage day is yet so I have to do some homework. Ha! Would be better for feng shui for sure.
My father in law does this stuff for a living and we work well together. Should be alright from that end. We are planning to brick over the windows in the room as well as inject a cranky crack we found in the foundation wall. I've read too many build and tear apart threads.....
Including myself, we are pretty trades oriented and this should be a pretty fun build. Exciting! Its nice when the rest of the family is bringing up the basement plans ahead of me. I'm playing coy so it seems like they are urging it on. So far so good.
Take lots of pictures. Always good to have before and after documentation, plus good for whenever you end up selling the house so that you can show that you fixed the cracks. I fixed a few foundation cracks and made sure that I showed that it was done very well. It looked just like the one that the professionals did before we bought the house. It is actually pretty easy and just adds piece of mind.
Good luck with whatever you do. I didn't mean to come across as a downer, but so many times I see people getting their hopes up on things just to have them not have the skills or understanding to do it right. It sounds like you are going to be just fine once you find out what you can do about those beams.
I like the concept of an RF distant, especially for finding equipment out of vision. I can look at one in the future when all the other modifications are tired.
Ok, so three beam options exist to remove the post.
1. Bolt C channel steel along both sides of the existing beam. Pros- easiest option, cheapest at under 500$ Done in few hours. Cons- beam still keeps its current protrusion into the headroom of the space.
2. 4 2x11 LVLs sandwiched together and sunk into the floor joist. Pros- beam now protrudes only 3" into headroom of space. Cons- more work and higher cost of approx 1000$
3. 8"x8" I Beam sunk into joist space with 2x8 laminated on top to hang floor joist from. Pros- beam protrudes 1.5"' slightly less. Cons- most work and lifting involved (over 400 lbs). Most expensive option at around 1200$ Most work to retrofit into current beam foundation pocket.
All three options allow the removal of the post and are suggested by an engineer as suitable choices. What should I do? What would you pick?
I had no idea on the cost until we went through an engineer. Happily surprised.
I guess where most people would encounter thousands of dollars is hiring the entire process out and working in a finished space. Putting it all back together when removing a finished wall can be costly. Luckily its just a concrete hole so far.
Option 1 is out for sure. Deciding between 2 and 3. Option 2 is attractive because it will be easy to relocate the electrical to the bottom of the joist neighboring the LVLs and have a small bulkhead to cover it up.
Plumbing in basement ceiling moved. Still need to have an engineer come to site to see the pre work state and confirm methods in person. LVL sunk into joist space is the goal still. Basement foundation crack still needs to be fixed.
After hurricane arthur gave the island a bit of a kicking, I realized how a UPS would probably be a good Idea.
Winter is coming....
I ended up getting a Double conversion online system that feeds my living room gear, Hifi and soon the HT. It is a 20A unit that seems pretty good so far. Probably overkill, but hey, thats part of the fun and madness of our hobby. A cool feature is it gives a live VA reading on loads connected. No more wondering how much stuff draws when in use.
It is located in the mechanical room and acts as a hub for homeruns I fished into the upstairs walls. I plan to use it in the HT as well for the projector, AVR and Amplifier feeds. Capacity shouldn't be an issue unless all 3 systems are running at the same time. Unlikely.
After the storm the neighbor was cutting up a downed tree with an electrical chainsaw in their yard. The lights in my house would dim every time the machine triggered. Can you say volt sag?!
2-5 second power outages and silly voltage fluctuations are common during storms here I guess.
Thanks to Nick's hard work covering cedia for us I'm going to ask for opinions on running future wires for ceiling mounted direct radiators in the mentioned square pattern.
This would yield 7.2.4 "connections" for the distant future acoording to current prices of processors.
Future proofing is a speculative thing due to the fickle nature of electronics trends. With the prescribed "death" of bluray I keep reading about looming, is Atmos a reality for mainstream consumers? What to do?
Future proofing is a speculative thing due to the fickle nature of electronics trends. With the prescribed "death" of bluray I keep reading about looming, is Atmos a reality for mainstream consumers? What to do?
I can't say i've heard about death of Bluray, unless this is a prelude to the new 4k images and a new form of DVD to hold 4k data. However, being truly realistic, of every single person i know around me, neighbors, friends, hockey teamates, etc. i am one of only TWO people to have a 'high' quality 5.1 home theatre system. I don't know of a single person that owns more than one subwoofer nor do i know of anyone who has a TV larger than 50".
Atmos may be coming but keeping up with the Joneses? For over a decade now we already surpassed the Joneses, the Smiths, the Browns, .... A 5.1 system is still very much the mainstream if not the dream system for most folk. What the electronics can do is advancing fast, but most people can't afford to keep up with, or even enter into the basics of a complete 5.1 home theatre IMO. How much are these new advances even being used? Heck, i still own a 2002 Onkyo and only now am having some thoughts about changing out the 12 year old 50" Toshiba RPTV for a flatscreen and swapping out the AVR.
Can you enjoy HD audio formats over the onkyo? (dolbytrue hd, dts master etc)
If not, definitely time to upgrade. I know what you are saying about the joneses completely. Having moved to PEI, a "good" system here is a HTIB to most.
All my purchases are off island now for this sort of thing. High end audio or reference sound is at best understood here as "it pounds!" from my coworkers.... . This is in regards to their samsung htib, of course. "1800watts!"
Ok, I sound like a snot.
The other day I was asked what kind of soundbar I would recommend to pair with a $2K samsung smart tv someone had. I told them they should be looking into the pioneer designed by Andrew Jones. I think they ended up grabbing a $150 walmart jobber.
Thank god for the internet! Where an audio nerd can find others.
Can you enjoy HD audio formats over the onkyo? (dolbytrue hd, dts master etc)
But why do i need those specific formats? DD 5.1 won't sound any different quality-wise. I don't have a 6.1, 6.2, etc. system so the extra channels that come with those formats are irrelevant, and being more of an audio gearhead than most folks, this proves my point.
A lot of people don't even have a quality 5.1 system to begin with. Most i know that get into the surround sound buy a small HTIB setup and certainly have no plans to get more than that.
At some point i personally do plan to add two rear surround channels and another subwoofer for a 7.2 system, but that is my limit. Until i get to that point, the only limitation i have with my 12 year old Onkyo AVR is it does not have HDMI. However with the recent purchase of an Oppo bluray player which has both HDMI and component video out connections, i can continue to use the Onkyo for awhile longer yet. Although i love the idea of getting a newer, larger flatscreen TV (another topic as to why i'm not atm), i was annoyed that to get a bluray functioning i may almost have need to buy a new TV and a new AVR! So for a $300 bluray player i need to get/replace over $3k in new electronics??!!!
The big killer IMO for new home a/v electronics will come in connection types. They keep coming out with new standards and new connections almost every other year it seems. A tv that could last 15 to 20 years is now almost defunct after 10 because it doesn't have newer connection types and/or a newer unit may not still have older connection types such that anyone replacing a broken DVDp for example, might be faced with having to buy a whole new TV as well. Most consumers aren't happy with being pushed into that narrow choice. It costs alot even at the lower prices at which one can buy a TV today. Replacing electronics at that pace is just stupidity.
Forward thinking; when we bought our TV back in 2002 we at least made sure it had component video in and 1080i resolution capable such that today, we do have a functioning large screen HD tv. Thankfully the brand makers didn't cut component video inputs off at the knees too quickly after HDMI was introduced or that TV would have had to disappear a long time ago.
Are we talking downmixed hd to dd5.1? or DVD audio tracks vs bluray tracks?
Take Sin City, dd5.1 vs DTS on the same DVD disc. Same disc, formats sound different.
Or Tenacious D, or many others. If the tracks on a single disc dont match, how can we reason the HD mix would be the same?
When they are mixed for HD audio and channels, they sound much better.
That's not the first time someone called me crazy. I've really lost track at this stage in life.
This situation is where the term "quality" must be clearly defined and it is hard to do so since the sound mix of one format vs. another can vary even with the same material on the same disc. However, try to remain objective when you evaluate the sound not for what you prefer, but for what you can hear (technical vs. subjective). Are the vocals sibilant on one mix but not another? Is bass heavier on one mix vs the other? Can you hear the raspy strum on guitar strings in both mixes? etc. AND, most importantly, are these artifacts reproduced consistently with other material on other discs in exactly the same way? i.e does a DVD-audio mix always sound more bassy than its DD 5.1 counterpart on 10, 20, 30 different discs? I think you will find that these types of 'quality' differences do not reproduce consistently for one format such that it could be labeled as 'lesser quality'.
Reproduce the sound quality differences then decide if one can be deemed a better quality than another, but don't assume that a 6.1 True HD DD mix somehow is higher quality than a DD 5.1 mix. The technical quality at which these mixes are produced already go beyond that which the human ear can detect from a mechanistic, engineering perspective. We are not dogs or bats. Human hearing capability is much more limited.
All that being said, yes, i absolutely agree that a DD 5.1 mix will sound 'different' from a DVD-audio track on the exact same disc. I've tested this in the past with an A/B switch method and demonstrated this very difference with people who came to audition the Axioms. I have tried 3 different DVD-audio discs with their DD 5.1 tracks on the same discs and reproduced what i perceive as differences in the formats, but both are of equal (and very high) quality.
I preferred the sound of the dvd-audio mix but not because i thought it sounded more clear, or accurate, etc. I chose it because i found the soundstage was more up at the front vs. the DD 5.1 mix of the same material which moved the soundstage more overhead, a bit more immersive (the more "surround sound" type of sound). To me, i described the differences in the mixes as follows: DVD-A sounded like i was sitting in the first couple of rows of a concert. DD 5.1 sounded like i was onstage somewhere in the middle of the band/orchestra.
I've also tested (long ago), DD 5.1 vs DTS on the same disc. This was not an instantaneous A/B test though and offhand i recall thinking that DTS really reduced the SPL for some reason so i ignored using it ever again.
Different does not equate to higher quality. Some people may prefer one mix over another, sure, but that does not define it as a technical quality difference vs.a personal preference likely related to the variation during the sound mix process.
Agreed. I typically prefer the Bluray HD mixes of movie soundtracks when comparing them to their DVD counterparts. I dont know if I would be capable of listening to a DD5.1 track on a bluray when its HD counterpart is there waiting. I would feel dirty.
I believe the newer batmans and new daniel craig bond films on bluray include both the non and HD versions of the soundtrack. I believe oblivion does as well. Anyway, these are good examples of films which would have been mastered for HD sound and likely good candidates for a DD/DTS vs HD counterpart test. I mention these as they are fairly ubiquitous and anyone can run the test for themselves.
Homework assignment for everyone willing.
I predict in every case the HD track is prefered.
I would agree that a DVD could potentially sound even better than its Bluray version technically, but in my experience this has never been the case. I dont think DD5.1 or DTS tracks got the same "love" when the studio sound master folks make the decisions which determine the final experience. This may be less the case now with newer releases, since a DVD soundtrack is likely a lossy version of the HD counterpart, but when back catalog movies are released and remixed for HD sound on Bluray, the differences can be startling. Holy run on sentence.
Btw, a lower SPL between DTS vs DD5.1 tracks could be an artifact of a component misreading or omitting the dynamic range parameters within the soundtrack from what I understand. If one sounded louder than the other, it could also have meant that track had more dynamic compression applied by the processor or during the studio mix.
Chess, you're crazy!!! Well, not really, I just felt like I was missing out.
I know I have a particular concert Bluray home that the HD format is actually way less enjoyable than the DD5.1. Damn it, I can't remember which one it is though. I recall the HD version really brought forward the sibilant aspect of the lead vocals.
From a technical standpoint, the HD version was probably doing it's job and being more accurate. However, the resulting accuracy created something that really bugged me.
In this case, you could have an interesting argument. Is it the responsibility of the producer/mixer to make it as accurate as possible, should they remove unwanted qualities, even if it is less accurate or do you just blame the source (artists/sound gear.)
In short, you are both right but sometimes accuracy does indeed come with a price.
Short answer: DD5.1 is compressed.... DTS-Master Audio and Dolby TrueHD are not.
Ok, technically DTS-MA and Dolby TrueHD ARE compressed, but they are more like a .zip file. extract the data from that file and you get the full lossless (uncompressed) audio in perfect form. DD5.1 is compressed much like an .mp3 is compressed. It literally throws away a lot of data to save space. Now, the problem is that just like some .mp3 files, the level of compression can vary from one source to another.
In the movie sound industry, HD audio is reserved for uncompressed or lossless audio like DTS-MA and Dolby TrueHD, and DD5.1 is just considered a sub-par audio track that is missing a lot of information. It is still surround sound, but it is like saying that the DVD that the DD5.1 audio is on is HD when comparing the DVD to a blu-ray which is in HD.
Now, do I really care what you enjoy? Heck no. Play what you want and enjoy it. You are missing out on what you *could* hear, but you seem fine with what you *currently* hear and who am I to spend your money on something that you don't think that you need.
DD5.1 is compressed much like an .mp3 is compressed.
Indeed Nick you have described a technical difference between the formats but i was questioning more the subjective term "high definition" sound.
DD 5.1 is not unlike a mp3 at >500 kbps (DVD audio is rated for a similar bitrate although this is only one metric of quality among the formats). I doubt anyone has been able to tell the difference between the compression and non-compressed versions at such a high sampling rate.
Compression does not equate to a loss in audio quality if it can't be distinguished by the human ear anyway. There is another similar discussion at the bluray forums which parallels this one. http://forum.blu-ray.com/showthread.php?t=159982
Chess, if you have an oppo you may be able to use the multichannel analog outputs into your avr. You can then use the oppo for HD audio decoding and your avr will basically become just an amplifier.
You didnt mention which oppo you purchased, but if it is the 103 or higher, it has channel controls like distance and spl trim level built in. It may afford you more features than your onkyo currently offers in terms of system setup parameters. Not sure about the 83 or 93 though.
You can also use the HDMI out at the same time for video only. This means when your tv is replaced, you can bypass your avr for video and go straight to the tv from the oppo. The newer oppos also have video inputs for hdmi and can act as a switcher and scaler. I believe they will also strip the audio from inputs and output over analog to your amp as well.
DD5.1 is compressed much like an .mp3 is compressed.
Indeed Nick you have described a technical difference between the formats but i was questioning more the subjective term "high definition" sound.
DD 5.1 is not unlike a mp3 at >500 kbps (DVD audio is rated for a similar bitrate although this is only one metric of quality among the formats). I doubt anyone has been able to tell the difference between the compression and non-compressed versions at such a high sampling rate.
Compression does not equate to a loss in audio quality if it can't be distinguished by the human ear anyway. There is another similar discussion at the bluray forums which parallels this one. http://forum.blu-ray.com/showthread.php?t=159982
Understood...
I generally steer away from Dolby TrueHD whenever there is a DTS-MA track, and most of the blu-rays default to DTS-MA as *the* track of preference. Maybe that is why I hear such a big difference. The DTS mix on DVD was always more dynamic than the DD5.1, so when they put it into a lossless format on blu-ray, it still sounds light years better than DD5.1.
I will admit, since we are all being honest here, that I have never done an A/B comparison between a DD5.1 DVD track and the Dolby TrueHD track for the same movie on blu-ray.
You may have challenged me to give it a shot tonight.
One thing to keep in mind is that my gear and your gear are going to have different variables, heck, I have an acoustically treated room that may be the biggest variable in hearing a difference or not. If a room destroys upper frequencies or has nulls in the low end bass, that would suck up any real clarity or bass extension that would would get from a lossless audio track.
Then again, some people have better hearing than others. Even though my wife is younger than me, I hear a lot more detail than she does, but not as much as my teenage kids.
I will see if I still have a DVD of something that I also have on blu-ray, but if not, I will just manually switch between the two Dolby tracks from the same blu-ray and report back tonight. The trick will be to find a blu-ray with Dolby TrueHD on it since most studios went with DTS-MA as the default for blu-ray and DTS in general is more "dynamic" than Dolby, so that wouldn't be a good comparison.
Oil tank moved! What a difference it makes to the flow of the space. Starting to visualize the room size now. Going from previous room of 12x17 to 15x22 or so. Woohoo!
The offending column is the unpainted one. Hopefully engineering report later this week for removal and LVL install.
I have to stop the household habit of "just put it in the basement for now." Its starting to become a storage morgue down there.....
Changes changes.... I'm now not "allowed" to fill in the basement theater room window openings as planned with cinder block. Married life comes with a price. I will still put a plug into the window behind the screen wall. The others will get some decent blinds I guess. Not ideal.
I did convince her that a door on the space is a good idea. I also pointed out an architectural sound absorber hanging in a store and she liked it. Cedar ceiling cloud sorted. Since cedar is such a pretty material, might as well make the back wall a skyline diffuser array with a media shelf integrated. So I lost one and won some.
This results in some other minor changes. The soffit idea is dead. No rope lighting around the room perimeter. Sucks. I really covet that look in everyone else's rooms I view for inspiration. ahem Nick.
Since I've been halted by waiting on others (who says engineers aren't timely.....) I've had the opportunity to check out some fabric sites to get ideas for covering acoustic treatments. This lead to a complete overhaul of the room color/texture scheme and the inclusion of Western Red Cedar as the highlight tone for the room. I've always liked the smell and look of cedar accents in spaces. Hopefully this idea will jive with carpet later.
The leading contender for fabric so far is "Grey Ages"
I've also scrapped the idea of having the equipment rack flush in the room space. Instead I will have it mounted in a cabinet outside of the room with an IR repeater module in the screen wall. I've read all over that this improves immersion in the movie. Less lights and counters for distraction I guess.
So far it is still in the conceptual stages, but as far as I am concerned the design phase is over. Any changes now will be running changes as the room is built and dimensions vary slightly. I still have to find sconces that will compliment the fabric panel scheme.
The jury is still out on to be or not to be an early ATMOS adopter. 7.2.4 is attractive for this space according to the early literature. But, as mentioned, Dolby's market share for movie soundtracks seems to be dwindling these days.
The only major issue I can see is a speaker in the walking path immediately entering the room. Hopefully it snugs up to the ceiling without too much coloration.
Those are great renders. I initially thought they were photographs, but I was struggling to identify the tower speakers in the first pic.
For the two windows, could you make some kind of shutters with strong hinges and heavy material that did a good job of obscuring the window when closed ? I'm seeing a picture in my head of a soffit around the perimeter with a sort of multi-hinged section combining soffit material and painted wood/drywall over each window so you could open it flat against the ceiling when you wanted windows but fold it back to become part of the soffit & wall when doing the HT thing. Sort of an upside-down appliance garage.
While you're at it, I think I remember seeing "powered speakers" somewhere that moved into position when you dimmed the lights. I bet it wouldn't cost much to put a linear actuator on the surround speaker near the door so it normally sat near the ceiling but moved down when you dimmed the lights.
Not only would you gain convenience when the room was being used for non-movie activities, but you would have never-ending hilarity as people walked into the speaker in the dark.
If you get your soffit & rope lights back I guess you could dimly illuminate the speaker, but where's the fun in that ?
You mentioned the rope lighting around the room. Honestly, it pretty much never gets used anyway.
As for Atmos and the "Dolby market share" at home, with most studios going with DTS-HD Master Audio, I agree. However, DTS is working on their own object based audio similar to Atmos, and there is also AURA 3D (which I don't think will ever get traction since it isn't DTS or Dobly), but like I said, there will be something from DTS within the next year. I would say plan and wire for overhead speakers. Run the cables in the ceiling with plenty of wire, mark where they end up in the ceiling, take measurements, and document their location. Leave plenty up there since you might need to "fish" it to a slightly different location later on. Wire is cheap in the scheme of a room, and even if you never use it, that would be better than wanting it later and not having the wires there at all (like me).
It is amazing how much changed in a couple of years for me. I had to have the equipment rack in my room because of the ease of putting a movie into the blu-ray player (without having to go outside of the theater or something. Now I have a nice HTPC and we almost never use discs any more, so it doesn't matter. I have actually been working a little bit on my theater again to finally get some exhaust venting (done now) and the equipment rack in the back of the room actually built in the space and not having an old stand alone audio furniture piece that never fit into the space taken out. I only need to make 2 more shelves and clean up the cabling and it is done. With that said, every device back there has displays or little LEDs that can be dimmed or turned off. The lights from the devices really aren't a problem at all. I wouldn't want them in the front of the room, and while I did run cabling for a IR repeater system when I build my theater, I don't use it at all. I bounce the IR signal off of the screen and it makes it back to the projector and equipment rack perfectly fine (as long as there is line-of-site, which there is now that I am building the rack the way that I want to.
Just throwing that out. A separate room is better for any noise/heat isolation, but if you much have some equipment in the room, put it in the back and up high enough to not have the IR signal blocked by things like seating, and you will be just fine without a repeat.
Which reminds me. I need to advertise my 2 IR repeater systems. One is a nice Logitech unit, and the other is a slick setup that connects up via your HDMI cable. Anyway, that is another story.
Thanks for the kind words. I've always loved the planning aspect of all my hobbies. Figuring stuff out is always half the fun. It's kind of hard not to shoot big. You guys have made some pretty inspirational rooms to follow along with others.
I guess I'll let the rope light scenario go. I'm not going to die on that hill when it comes to trying to convince the wife that escape hatch window panels are plausible. It was a great idea that wouldn't have even occured to me.
Another great idea is the motion speaker mount. I totally get it. Kind of like a recessed projector mount. The me a few years ago would have been all over that. Having made a couple of Lumenlab DIY projectors over the years, the wife is tired of frankenstein projects. Probably for the better.
I will scale back the couch from what we were planning for. I have a new render with a new sofa's dimensions in mind. Anyone ever bought a sofa online from www.wayfair.com before?
I think it will be doable. I was hoping for seating for 6. But realistically, it will be just the 2 of us 90% of the time anyway.
Nick, you are absolutely right. I'd be kicking myself later if I didn't at least pull the wire while I had the chance. I'll be sure to add 4 ceiling drops in the squareish pattern at Dolby's site.
It will be a while before I upgrade my receiver to one capable of 11 channels, but I will be prepared for down the road.
Bridgman, the speakers are nondescript in the render by design. They aren't Axioms and I didn't want to make a rude impression here. Axioms were on the table at one time, but when I went shopping for my brother's theater speakers a deal jumped at me I couldn't pass up.
I picked up a package of Mordaunt Short speakers on closeout for about 50% of MSRP. They are fantastic. (For now) I couldn't imagine owning anything else. Until I audition some Axioms in person and get the feel for them I wont know what I'm missing. I did listen to Paradigm studio series speakers, which are often compared to axioms. So I might have an inkling about their flavour.
This is the system I picked up. I opted for 2 floor standers as surrounds at the time because they were such a deal. A year and a half later, I scrambled to get a set of matching bookshelves to make a 7 channel setup. I think I picked up the last "new in box" pair in black in all of Canada out of Montreal. Cutting it close.... 2 SVS sealed subs round out the bunch.
I don't mind sharing, as I don't think they can be bought anywhere now.
We auditioned a LOT of speakers at all the big box stores and then out of curiosity went to some of the high end shops back in Calgary. I'm sure glad we did. We listened to some uber dollar setups that completely changed my direction in the hobby. My focus went from feature driven bang for buck products to being purely reproduction obsessed.
My brother picked up a high dollar setup that trounces mine on paper. But my OCD about synergy and setup had always left him scratching his head when we compared the end results.
Thus began my acoustics oddyssey... never ending as I'm sure you know from your experiments. Such a fun hobby! Boy I can ramble on.....
Sounds like you're making great progress -- even the annoying details ("ow, my head") are getting solved.
Making the couch shorter is the kind of idea that would never have occurred to me
I'll just mention one more option for the windows & soffit -- do a Google image search on "egress window". Basically dig down so you can have a taller window in an enlarged window well with steps, in your case starting below the rim of the soffit. You sell it as a safety thing, of course.
That said, if it's the rope light that matters and the soffit is just a way to contain it, the best rope light solutions I have seen involved a free-form structure built down from the ceiling away from the edges of the room, like what you have at the first reflection point on the ceiling now. Just extend it back, give it a cool shape, and run the lights around the perimeter.
BTW I love that slatted wood look you have at the first reflection point, but wondering if it might reflect a bit too much. Maybe space the slats further apart or cut a "wave" shape into the supports so the surface is rippled ? Maybe extend the structure further back and have variable slat spacing, far apart over the FRP so the absorbing material behind the slats can work, then closer over the listeners ?
I could probably move the ceiling cloud back as far as I like. There will be no direct overhead lighting to compete with for space/shadows. I just have to ensure the position wont conflict with the tentative locations of future ATMOS speakers.
I plan on building the room and placing the speakers before the front wall is built. This way I can adjust and cheat the false wall forward or back as needed. Everything is precalculated to be pretty darn close already so far as I can figure. The program I am using makes it hard to triangulate the ceiling FRP with any accuracy. I have to draw it out on paper I think.
Increasing the spaces between slats is a good idea. I dont want to reject mid to high frequencies. I may also mitre the leading edge at 45 degrees to cheat a little more space in without being visible from the seating locations. Every little bit helps I guess.
See, I knew I wasn't done planning yet..... Will I ever be is the question.
I could probably move the ceiling cloud back as far as I like. There will be no direct overhead lighting to compete with for space/shadows. I just have to ensure the position wont conflict with the tentative locations of future ATMOS speakers.
It just occurred to me that a big cloud-thing in the middle of the ceiling would probably be an ideal place to hide Atmos speakers.
I've been planning for at least 30 years... it's the building part that I'm not so good at
I was always of the opinion that a theater room walls needed to be painted flat black. But after looking at these pictures, I'm kind of liking what you've done here.
I tried to design something that would be as welcoming with the lights on just listening to music too. A good balance I am hoping. Glad you like it so far.
Lauded home theater designer and constructor Dennis Erskine shares some of this projects and outlook on room design and acoustics. He touches on ATMOS and 4K video technology as well.
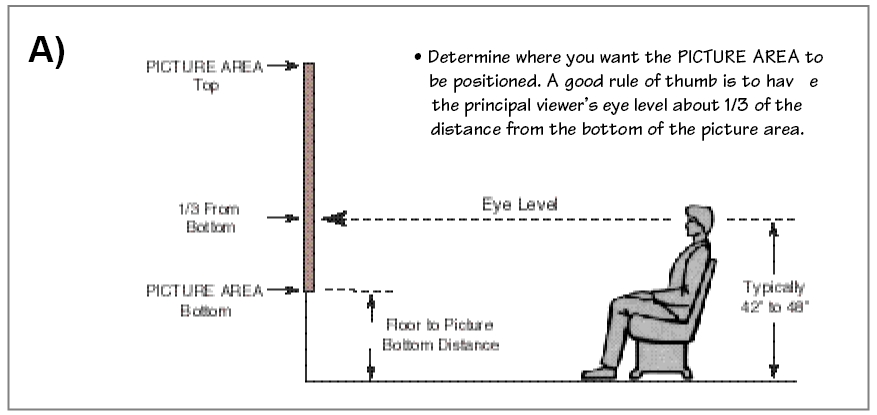
A couple of gems I took away from the interview was his notion of being able to bias the bass response by using 2 or more subs balanced to provide a "virtual" subwoofer location. ie. if the sub would be ideally located in the center of the floor, you can create this location by splitting the difference between the actual physical locations and individual gain settings. He states "the experienced typical ideal location for a subwoofer is in a moderate location in the room about 1/3 from each neighboring boundry into the room." He explains how using multiple subs can balance modal issues-- not necessarily smoothing bass response across all listening positions which he refers to as a misnomer. "Smooth bass is not the same as good bass. It only means same bass- good or bad." Very interesting.
Another tidbit I heard and echo again and again is the importance of the room in a design. To paraphrase: "80% of what you are hearing is the room. It is the single most important factor in the system- more so than the speakers themselves." He also favors engineered acoustic products over DIY. Go figure.
He also showed how he used acoustical panels to act as doors for storage cupboards and screen wall access. A great idea for access to the electrical panel and rear of equipment backing into the wall of my planned room.
Ok, so three beam options exist to remove the post.
1. Bolt C channel steel along both sides of the existing beam. Pros- easiest option, cheapest at under 500$ Done in few hours. Cons- beam still keeps its current protrusion into the headroom of the space.
2. 4 2x11 LVLs sandwiched together and sunk into the floor joist. Pros- beam now protrudes only 3" into headroom of space. Cons- more work and higher cost of approx 1000$
3. 8"x8" I Beam sunk into joist space with 2x8 laminated on top to hang floor joist from. Pros- beam protrudes 1.5"' slightly less. Cons- most work and lifting involved (over 400 lbs). Most expensive option at around 1200$ Most work to retrofit into current beam foundation pocket.
All three options allow the removal of the post and are suggested by an engineer as suitable choices. What should I do? What would you pick?
For those of you playing along at home (designing and building vicariously as I love to do as well)
THE WINNER IS OFFICIALLY OPTION 2
The engineering report and drawing is complete and approved for construction according to their strict specifications. The column can be removed. The build can proceed now as designed. Officially!!
Changing electrical runs in the basement to not interfere with LVL location is more work than I thought. Not so much the re-routing of existing homeruns, but re-feeding runs on the main floor that stopped in octagon junction boxes before going to the next floor. WHY?!
The house was built in 1968, so it seems every update made was in the form of feeding a basement junction and branching from there to the main floor.
Affected are:
Garburator Dishwasher Counter Cooktop (Spliced # 8s -WHY?! ) Garage feed (which is on the same homerun as the bonus room on the main floor ) Microwave In-Cabinet Range
I also have to fish in another dedicated 20A counter plug and re-feed the fridge- as there are no dedicated branches for kitchen counters. Things have changed since ole '68. Weekend mornings making toast and coffee at the same time result in the circuit tripping if the fridge compressor decides to play too.
Last but not least, all 4ft fixtures in the basement stopped in a junction and T off to the next light before feeding the fixture. Not a big deal, but strange.
Although the service is 100A, an upgrade to a modern 100A or 200A service is definitely in the cards. Haven't decided which yet. It may be nice to have the option to run a heatpump or instant hot water baseboards in the future.
BTW the existing panel is the definition of cheating. In every way. Oh how things have changed.
Yesterday was a very productive day. It helps when someone you rely on for help shows up while you are still in PJs with an armload of Tim's coffee. (or as we Canadians know it as- morning nectar.)
We had gone out for beers the night before and the topic of the LVLs came up.... so my alarm clock was "lets do this." Unfortunately, lazy me wasn't ready for the LVL install quite yet. I spent the day tidying up electrical loose ends. I said "Come back in an hour and I'll be ready." 8 1/2 hours later I called it for the day.....
Needless to say the LVLs didn't get installed. On the upside I took care of a lot of gremlins this old place had been collecting for the past 45 years.
Renovations often bring unhappy surprises. Mine was a junction removal that actually had a wire leaving the back of it into the floor above to feed the fridge. But not directly beneath it of course. After a half hour of troubleshooting, we were able to isolate the fridge feed from the others it was spliced into- only to find it has a buried junction box somewhere behind the kitchen cabinets. Delete and re-feed from scratch. Then we re-fed the dishwashwer only to find it had been leaking for quite some time when we pulled the front kick plate off. David Suzuki would be proud of my little hidden silverfish colony. A marvelous micro-ecosphere. Gross.
But all in all it was a happy day! Progress is progress and I can already feel the excitement of things to come. Here is the state of things. So far 5 existing junction home runs are deleted and replaced and the beam is finally bare.
Just remember that you are doing exactly what you said.... Fixing 45 years worth of issues. Fixing them now is a LOT better than having to deal with them later. The extra hours will seem like nothing and will be well worth it in the end.
Chipping away! Today was another step in the right direction. Shoring material picked up and built. Picked up all the joist hangers and LVL bolt hardware. Also picked up a spray foam kit for the rim joist.
The main floor feels like I could host a concert and it wouldn't budge. Sure strengthens the place. Each joist is supported by a 2x4 and angle bracing beefs it up a little more. All material will be reused in the final frame up once the beam change out is complete. Even the old beam material will find a home. I'm learning a lot and I'm sure glad I have knowledgeable help!
Progress feels good! I screwed up and the room is actually a little wider than initially planned (about 8"). The speaker VS sofa conflict may be a moot point now. I also found some cool software that Sirquack may have used back in the day for finding and verifying first reflection points before the room is built. The plan is to have sconces on the acoustic panels so this is a great find. Good ole Axiom archives.
I have been off of the forum for a long time, perhaps 7 years. Life has gone in interesting directions. Short story is I am back into this life and super excited. I'm planning a brand new theater room from scratch. I own a 7.1 on wall grand master speaker system. I have noticed that some folks out there choose to mount their QS8 surrounds on wall at about listening level or on the Axiom wall mounting bracket at ceiling level and point them towards the seating. I rather like the idea of the mounting them higher using the brackets but not sure its the best acoustically. Does anyone have any idea the pros and cons of each mounting strategy?
Due to the quad polar design of the QS series, they are very forgiving wrt placement.
My QS8V4s are mounted on our back wall at about 5' from the floor. Due to the odd shape of our room, they are far from being equidistant from the MLP; however, Audyessy takes care of any anomalies that results in excellent surround sound.
QS series are a great design & are highly thought of...
Unfortunately that room is no longer in my life and I have been floating through existence with only temporary solutions. The good news is I have a new home under construction and I have an 18x18 space that will be mine to do with as I DARN WELL PLEASE!
I still have my 7.1 Grand Master system which I will be using. I will need to get started all over again on most of the other equipment which will be fun. One major mistake I made on the old room was sound insulation. That seemed like the one place I was willing to skimp to try and save cash. I would like to do a better job this time with that but I still don't want to break the bank with decoupling walls and stuff. Does anyone have any thoughts on this? Double drywall? vinyl sheeting behind the drywall? inexpensive solutions?
My thread is polluted with broken links. The horror. Lol.
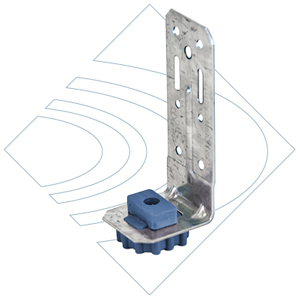
Welcome back Aaron. I've been working on my own "best for less" solution for sound isolation. I'm going with,in order, 5\8 drywall on resilient channel and roxul safe and sound on all sides. My common wall will be a 2x6 plate with staggered studs and roxul woven into it. The ceiling will have 1" spray foam on bottom of upper floor and then roxul with channel and drywall. 3 of my four walls are backing onto foundation so that's a plus.
Spray foam was the way to go for me as the subfloor is 3\4 tongue and groove. Too much work to seal with caulking gun. Each plate and header will be spaced with foam\neoprene to help reduce transmission of vibration. You can of course do much more... But this plan is already adding roughly 1.5K to the cost of my build over standard building strategies ie. a bedroom.
You are more than welcome to share this thread. Many questions you may have will likely benefit us both being answered. I put this up to help and get others involved anyway.
Wow that's a of good stuff thanks. I will take a look at the roxul. Looks pretty inexpensive which is great. What do you think of the acoustic mass loaded vinyl sheeting? From what I read if you put it between the drywall and studs it basically reduces the amount of bass vibrations that travel up the studs and into other areas of the house. Also is there any benefit to doubling up on the drywall?
One suggestion for the walls is to use 6 inch upper and lower plates, then use staggered 2x4's so that each one only touches one wall instead of both. Maximum reduction of vibration this way.
Is it too late to suggest something other than square (18x18) for the room dimensions ? IIRC the room would be large enough that the dominant room mode would be down at 30 Hz but it would still help a bit if you could get length and width to be different...
The only way for me to adjust the length or width would be to build out one of the walls. Would that really be that much of a benefit and worth losing the space in the room?
One suggestion for the walls is to use 6 inch upper and lower plates, then use staggered 2x4's so that each one only touches one wall instead of both. Maximum reduction of vibration this way.
Too late to edit: Also fill the wall cavity with insulation.
The only way for me to adjust the length or width would be to build out one of the walls. Would that really be that much of a benefit and worth losing the space in the room?
There is always a way to deal with problems if you are willing to learn(spend) and treat the space for anomalies. I say keep the square footage (literally square) even though it is the acoustically worst scenario. Room modes will reign supreme!
My room is a from scratch design. No accidents. Few comprimises. If you have the same latitude, you should take advantage.
Some notes on the room size... A "square" is an acoustical nightmare. 1 Foot difference in length or width will make a difference (pun intended) in the acoustical performance.
Staggered Stud Wall is what Catbrat is mentioning with the 2x6 top and bottom plates. I did this. You will need to be a little creative with a door, but this will help with a lot of the sound proofing. You will still need to do something with your ceiling (search Whisper Clips and Hat Channel). Floors are REALLY tough to do.
Do NOT "fill" the wall cavities with insulation. Fill 1/2 of the walls with regular pink/fluffy normal insulation, but leave the other side with an air gap. You want sound isolation, and stuffing the wall cavities recouples the inside and outside of the room.
Here are some pages with GREAT information (and pictures) on the subject. Look at the first link and note that it talks about filling in just some (most) of the air gap between the two walls with insulation in point #2
Here is the one graphic that I like. Think of the "his side" as the theater side. This has 2 layers of drywall on both the inside and outside of the staggered stud wall, with green glue applied between the layers. Now, I opted NOT to do the 2nd layer on the outside of the theater because the performance improvement really goes down at that point, but if you can swing it, do it.
Better yet, just go here and read all of the links within the link below. If you have questions, give Ted or John a call. They will give you sound advice without trying to "up sell" you on things that you don't need. You can certainly get products like Green Glue and the Whisper Clips elsewhere, but their prices are good, and they really helped me out.
Or you can ask me. I've gone through so much of their material and others. Their website and Ted and John both give real and true assistance and are considered one of the best and most helpful soundproofing companies out there.
One thing that surprised me recently was that low frequency waves didn't seem to care much for my spindly little internal walls, and only the solid external walls really seemed to contribute to standing wave formation. That might turn out to be good in your case, although I imagine that doing a good job on soundproofing would make your walls have a greater effect on standing waves.
Any chance you could post a floorplan pic ? Not just the room, but the entire floor including exterior walls. I have this crazy idea that you should soundproof three of the walls and leave one untreated so your room *acts* rectangular even if it's actually square.
Without naming names, there are some frequent posters here with square rooms who might be able to offer more useful advice than me.
Below 200-300hz the walls become less effective at blocking sound transmission. Room modes are thought to be augmented by bulking up walls, as you allude to, but they are best dealt with by dimensions and bass trapping. Planning on a single flimsy wall and beefing up others unfortunately is pouring money down the drain.
Square rooms are best set up in a corner firing along the diagonal. Parallel boundaries are bad news. But all in all, best avoided.
Curious to hear what square room folks have to say.
Planning on a single flimsy wall and beefing up others unfortunately is pouring money down the drain.
For what it's worth, I wasn't recommending beefing up the other walls to deal with room modes -- it's likely to happen anyways (based on where the thread is going) in order to provide some soundproofing and I figured it might be possible to get a free ride from that work...
... I was hoping there might be an interior wall where soundproofing could be skipped, reducing the impact of the room modes. Then again if it's a full blown HT build it might be possible to add some serious bass trapping without adding a serious pile of ugly in the process.
Originally Posted By: Serenity_Now
Curious to hear what square room folks have to say.
I have this crazy idea that you should soundproof three of the walls and leave one untreated so your room *acts* rectangular even if it's actually square.
sorry I assumed thats what you meant. Oh the interwebs...
sorry I assumed thats what you meant. Oh the interwebs...
Yeah, it would have been better to work a bit of context into my comment and say something like "I have this crazy idea you should leave one of the walls un-soundproofed...".
I am guessing my wall plan of 5/8 on channel with an insulated staggered stud wall will net me an STC at or near 50db. I think the weak link in my dividing wall will be the french door with a large glass area in each. Might look at custom making doors with spaced double panes. Prehung french doors would be so easy though....
Hey Nick, did you ever get your cooling scenario figured out? I stumbled on your thread while trying to find cooling and air turnover specifics. I'm thinking I may put a thermostat controlled motorized damper inline ahead of the main and second floor tee-off point. My thoughts are that if the room gets too hot outside air will be pumped in and out at the full CFM the HRV can muster. Theoretically, at max would turm the room over just over three times an hour. Hopefully its enough..... A dead vent will add another weak link in my wall.
New HRV and whole house replacement windows showed up friday (old ones were single pane when we bought ) Installed 5 windows today. HT on backburner... again. Poo.
I had a long post and accidentally closed the tab in Firefox and lost it.
Ugh.
Soundproofing... I spent probably no more than $600 more for extra studs, drywall, clips, hat channel, insulation, green glue, and the custom ordered door and sill plate. VERY cheap considering the enormous impact it had on soundproofing the room. I can play things pretty loud without disrupting my wife watching Dancing With the Stars.
Here is a video that I've shared before. Just watch the first few seconds of it. This was from a year ago. I had the movie Oblivion playing even louder than I normally watch movies, and start the video with the door shut. Yes, you can still here the video outside the room, but compared to when I open the door, it is a huge improvement.
My wife wanted french doors too. There are several problem with that. They aren't soundproofed at all, they rattle, they are pricey, and they let light in. In talking to my wife, she said, "just put a curtain over the window." Well, what is the point of having the glass door if you just cover it up. After going with the solid core steel exterior door, she is OK with it now because of the above mentioned ability to watch DWTS without me disrupting her.
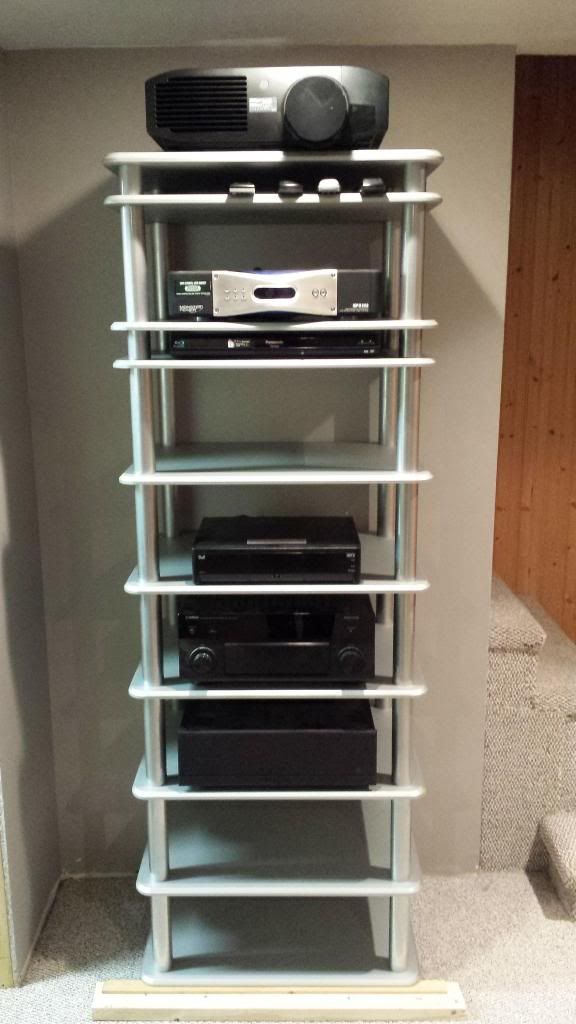
As for the heat issue, I haven't quite figured it out. I know that I need to get air out of the room, so a few weeks ago when I finally did my equipment rack, I put in a 250mm fan above it to blow air out of the room. This *should* work when the A/C is running as it gives the A/C a place to flow towards, however the weather has been too nice to really have the A/C on. It won't help much in winter since there is no source of cool air.
I think that my final plan will be to change out the fan for a direct air return for even more exhaust pull from the room, then in summer when the A/C is running, it will work even better than my little fan that is just blowing into the basement ceiling joists. I then will need to be able to set up a powered fan setup to pull air from outside in the winter. That would give me my source of cool air for those months and I would just close the HVAC vents and put small covers over them to seal them better. Then for the hot and cold times of the year I will have cooling to the room and something to pull the hot air out. Spring and fall will become the issue at that point, but having something working the rest of the year is a big improvement. I really should get going on figuring the winter cooling out before winter is actually here.
I then will need to be able to set up a powered fan setup to pull air from outside in the winter. That would give me my source of cool air for those months and I would just close the HVAC vents and put small covers over them to seal them better.
Sounds like a great idea. Learn from my mistakes and make sure you have a *very* good screen to keep rodents & bugs out though...
Sounds like a great plan, Nick. I read through your other thread and others. Mini-splits are popular, but come on! Spending upwards of 1-2 thousand for a single rooms HVAC? Better planning could have saved those blokes $ considering a minisplit doesnt exchange air.... Some of them are pretty militant about it too.
I'm wondering about the need for heating in the space. If I am thinking right, I should be able to get away with heating the common area just outside of the room with hot water baseboards. I might try to find a big old rad. They are cool.
When we are in the space with the doors clsed it should be pretty toasty. When not in there I can leave the doors open and warm air should circulate through. I wish I knew more about HVAC.
bridgeman, the furnace in our house isn't a "high efficiency" one, so it needs a supply from outside already for fresh air. I doubled up the screen on the outside vent, and put a doubled up screen where it comes to the inside as well. I would do something similar for the theater.
Serenity_Now, for future resale, you might want some type of heating in the theater, just plan on never needing to run it. To date we have NEVER had the vents open in the theater when the heat is running. Even in a cooler basement when the door has been open and the temp is a touch cool. Fire up the projector, put some 3500 BTU/hour people in there, and you don't need heat. But having it for whenever the day comes to sell, or even if you get an appraisal, most places count finished square footage based on a couple of factors, including a heat source (they don't care about A/C oddly enough) in each living space.
Thanks for all that sound insulation advice. Lots to take in and I am trying to stay inexpensive so I will do my best with it all.
Sorry my facebook privacy settings don't allow the pics to show. Not going to change those settings though. Is there another way to post and share pics on this site?
Also I am looking for seating. Trying stay inexpensive as well of course. My hopes are to find reclining love seats or couches but with cup holders. Most of the seats I am seeing all have dividers in them. I have a lot of couples over the house and usually the ladies complain about the separation of the chairs. Any options anyone knows of that are recommended?
My room isn't exactly square. At the largest lenth and width it is 18x18 but the entry of the room is bumped in about 4 feet on one side of the room making that side of the room 18x14. I am not sure how to get a picture of the room posted here. I have a floorplan but the only way I can see to upload pics is to load to facebook first but I have privacy settings I am not willing to change. Maybe there is another site I can try?
Usually cupholders means dividers. I've never seen a sofa with cupholders just on the ends. If you find one I'd be curious to see it too. Hopefully you find it in leather.
Other Options maybe:
Coffee table End table Serving tray on ottoman Sofa table behind couch to put drinks on
I remember reading somewhere that if you can afford the loss of space that 2 separate walls with no plates shared is the best....and then I thought what a lot of work/expense/space...
I was designing a video conference space for my employer and needed sound control. I called an engineering firm that was owned by a grad of the university I worked for, and he mentioned extremes of sound cladding all ventilation ducts and runs - both inside and out.
Here are the theater seats that I got. About as inexpensive as you can get. I set mine up with a loveseat option in the middle, but they could have loveseats on the sides (like 2 loveseats connected), or just like a couch with 4 reclining seats and cup holders on the ends. Now if I could just remember the company that sold them.
Found it. Seatcraft Eros seats. Pretty much all of the companies that sell it are really the same company with different names/websites.
They are about as cheap as you can get for reclining theater seats. They are NOT leather, but have held up really well even with a cat and small dog.
Best seats out there? Heck no. There are many times that I wish I would have spent another $1000 on seats with higher backs and longer footrests, but they do fine for a 2 hour movie. Problem is, in order to remove an armrest, it actually costs more money. You are looking at about $1500 for a "couch" layout of 4 seats (a little over $1400 after their 6% discount that they ALWAYS seem to have). That does, however, include free freight shipping to your driveway. You can pay for delivery and setup in your house with any of the stuff from those places.
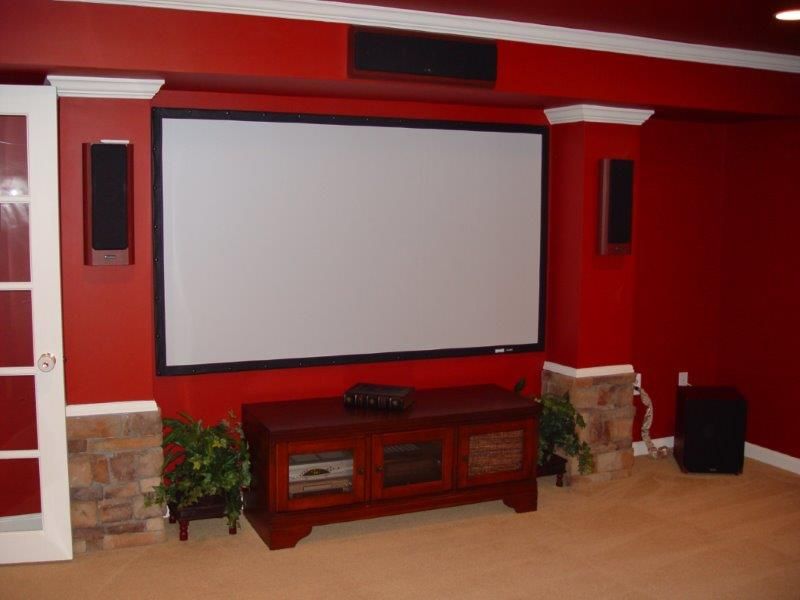
A few things I learned quickly was that I paid no attention whatsoever to sound insulation and I shouldn't have mounted my center channel above the screen. Since then I have also used the trade up program for the 350 Sub and the QS8 surrounds. I am now shopping for a new receiver to power the system. I have enjoyed Yamaha recently mostly for the ease of use. I used Denon in this theater but really hated the sytem menus.
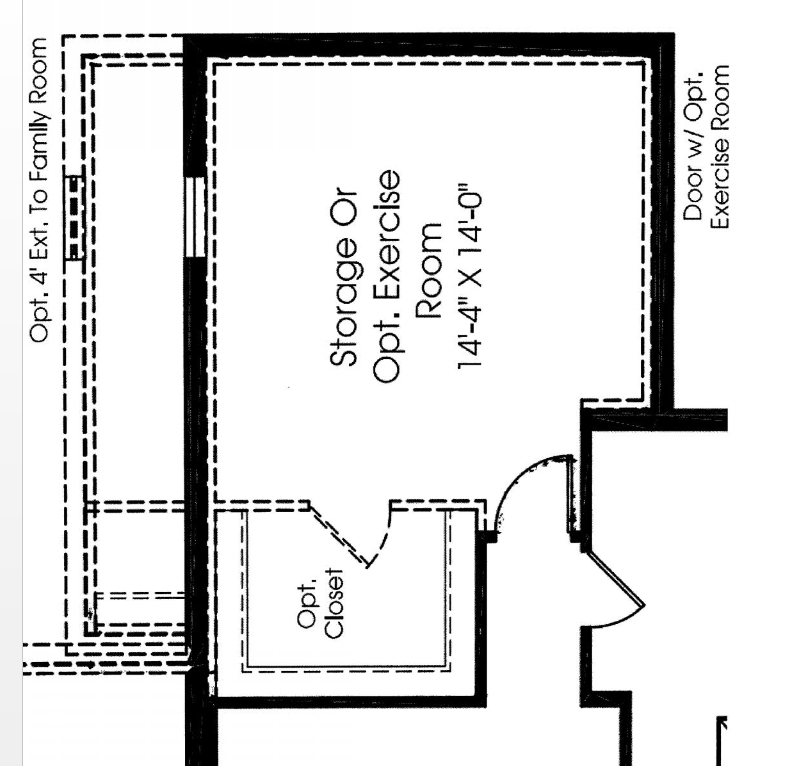
Someone asked to see my theater space. Here are some pics. The first is a copy of the floor plan. Its an exercise room that I am converting into a theater. Currently unfinished. The diagram shows a 4' bumpout which I will have and a closet which I will not. The room is 18x18 at the largest points but you can see that with the entry way the rear of the theater room will be smaller. [img:center]http://s1371.photobucket.com/user/aspice...?sort=3&o=1[/img]
In photobucket choose the direct link to post images here. The address should end in .jpg. Preview your reply before submitting to check links. Hope this helps.
You may want to edit your settings in photo bucket so your entire image library isn't public if you want.
Your old room was nice. You are renovating the same space?
Thanks I will check my settings. Not renovating. I actually don't live there anymore and have rented that home out. I am having a new home built and starting from scratch with the exception of my Epic Grand Master on wall speakers.
Any thoughts or suggestions are welcome as the home is in pre construction right now.
I'd have the hallway partially removed, so both sides of the room were the same. The alcove behind the rear seat would remain. This would allow your rear overhead speakers to be located in more ideal locations and center your rear seats.
The adjacent room to the right needs the hallway for the entry door. The HVAC and Sump Pump is in that room and there isn't another wall to place a door for entry there.
I suppose I could remove the hallway and have the access to that room through the theater but I was planning on finishing that room and building a closet door to the HVAC. That room will be the kids toy storage room for the basement. I would prefer not to have the kids running in and out of my theater room to collect and put away their toys.
I suppose its a trade off. Do you think my sound will be greatly impacted by the decision to leave the hallway there?
- stand at entrance to hallway (facing "up" in the diagram) - starting at room corner on your left, angle up and to the right 45 degrees until you reach other side of hallway - starting where you reached other side of hallway, angle down and to the right cutting off a corner of the toy storage/HVAC area - door to HT goes on the first new wall, door to toy storage goes on second new wall - depends on whether the corner of the HVAC/toy storage room you just cut off had anything important in it, like the HVAC
anyone want to talk projectors? I'm probably in the under $2000 budget range for the projector only but there are some packages out there I am considering. VisualApex.com has a package that looks initially. http://www.visualapex.com/projector-pack...p;Screen=FF_100
Actually I just noticed that the left rear side of the room will have a bumped-in corner, so if you were to shorten the hallway to match (or even be a bit longer) you would have room for a door to the toy storage area, wouldn't have to cut any space out of the HVAC/toy room, and would still open up the space to the RHS of the rear couch enough to make (IMO) a difference in sound.
You would also be able to move the right rear speaker over to the right a few more feet (as long as HT door had some kind of stop so you didn't hit it, or if the HT door opened outward with hinge on the left) which would balance the sound a bit more.
EDIT - if you felt like going overboard with sound control you could also put a second door at the entrance to the hallway. The local gun club has a double door arrangement like that and it really makes a difference in the amount of sound that gets out.
Quite possibly true but I'm a tad to proud of my Axiom speakers to hide them behind a screen. Also isnt it pretty hard to find a transparent screen that will reflect a high quality image?
anyone want to talk projectors? I'm probably in the under $2000 budget range for the projector only but there are some packages out there I am considering. VisualApex.com has a package that looks initially. http://www.visualapex.com/projector-pack...p;Screen=FF_100
Not sure that I would get the whole package as most of what is included really is fluff. The VA screens aren't bad at all, but they are considered an eco screen for sure. The generic universal remote certainly isn't a big deal, nor is the Disney WOW disc (I have it. Put it in once, and never touched it again.). IR Repeater. I built my room to handle an IR repeater, but I never installed it as my screen reflects the signal just fine without it. The mount is fine, but it is only worth $50.
Plus, do you NEED the 5030UBe over the 5030UB? You are paying around $300 more just to not have to run just one HDMI cable?
I would say that if you were fine with this price point of $3124 (I know that you said "under $2000), I would go with: Epson 5030UB - $2500 AV-817U Mount - $50 Seymour XD DIY Screen - $110 for fabric, $50ish for wood for frame + glue/screws/staples OR Jamestown Seymour XD Screen - $500 for 110" including frame. Assembles super easy (A friend of mine bought one of these and it looks great) HDMI cable - $35 from monoprice for a good quality and long one.
That comes to $3085 for the non-wireless projector, non-DIY screen that is better, larger, acoustically transparent, and assembles is 30 minutes, the mount, and an HDMI cable. Better quality screen and less money.
If you don't want an AT screen, then the price is even less and there are other options. (Jamestown has non-AT screens for $195 for 100" matte white, and $225 for 100" high contrast gray)
Depends. I would think with the Epson, in a room with fully controlled lighting, I would go white. The high contrast gray absorbs more light, but gives the illusion of deeper blacks by, well, being gray in a room with ambient light vs. more reflective white. That is why teh matte white will be rated around 1.0 gain, but the high contrast grays are usually 0.8 or less.
Long story short. If you can control the lighting in the room, then go white.
Wow $150? DIY is probably pretty easy on a screen huh? I have never done it but in my past I was an oil painter and used to stretch my own canvases. I assume its the same process?
Well its been a few weeks since I made any progress on the HT and this weekend is no different. Windows, trim and dump runs have been filling my spare time.
This weekend I was able to break away to make something cool for the listening room though. A mini project. Acoustic Panels v2.0!
They now belong to Mojo somewhere in Calgary. Hello Mojo if you're out there.
The new panels are constructed out of a 1/2" MDF frame and surrounded by Foam crown moulding. I found a local weaver at the farmers market to custom make wool fabric panels for them to match an existing rope wall hanging behind the listening position. Screening in the fiberglass batt insulation(owens corning 3 5/8" quiet zone) is greyish sheer fabric. They look great and most importantly were cost effective. Treatments can get silly expensive quick, so DIY all the way! Total project cost for this was just under 200$- the bulk of that being paying for custom woven fabric panels.
Here are the new panels.
The reason I added them to this thread is this will be the basic layout for the panels in the HT room. Fabric and trim paint will change. They were just too easy and cheap to make. Perfect! The plan will be modified to be longer and house an octagon extention ring for panel mounted wall sconces.
As soon as they were hung straddling either side of a 3 panel patio door we noticed the room was less echoey. These are not going to be used for FRP but strickly for slap echo in the room. So far so good.
Nope under a 2 storey. That cutout was the future home of LVL. Previous beam sat under floor joist atop the offending column.
Waiting for shoring walls to come down. Then pics. Today was another busy and chemical filled day. Promised my buddy I'd wait to pull the walls down together. A ceremonial unveiling.
Either your cooking meth or working on home renovation.
Peter, Peter! I always held you in such high regard as a keeper and guardian of the language. How could you let me down like this? Go, right now, to the bathroom mirror with a Sharpie and draw an apostrophe on your forehead!
Nope under a 2 storey. That cutout was the future home of LVL. Previous beam sat under floor joist atop the offending column.
Waiting for shoring walls to come down. Then pics. Today was another busy and chemical filled day. Promised my buddy I'd wait to pull the walls down together. A ceremonial unveiling.
Ok one pic. The more polite one. Lol.
You're lucky you live in Canada, Trevor, because everything in that picture would be a U.S. code violation. Nice hazmat suit, though. I'm kidding, but not about the suit.
edit: Wait! I just though of a meme for your pic. "Living so for from the epicenter, friends found Trevor's fear of ebola to be unfounded."
So, there has been some concern about the removal of the column. Here's how it works. The new LVL beam clear spans the space where the old column used to support the main floor. This is all spec'd by an engineer (who has yet to send me the bill for some reason.) Detailed drawings are provided based on caluclated loads etc. engineer stuff. They spec the LVL size, bolt patterns, etc.
The temp walls are down and boy o boy am I excited!! The pics earlier were from yesterday where we got the beam up and installed. Here is where we were when we set the tools down. I WAS PUMPED!!
We had the LVL assembled and up in the pocket and sitting on the remaining column we were tying into. Today I bolted the beam together and finished installing the remaining joist hangers.
DIY tip, if you use a plastic bag to remove goop from your hands you dont get the paper towel lint going on. PL premium is a bitch to get off your hands.
Here is where I was at by lunch today:
I spent the afternoon spray foaming the Rim joist and the screen side of the theater ceiling. I ran out before I got to the second half. Oh well. I've already used 2 kits and at 300$ a pop they are too expensive to buy 2 more to finish. I'll double up batt insulation in the back 1/2 of the room.
Here is how the foam looks:
After my building pal got off work we took down the shoring walls and stood back to appreciate the job. What a job it is. Before you do anything like this ask yourself one thing. How home theater obsessed am I? I guess you already know how I answered.
Here is the current state of affairs. There are a couple of shots to let you know how the clear span is secured to the existing structure.
Lastly this is the "after the hurricane set the house back down" pic. Code violations were mentioned before. If you can find them all in this pic, you win a prize. All this stuff is very temp btw. I think I'm going to wear the suit to bed tonight. Kinda warm and comfy. Off to eat pizza.
Be careful about doubling up the batt insulation in the other half of the theater. A decent air gap helps with sound proofing. The spray insulation doesn't do much for sound proofing anyway, but for thermal separation, and the thermal difference between 1 layer of batt vs. cramming in a second layer is very minimal unless insulating an exterior wall.
Ooh, nice. I really like LVL beams -- there's one about 50 feet long holding up my house. A million or so 2x6's support the LVL beam, LVL beam supports the roof, roof stops the walls from falling outwards... or at least that's how the engineer explained it.
If I could do it again I would not have spray foamed the ceiling like this. It isn't thick enough to do anything but air seal that area from above. I rationalised it in my head because we have hardwood floors on main. The screen half is directly under the dining area where the chairs skate around on the floor. That side is also where a dishwasher sits above. I have yet to do any real sound tests, but a quick "stomp, talk and scoot chairs while I'm down here" test revealed the sound was only muffled slightly. Still could hear easily... Oh well. At least our farts will stay down there I guess. .
Today I have to jack hammer out the remaining 2" concrete pier and re-secure the existing wiring. We gained 4 1/4" of headroom under the beam. Now I have to decide if I want to sneak a duct alongside it or drop them in the double wall (which is now happening.)
I'm starting to frame the exterior walls and have come up against an issue. Can anyone tell me how they seal the rim joist area above the top plate where the wall is perpendicular to the joists? I get I have to vapour barrier the wall, but it seems pointless if the area above it in the ceiling space is left wide open. Holy cow is it hard to find a straight answer online.
Slit and Fold vapour barrier over top of wall at each joist and attach to foundation sill plate/joists with acoustic-sealant. Insulate entire area above wall to rim joist.
Good weekend. 80 studs installed. 80 waiting to go in. I made a spreadsheet with calculated materials to budget the project and keep costs in perspective. In the original estimate I budgeted 90 studs..... I hope this is the only big whoops in estimating.
Perhaps, but man are my knees sore for it. Getting old. I'm on days off right now so this is my temp "day job." The whole house is getting a minor facelift slowly too. This space is more fun though.
The framing stage is pretty much finished now. Tomorrow I will be looking at making a rough layout on the floor with tape and my major tool will be a calculator. Time to actually mock up the room for speaker/treatment/lighting locations finally. I am comitted to the double wall. The STC rating of 60+ was just too enticing. I'm hoping the extra in the wall will make up for the loss in STC at the door.
I should be able to hammer out the electrical in a day or two. Might do the HVAC first. Then finish the bulk heads. Having spent time drafting and making this thread was an awesome idea. Every time I get held up from the decision commitee I have evidence I have thoroughly thought things out. A huge plus when the eyebrows come up!
3 studs left of 80.
A look from outside the room to rear.
A look from outside the room to screen side.
Future French door location
The camera on this thing is showing its shortcomings I know. Not a very wide field of view, eh?
So what did you figure out for a french door with good soundproofing capabilities? Not that I want to change mine out, or tell my wife that something exists since she wanted one, but I thought I would ask.
I havent figured out anything but its size so far. Most likely it will be diy using sealed double pane inserts and layers of mdf. I'll keep you posted.
I insisted on a door and she insisted on an open passthrough. This is our comprimise. It came up today after I double studded the wall. "This is staying open, right?" she said.
^^^ You could also add a sensor, motor, and a small sound setup and have it automatically, open when someone walks up to the door with a "Star Trek" like whoosh sound
I can't imaging going through the efforts of all of the soundproofing just to have a massive hole that lets out most of the sound anyway... I read somewhere that there was a calculation based off of room size, opening size, and of course db level as to how much sound was actually escaping a room through that doorway. It was a surprisingly high number. Pretty much a "don't bother soundproofing without a door" type of number for most spaces.
There is a "strong wall/weak wall" calculation in one of my books somewhere. Basically, you can calculate total stc by adding sq. area of each value at different weightings. Way too involved for me.
I almost passed out when she said that. Good thing she came around to what we had agreed upon earlier. I heard in my mind a toilet flushing and saw $ going down it. I think it was a reaction to how cut up the basement seems now. It should look larger once drywalled.
I have left a 1/2 inch gap between the double wall and floor joist above. Right now it is temp pinned with deck screws. Should I beef it up or leave it as is? Concern here is decoupling, but I dont want the wall to fail either.
You still want the walls to be structurally sound. Yes, some flanking sound will go along the ceiling joists between the two walls, but unless someone uses clips to isolate the walls from the ceiling:
I didn't do this and I am very happy with the soundproofing with my staggered stud wall for 2 of my walls (the other 2 were basically double walls with the inside studded and the outside concrete with a 3 inch gap). I then focused on decoupling the ceiling, and doing double drywall and greenglue. If I could prevent a lot of the noise from even getting to the ceiling joists, then it wouldn't matter for the flanking sound. It too seems to work well.
So long story short, nail those suckers in at this point. Short of starting over and using those hangers, the walls are touching the joists anyway.
I have read so many threads where there is zero tolerance in soundproofing, and others rail someone for cutting a corner. In reality, how would I know the difference unless someone like you, WITH EXPERIENCE ,chimes in.
Yup. Some people go all out nuts. I thought about the hangers like the ones I pictured above, but the more I thought about it, my weakest link would still be sound getting up through the ceiling, so instead I put my few extra dollars there to try to keep the sound from ever getting to the joists in the first place. Or at least stopping as much of it as possible.
Slit and Fold vapour barrier over top of wall at each joist and attach to foundation sill plate/joists with acoustic-sealant. Insulate entire area above wall to rim joist.
Sounds like I'm good to go.
Sorry i hadn't seen this earlier or i could have replied. This is pretty standard practice for running vapour barrier into the joist ends or at the ceiling, however most builders don't bother with the acoustiseal caulking. I however do and thankfully, (but with exception in our basement), the rest of our house was constructed in this method. I was pleasantly surprised to find the tarry black substance while drilling down from the attic into a wall stud below.
Thanks Chess! Luckily I'm nowhere close to that step yet. Just thinking ahead I guess.
Been busy with tying up loose framing ends and starting electrical. All boxes are mounted and basement is half pulled. Theater side is close to done. Have to finish lighting zones and low voltage wiring. 2" PVC conduit ran to front and back of room at center of each wall. Front will get LCR, IR and sub feeds behind false wall. Rear pipe will get ethernet feed and HDMI for projector.
We decided to incorporate the oppo into the rear media shelf, along with the blurays etc. Now there should be no reason to go into the main av cabinet when others are in the room with the harmony remote. The rear 2" sleeve tees off to the projector and carries on down the wall to hit the oppo at end of line.
So far I am at 4 dedicated theater circuits. Back wall, side walls, subs, lighting. 5 if you count the 20A ups feeding the av rack outside the room. I am also roughing in for a future TV mount location, should we ever decide to sell the house. The TV location will have a plug at standard height and a plug at 5' directly above. This will also feed a TV loction in the workout space adjacent.
The panel swap is tentatively scheduled for Friday. Hopefully it goes off without a hitch. Feeds coming in from meter base are long enough to reuse in the new panel. Bonus! We are moving up to a 100A 32/64 circuit with surge arrest panel.
Things are really chugging along. Goal is to get inspected late next week and order drywalling material. Have to call a plumber to get a heating zone installed outside the theater too. Inside the theater will be a 240V panel convection heater, should the need arise. Now about that HVAC. Things to do....
Serenity_Now (insanity later??), What remote - with RF, right???? - are you going to use? After all, it's the one device you'll use more than *ANYTHING*
I'm a staunch URC fan (having used Harmony 990, and One). Just thought I'd ask.
I actually received a harmony (650 I think) as a gift from my wife. It has lived in a box since we've moved, so its pretty much new. If in the future the need arises, I'll definitely give URC a close look. Thanks.
Geez, its been so long that all my gear will feel like new again. I love that new gear feeling. I have 2 power amps I bought just before leaving Calgary that only left the box to be tested.
temp post as former self. keyboard is broken and underscore wont work. this will be an all lower case post. no shift key function....
i am at the point of starting to pin down all the technical aspects that make a theater a theater. lighting is set. zones are layed out. lots of circuit power headroom. now i have to ask a couple of questions.
1. projector mounting. i ran a little test with the planned ceiling mount location of the pj for stability.
i made a makeshift pendulum with a lazer attached to one end and fixed to the floor joist. i had someone walk around like a dinosaur upstairs and observed the bounce at the other wall of approx 5 inches or so from plumb.
without resorting to a wall shelf mount situation, what is the best option to eliminate vibration short of major structural stuff, of course.
2. i have roughed in the pvc conduit and 2 double gang boxes for the av rack location outside of the room [see first post]. they are about 1' apart and the top power box is about 8 inches below the conduit. these are fed from the ups located in the mechanical room just behind me taking this pic. comments or concerns welcome. i defer to those pioneers before me.
p.s. nick and chess your lighting ideas from earlier are part of the room. kudos to you both.
Ah, the advantages of a concrete ceiling and having nothing but roof above me. If anything is stomping around on my roof hard enough to rattle the projector, I gots bigger problems.
without resorting to a wall shelf mount situation, what is the best option to eliminate vibration short of major structural stuff
Carpet (thicker) upstairs? Rubber between the mounts and floor joist along with rubber or cork between the mount and PJ?
We used parts from 3 AV towers, not sure this would work for you though. This was a test fitting before it went in the room. I ended up spinning the tower 90° but the components still sit as shown. The PJ was also turned to fire towards the screen.
Note the remote shelf... PS4 sits in the mid height empty shelf.
I like your rack idea. I have to ceiling mount in this case because eventually we may do 2 rows of seating. Head shadows are the worry here. I have to get the projector closer to the future planned "bar stool row" behind the couch.
I was thinking about it last night... Consider the current depth of your floor joists, use one size smaller spanning the same direction as the current, these would be supported at each end but not connected to the existing floor. Only the PJ would be mounted to it and once covered no one would be the wiser. You'd also want to re/add support below them.
Or,
Place a sheet of plywood across as many floor joists as possible. This should add some rigidity.
Edit: Sorry, looking at the current electrical runs, the first idea will not work.
I like your rack idea. I have to ceiling mount in this case because eventually we may do 2 rows of seating. Head shadows are the worry here. I have to get the projector closer to the future planned "bar stool row" behind the couch.
Head shadows suck but not nearly as bad as I thought it would be. As its sits our PJ has +/-2" clearance from the (7'2") ceiling. It works. Good news, this room ended up being mostly for me, no shadows. Its all good.
I might try to add blocking between the joists and run the test again. If still bad I'll add plywood to the underside and omit the resilient channel for that small section. 1/2" drywall would work and would be invisible after completion.
i am trying to pin down locations for the atmos pre-wire. in the last couple of months i have watched several vids with interesting, although differing opinions on the 'correct' overhead atmos layout. front wides would be nice, but i have to draw the line somewhere...
here is the latest and greatest speaker layout i will be using as a plan for work tomorrow. thoughts [question mark.] the 'base layer' surrounds are already finished.
i will be landing backer boxes for them for sound isolation. i wont be able to move after drywall without some serious mess. it sucks having to do this without even having heard an atmos system before. big guessing game.
You should consider placing them in line if possible. Your rear surrounds and top middle pair look right, can you/would you be able place the top rear pair inline?
Grimani talked about the front heights being pushed forward and just inside of the mains. He didnt mention anything about the rear heights, so I went with the dolby layout for them. I think the Grimani layout omitted rear heights in favour of front wides.
I'll move the rear heights inline with the front heights. Front heights will stay put.
I wish I could jump on the Atmos bandwagon now but it'll have to wait. Placing them in line with the mains (slightly narrower as per Grimani and your current layout) should work perfectly. I look forward to hearing your thoughts on the inceiling M3's once its all set up.
Some other thoughts. "Side" surrounds are OK where you have them, but unless the seats recline, you might want to slide them closer to be more 90 degrees (in line with) compared with the actual listeners ears. Like I said, it is still within Dolby specs to be slightly behind. Some people prefer slightly in front of the listeners ears, but that hasn't been something that many "experts" have talked much about, just people experimenting.
I hear ya about the M3s for Atmos overheads. I just bought four on-wall M3s to replace my four QS8s, but who knows. I may end up with some hybrid with a 9.2.2 setup. Change out my QS8s for the M3s, shift one pair of QS8s up to be "wides", and then sell the other QS8s and VP150 center that I already upgraded a couple of years ago and get a pair of M3s for the overheads.
Girmani likes dipoles for the wides to fill in the space, even though Atmos says that they want all direct/monopoles all around.
Who knows. An 11 channel Atmos receiver is still over $2000 by itself.
I'll see what I can do about sliding the side surrounds forward a bit. I dont have too much wall to work with there. I also have the ability to add 1/2" ply around the box to give mounting flexibility once I see how much real estate the door trim and acoustic panel leave.
Thanks brwsaw for the ply idea. Way easier than 2x4 blocking for future proofing.
I agree with you Nick.
My receiver was 2k less than 2 years ago.... Another receiver so soon is tough to do right now I know. . I'm hoping oppo or someone releases an ATMOS stand alone processor that I can add to what I currently have without taking a hit on selling my now "antique" receiver.
ok i've got the main trunks ran and split off to the room. i am using 4inch flex duct for the last 10ft or so of the return and supply runs feeding the room. voila.
i've read that to ensure the vent is dead silent there must be a box before the exhaust\supply point. apparently this creates a lower pressure zone and the air slows down enough to change any audible whistle or whatever in the vent opening. i'm not even sure 100cfm is enough of a breeze to cause an audible vent noise, but i'm airing on the side of caution. [surprise]
to purchase something ready made is not easy here on the island. a lot of blank stares today and 'go see this guy over in stratford' a whole other town.... once i did finally find someone who knew what i was after, the price was 160bucks for a sheet of rigid linocoustic. duct not included.
diy to the rescue. here is what i came up with for now. eventually i will have to track down something to put into the box if i need to deaden the vent a bit, but that can be done after from the vent opening. there are 2 of these made. one for each of the supply and return 5inch diffuser locations. they will mount in the stud space beside the door and just outside the screen wall at about 6 inches from ceiling to center or so. i am hoping this is enough for ventillation in the room. it is powered by a 160cfm hrv unit that will exchange the rest of the house too. inside the room i plan on having a 3 position switch to turn the system to on then to high if needed. i thought about the whole 12v trigger relay auto turn on and off thing. doable but dont feel like doing up a relay box etc. in my already cramped mech room.
does anyone know of a good product to place inside a vent to muffle sound from escaping\entering a space[question mark] i'm not sure i'll need it with the flex duct, but better find a solution for down the road....
in the unlikely event i need heat, a 1500w wall panel convector is going in on the rear wall. i will set it at 18c or so and it will likely never turn on. a\c is not doable. too expensive to install and run later.
Due to escalating reno activity elsewhere in the house before winter sets in, my basement funds are temporarily exhausted. Subbing out work gets expensive, but I dont own a backhoe
Probably a good time to take a breather due to the holiday season anyhow.
Merry Christmas everyone! More updates and consruction in the new year.
Fiddling around with loose ends. HVAC (HRV) finally up an running. The rain quit long enough for 5 hours of beautiful weather. I got to work putting in exterior vents.
Coming from Calgary, this weather for December is totally strange.
Even though the basement is not drywalled, I can definitely feel the air circulation in the theater space is going to work well and be fairly silent. With my ear inches from the supply I can only hear air - no mechanical noise. Cool beans!
When I switch the unit from low (where it will run normally) to high (where it will run when shower control buttons are pressed) it literally feels like I'm in a light breeze. I have prewired for a 2 stage in room t-stat to handle temp swings automatically.
I am starting to get into looking at ordering room finishes. I'm starting early so by the time I need to make decisions I have left ample time for my wife to be involved in the choosing process.
I have plans for a DIY door involving 4 layers of 3/4 MDF and 2 plates of glass (planned with one plate @ 1/4" and one plate @ 1/2" per door spaced at 2".) These will be built and hung before the room is drywalled to allow proper sealing and beefing up DIY casings. We are heading to HD tonight to have a look at colour schemes for carpet/paint/trim/woodwork. This way I can keep finishes in mind as I am sealing the area between the plates of glass. I've been warned the door can't be a mcguyver hackjob. Huh?!
I also went to a local AV specialty store to try to source an AT screen locally, or at least find out about pricing. The first guy didn't even know what I was talking about. He was the owner..... "I'm looking for an acoustically transparent screen for a front projection theater." Pause. "You know, where you mount the speakers behind the screen at the front of the room." Pause...... "Is that a 4K tv?" I guess they dont get much call for these where I'm at.
The second fella in the store, a seasoned installer, knew exactly what I was after and quickly jumped on the phone. I got a quote for a screen from the distributor for a Draper fixed frame woven AT screen at 110". He was pretty great to deal with and I could tell he yearned for more customers with a background in the hobby.
It was pretty expensive, more than I imagined. So far the DIY route remains a no brainer.
I made a 138" DIY frame with Seymour XD (AT) screen material. Total cost was less than like $350 for everything. It was nice to get the screen material only right from Seymour.
There are other alternatives. Jamestown is basically a DIY screen on steroids. A friend of mine has a 140" Seymour screen on a Jamestown frame with Axiom in-walls firing through it.
Of course you guys are in Canada, so who knows what your cost would be. Jamestown Screens
DIY is still cheaper, but having something easy to put together and knowing that it will be perfect the first time without running around to get lumber, supplies, help to put things together, etc has value too. Granted, I didn't go that way. LOL
The duty from Seymour was around $30??? It was a while ago but I do recall it being a lot less than I thought it would be.
Just a reminder, XD comes in 98" widths which I turned 90 degrees and used the 98" dimension as the height. The roll can be quite long should you choose.
I went with a roll 8'x11' and didn't trim any off. I could have and still might but it's worth mentioning.
The roll showed up in a nice heavy cardboard tube.
Well worth the cost.
I should add the also carry a black AT screen like material. I am considering it for the front and back wall.
Thanks guys. I really like the idea of an AT screen that is ready to go on a pre-fab frame. I'm sure in the end I'll need to shave some money off it for some other expense. So DIY frame likely... After the first blackout cloth screen success from V1.0 this should be OK. I'd be a little paranoid with the XD fabric is all.
Is the black fabric speaker cloth? Flame retardant?
For those squirming with curiosity the retail screen was just under $2500 before tax.
I made it out to Futureshop over lunch to check out the Pioneer SC-85 with Pioneer Elite Atmos enabled speakers in the Demo room. The dolby ATMOS demo disc was kinda cool. I knew the scenes from articles and podcasts so I asked for the leaf scene, the F1 scene and the dolby crystal triangles scene. They were pretty cool and I thought they sounded pretty good, but nothing too crazy. Then it dawned on me....
The receiver had never been firmware updated and I had been watching all the clips in DolbyTrueHD only. (Only, right! :D) Anyway, the salesguy there was pretty stoked we noticed and he is going to have the techs install the firmware tomorrow or Friday. I'll be able to directly compare the ATMOS demo in both standard and Immersive then.
He is also going to have The Expendables 3 on hand for demo material. Should be fun. Finally! I'll have my ATMOS experience.
As a side note the pioneer elites seemed pretty decent in non atmos config.
For a Canadian manufacturer/supplier of screens, you should check out EluneVision. I believe their screens are available through Future Shop or from Eastporters in Hamilton.
Not sure if its flame retardant. I should say I assumed it was similar to the projection screen and not fabric. It may be. They do offer a few different options.
For less than $500 you would have a XD screen on a DIY screen frame. Its possible you could upgrade to the newer screen inside the $500. Seymour has 2 sites, if you go DIY you will want http://www.seymourav.com/screens.asp .
Thanks Fred. Checked out the 4k audioweave products. Still very expensive. 1649$ for 108" 16:9. Still better than the Draper no doubt.
Brwsaw, I've been checking out the DIY section at seymour periodically. They were out of stock and had some production run issues I guess. I'll still end up ordering through them I'm sure. Just too good a deal to pass up and independent testing confirms their product performance.
Bored an in a puttering mood this morning. I took a clock radio on full blast volume and stuck it inside of the duct box in the supply end of the HT. I went upstairs to see if I could hear any sound coming from the vent in the living room.(located in same duct line teeing off 15' before HT)
All I can say is flex duct is an amazing product for eliminating sound transmission. I know its only a clock radio, but it was put literally inside the duct system at an irritating volume. In use I dont think the duct will ever get that much direct sound energy. Feels good to get the concept tested before drywall is up.
I have started to put together a material list for the drywall order and have partly insulated the dividing wall with left over insulation from making the acoustic panels. The framing for bulkheads around the beam and ductwork is done. Not much to show for pics, but chipping away at the tedious details.
I am not interested in green glue or clips (not in budget) but for an extra $200 or so I can 5/8" double drywall the ceiling. Is it worth it for just the ceiling?
Edit: I should mention that all walls/ceiling will be insulated with quiet zone and drwall mounted on resilient channel.
Went to futureshop today with USB firmware upgrade in hand. Made some new pals. ATMOS achievement inlocked! There was no mistaking the effect once it was working correctly.
I messed around with the Dolby ATMOS demo disc and then the first chapter of Expendables 3.
The difference between ATMOS vs TrueHD is substantial. The Dolby surround upmixer is also very worthwhile and robust from my brief but intent testing of trailers before expendables. I messed around for an hour or so.
I want it!
The pioneer SC-85/upfiring Elite speaker combo isnt the best I've heard, but the demo was still very pleasing. I would have to wait till I can afford a next gen receiver with more gutz than the pioneer had on hand. Not that it was distorting, but sounded pretty thin to my ears. I finally have good gear I had to save up for, and now have to save to upgrade for immersive. The cycle repeats. The VISA taunts....
ATMOS\DTSX Backer boxes built today! One step closer.
They are approx 1cu ft. inside volume and should handle speakers up to 6" deep once installed in ceiling.
Easy project and cost me $50 in new material and a six pack of beer for all the MDF and some good help. Sorry for the poor phone pics.
They are like little monkey coffins complete with pillows. They will mount in the ceiling on top of the resilient channel betweens the floor joists. I just have to put weather stripping on the cutout for when the boxes mate up to the back of the drywall.
The ceiling backer boxes are in. They were a pain to get into the front of the room just in front of the LVL beam. Some brainiac thought it would be a good idea to spray foam that entire area.... I got to spend some quality time scraping away with a putty knife. Fred Style.
The other issue that made it difficult was the floor joist are 7 5/8" and the boxes are 6" deep. Not a big deal until fiberglass batts are crammed behind them. Pretty tight fit, but doable. I used utility banding as a temp support until the channel is up. Only lost one knuckle on the screws poking from above.
So you crammed insulation between the boxes and the bottom of the subfloor?
Good for stopping airflow from seeping in through any gaps, not so good for sound proofing where you want a gap. Just trying to help now before you fire up speakers that might as well be directly mounted to the subflooring above.
Yes, I put insulation up first and pressed the backer boxes up into the cavity. They are pretty much spring loaded in there and I had to put the screws in on an angle to suck them up higher.
I was thinking as I was doing it the pros and cons of keeping them that way. Looks like even though the speaker will never be in physical contact with the box the sound will cause vibration through the box--->insulation--->floor. I will have to revisit these and remove the insulation.
So I should put nothing behind/beside the boxes in the gap? I wish I made the boxes shallower, but that really limits speaker choices.
When it comes to soundproofing Seems like: More is not more. Less is not more. Just right is more.
Yeah, that is the benefit of pictures and frequent updates. Fluffy insulation compressed into a little more than 1.5" space basically becomes solid.
Soundproofing is some strange stuff. I spent so much time reading and asking questions about what to do, what not to do, what I cant do (because of space limitations, financial limitations, etc). I am not an expert, but I've got a few things hammered into my head from my own design mistakes and I was happy later on to have had someone jump in and stop me before drywall got hung.
Ok, updates and wierd results to share. Contrary to our thoughts.
I set up a RTA reading in the kitchen directly above one of the ATMOS locations. First I measured before removing the insulation. I didn't take a screen cap but am kicking myself now. To test I wrapped a knucle against the top of the box as it hung in the ceiling.
I went ahead and removed the backing insulation and thought all was well... Until I repeated the measurement. Here is what it read. The RTA ran as I went downstairs and wrapped on the box and came back. A worst case scenario test. The peak values were stored as the blue lines in each octave. It peaked at about 55db at 200hz. Ignore the reading in the right top corner. It is the RTA ambient room db in the kitchen after the peak reading.
Insulation Removed
I swore the values were worse with the insulation removed so for the heck of it I put it back and resecured the box for another measurement. I wrapped harder than before just to be sure....
Insulation Replaced
The peak was reduced to 45db at 200hz. A 10db drop in the world of sound isolation is pretty significant. Anyway, it seems the reason this wild result occured was how poorly 1/2" MDF acts as a speaker cabinet. The insulation was actually acting as a damping agent for the rear panel. With it removed it rang like a bell.
What I can't decide is if the lower frequency readings reduced with insulation removed vs replaced can be trusted. It was a pretty makeshift test and for all I know a truck could have driven by while I was downstairs to skew the result.
I'm glad Nick pointed this out so I could discover this completely by accident.
Just repeated the "with insulation" measurement with a lovely but reluctant assistant (my wife) and confirmed that insulation reduces higher frequency box resonances at the expense of coulping lower frequencies to the floor.
What to do....
Given that these are impact tests, and far more energy is being exerted than a speaker would create in the back panel, I'm inclined to leave the insulation as is.
Yeah, too bad all frequencies weren't easily contained using the same methods. Also keep in mind that knocking on a speaker cabinet box isn't exactly real world either, it would take systematic frequencies played through the installed speaker and measured upstairs to get the actual best effect, thus the reason that I trust the experts and people from multiple trusted companies that say that fluffy insulation is good, packed insulation is bad (for in wall/ceiling absorption) and you want to disconnect as much as possible from inside the room to outside.
That is where the gap comes in. My guess is that you are compressing the insulation just the right amount to impact certain frequencies only instead of having it fluffy and being able to grab a wider frequency range.
Well, given that I respect your opinion and research so much FINE we'll do it your way! ::stomps away like a toddler::
I think what I'll do is remove the boxes and add a layer of MDF to the back with GE Silicone II sandwiched between. This should make me happy with the ringing problem and increase mass. Then I'll get some thinner insulation to line the joist space directly above the speaker. I can get 1" thick stuff I think. I'll add whatever is left over to the inside of the cabinets on the down facing side opposite the rear panel.
I agree the knuckle tests arent telling full the story too.
You don't happen to have green glue to put between the box and the extra layer? It would help a little better than the silicone , but for the back of a set of speaker boxes, I don't know if there is THAT much benefit to worry about it if you don't have GreenGlue.
Great call on the GE Silicone II in general by the way. The clear is a really good product to use for sealing up any gaps in a theater.
Soundproof french doors on horizon. Ordered glass today...... This should be interesting. I cant wait till down the road when I say "they only work when they're closed."
Will improve backer boxes and post up new graphs in the next couple days.
Had to youtube it to get the reference. I knew him as Inspector Gadget.
Cone of silence looks like huge glass boobs.
Picked up material to make the french double doors. Will put backer boxes in tomorrow and get to ripping all the MDF pieces down. Handling a 3/4" sheet on my own on and off the truck was no picnic. The glass is soggy too.
Its basically going to be more of a hinged wall with a window than a door. Will frame the doors like a staggered stud wall with ripped 3/4" plywood. Then make a rough opening for the assembled window casement to go in. Then sandwich it all together with a sheet of 3/4" MDF on either side. The glass, 2 panes of 1/4" laminated, will be seperated by 2". Inside the window gap will be vents around the frame open to an area of insulation. This will be faced with dark brown fabric and hidden. Once insulated the estimated weight will be 150lbs per door. Total cost so far is 400$. Not too bad.
The boxes have been altered and reinstalled. I am happy with the result. They now have no insulation behind them and there is a 1/2" air gap between them and the subfloor above. Talk bout cuttin er close, eh? I only ended up using one bag of thin insulation. It went into each box on the bottom face. Same hyper accurate test was performed of knocking on back panel.
I noticed now the peak dropped to around 80hz. This is centered on where these babies will be crossed over. There is also a reduction in lower frequency floor coupling. Good to go! Finally got the program to save pics to memory.
I work with a guy that went with in-ceiling speakers when he built his house. He went with over-priced product that the local "audio/video experts" priced up and installed. Honestly, it sounds bad. I know that surround speakers don't need to be amazing speakers to be effective, but yes, you can tell that the sound is above you and not around you.
Interesting. I was considering the in ceiling for a 7.1 dedicated home theater. Front and center on wall and the 4 surrounds in ceiling. I was considering the for asthetics. Sounds like it might not be worth it if the sound quality will be that poor.
I only have experience with one setup with the 3 main channels in ceiling. It was spec audio in an upscale home. As Nick said, not good.
If you go the route you are contemplating you will at least have height channels pre-installed for later. In-walls are way better for the hidden 7.1 setup you are thinking of. (If you are surrounded by walls at least.)
With the new ATMOS/DTS:X formats about to become default codecs, and legacy decoders being the fallback, base layer surrounds are definitely priority over only height surrounds.
Yeah, go in-wall if you need to hide them. Heck, I can even get you in touch with someone who knows how to cover the in-walls with custom printed fabric panels that will let the sound through, but hid even the in-wall speaker grills. (That would be me, by the way. LOL)
I am not that familiar with the Atmos. I currently own Axiom Grand Master 7.1 on wall that I have from a theater room in a home I have since moved from. I am building my new space. I have yet to purchase a receiver. Based on some of the things I wanted to do in term of columns, sconces and movie posters on the walls I wanted to get rid of the QS8's in favor of something I could put in ceiling. The 3 front speakers would remain on wall...
What will the Atmos do for me? What components do I need?
PS the aspicer1 from above is me I just made a new profile a while back and had forgotten the user name.
There are many places to go to research ATMOS. I wont repeat the whole story here but here is the readers digest version.
To use ATMOS you need to add height (and optionally wide) channels. This is accomplished by using atmos enabled speakers, atmos modules or in ceiling speakers. In ceilings are the best option.
You also need an ATMOS processor. There are currently many AVRs offered with this feature. They are still very expensive, and having sampled an upper tier model personally, are not worth the current asking price.
ATMOS is the first of the object based immersive sound formats. They will soon be the standard soundtrack on bluray titles. The other current formats are AURO and DTS:X. DTS:X is not slated for launch until March, when more details will be available.
I have experienced ATMOS, along with others here and can say without hesitation that even on non-atmos content it is a worthwhile technology.
Whether or not the added cost of more speakers and amp channels to drive them (new avr/processor) is up to you.
You need basically 4 speakers for the ceiling (2 is the minimum), and a good $2500-$3000 for the receiver or receiver/amp combination to power all 11 speakers (7.1.4 setup).
It gains you what is called "object based" audio where they can literally place a sound almost anywhere in a room, not just from a speaker location, but anywhere. Think back to the days (if you are that old) where people with 2 speakers for audio could create a "phantom" center channel by playing sounds "just right" to make it seem like there was a 3rd speaker for a center channel and still have clear left and right channels. Take that idea, and use a "dome" of speakers, and you can get "phantom" objects able to be placed anywhere in the room. It isn't "phantom" imaging of audio, but that is the best way that I know how to describe it to someone who hasn't experienced it.
At CEDIA I heard a demo from Star Trek: Into Darkness (actually heard it many times) where the "natives" on the planet at the beginning are throwing spears. There is one point where a spear is thrown almost right at the center of the screen. If you listen carefully in an Atmos room, that spear could be hear behind the screen, through the screen, several feet in front of you, and then BAM, right "through" you. It was very impressive. Instead of just sound whizzing from the front speakers around you on the left or right, they could sound like they were right next to you, or above you, and it was much more immersive.
For me, it is absolutely worth it, however I am waiting for DTS:X to be spec'd out and for receivers to come down a little in price. I've already changed my current 7.1 speaker configuration to prepare for Atmos, but will probably hold off at least 1 year just to get the cost closer to where I want it to be, and for the technology in the receivers to be even more refined.
I hummed and hawed over it too during my build planning phase. In the end I decided I'd be kicking myself later for not doing at least the rough-in for it.
That's really interesting stuff. Thank you. Sounds like short version is regardless of whether I spend the money for Atmos or not, losing my on wall QS8 surrounds in favor of only having in ceiling surrounds is not the best choice. Better to figure out a way to create the space on the walls for the surrounds and decide if I want to further upgrade for the Atmos. Appreciate this insight. Very helpful.
You don't give up wall surround and replace them with ceiling ones. You take a regular 5.1 or 7.1 setup (you talked about going 7.1) and then ADDING 2-4 additional speakers to the ceiling. Thus the 7.1.4 I mentioned before. You have 11 speakers and 1 subwoofer channel (split between however many subs you want).
Amazon.ca has a receiver for $1800. Amazon.com has one for $1600.
Which models? I didn't know that there was anything out there that could drive 11 channels (powered) for a 7.1.4 setup. I know that there are some that have 11 channels "processed" but not that many are powered, and then you have to add a separate amp to drive those extra channels.
If there is an 11 channel receiver that powers all of those 11 channels for $1600-$1800, then I am going to have to start looking at that more. I know that the Onkyo TX-NR3030, which powers all 11 channels, is running a little over $2,200 and it is one of the (if not THE) lowest cost Atmos receiver powering all 11 channels for a 7.1.4 setup.
You don't give up wall surround and replace them with ceiling ones. You take a regular 5.1 or 7.1 setup (you talked about going 7.1) and then ADDING 2-4 additional speakers to the ceiling. Thus the 7.1.4 I mentioned before. You have 11 speakers and 1 subwoofer channel (split between however many subs you want).
Yeah I got it now. My initial question was would it be reasonable to move my on wall surrounds to in ceiling so I could use more of the wall space for décor. That's when someone chimed in with the Atmos and here we are. Glad I asked, learned a lot.
In the realm of audio, and the construction of an altar to exalt that audio experience, the price is not the cost of doing immersive, but not doing it.
Yeah, unless you have a multi-thousand dollar hole in your pocket. I have been VERY excited about Atmos since experiencing it at CEDIA, but I don't have the extra bank roll for that with the current generation 1 products.
Yeah, unless you have a multi-thousand dollar hole in your pocket. I have been VERY excited about Atmos since experiencing it at CEDIA, but I don't have the extra bank roll for that with the current generation 1 products.
Me neither. Just talking big so you make the jump first.
Ok, coffee is over I guess. Back to work. Doors are well on their way. I didn't have much to go off of plans wise so I made one up based on all I've read and learned so far. These will set up overnight and I can fill holes and sand them up to be ready for primer tomorrow. I might gel stain them but that will be months from now.
They are 24" doors modelled after the doors in our living room my wife likes. They ended up being 2 3/4" thick and I estimate the weight at around 120lbs once the glass is in. Pretty standard issue except where the window casing is concerned.
The windows will set into a frame pretty much as the finishes go into the room. You might notice there are holes drilled into the casing at the corners and near midpoints on the sides. These are to reduce resonance between the glass as the interior panel is vibrated by the room sound. The ports open to an insulated cavity around the window where the goal is to have the energy decay harmlessly. The gap between the glass will be wrapped with fabric so no one is the wiser. The windows will be sandwiched between neoprene gaskets and held in place by trim on the face of the door panel. Dress them up later with some sort of recessed panel look.
Instead of drilling the door out for a lockset I'll attach cast iron handles to the door face. The door will pull closed and be retained by bullet closers (2 per door top and bottom.) Never heard of them before this, but really cool find. Basically a spring loaded ball bearing that goes into a stationary strike on the threshold and top jamb.
As you have guessed by now I'm kinda going OCD with all this stuff as best as I can for as little $ as possible. These cost 450$ all in. No way I could have had these cash and carry. "Soundproof" french doors don't exist to purchase off the rack. All quotes were for custom doors and were too spendy 1K plus for only single pane glass. These have 2 panes of 1/4" laminated per door. Almost bulletproof for Chess!
In my new construction home I was very unfortunate to learn that the only place the builder would locate the homes electrical panel board is in the room which I have assigned as my dedicated home theater.
I am currently in a townhome and I used the entire lower level as my media room. The base from my system can occasionally trigger loud and annoying vibrations resonating through the electrical panel board located in the room so I know I am in for a problem unless I can resolve it.
The good news is my room will be left unfinished so I will be able to mess with insulation and such. My first thought was to use spray foam insulation all around the box to reduce the metal on metal vibrations that could occur. Does that sound like the right idea?
You could put insulation around it, but I wonder where the vibrations are actually coming from. The doors aren't known to close the most securely. You could try some really thin stick on foam weather stripping on the panel door itself so that it doesn't rattle. If it is the wiring inside the panel, that will be difficult since you don't want to put anything in there for a number of reasons.
Well my townhome room was a total afterthought and is really not insulated very well at all so it could be a lot of different things. I will try the foam insulation around the box and the weather stripping on the door. Hope its that easy...
Spray foam is a terrible idea on a panel. For a million reasons. My panel is in the corner of my room too. It isnt the builder who decides its the utility company.
Is the panel flush mount or recessed in the wall? For flush mount put neoprene weather stripping around the door cover. No more rattles.
For recessed, build a door for the whole thing flush with the wall that meets these criteria:
Must be identified as covering the panel so anyone can locate it to turn breakers off. Must not be locked ever.
Must have a clear unobstructed work area of no less than 1m once the cover is open. More is obviously better.
Must be of a material appropriate for concealing electrical equipment. Ie fire rated.
Its really a good idea to have your GC ask the inspector what will fly in your area.
Spray foam is extremely flammable. A fault in your panel would cause big fire concerns. The best thing to put in direct contact with a panel is nothing at all. Failing that I would do roxul. It wont burn under a direct flame and can be removed if necessary.
Spray foam also makes maintenence or future wiring impossible.
Just saw your second note about the spray foam being flammable! WOW. Good catch. I will try the Roxul. As far as the door do I remove the metal door all together and place an approved decorative door over the entire panel or leave the metal door on the panel as well as adding the decorative door?
Spray foam is extremely flammable. A fault in your panel would cause big fire concerns. The best thing to put in direct contact with a panel is nothing at all. Failing that I would do roxul. It wont burn under a direct flame and can be removed if necessary.
Spray foam also makes maintenence or future wiring impossible.
Exactly. No insulation inside the box at all. If it is mounted like most boxes, it shouldn't need anything around the outside as it should be solid an secure to at least 1 stud, and somehow tied in to a 2nd stud, which wouldn't be where the vibration is coming from anyway since they should be solid.
I still say it is the door rattling, but I am not there to actually hear it.
the Yamaha 3040 is pushing my price range and the more I read on Atmos it doesn't seem like many movies are rated for it. I was thinking of pre-wiring for it and then upgrading equipment down the road when it becomes more mainstream...
If you go ATMOS you are likely looking to add an amp anyhow. Most AVRs only drive max 9 channels right now.
What you are referring to is going seperates vs an all in one receiver. There are pluses and minuses to both and strong opinions for either being better.
I chose a hybrid approach, as many do, and will run my front channels on outboard amps and let the AVR run the rest. Most of the soundtrack (over 90% according to hometheater geeks podcasts) comes from the front 3 speakers. I doubt this will change much, even with ATMOS, as the sound must still be anchored to the picture.
An AVR is the "brain" of the system while an outboard amp is the "brawn". I much prefer the theoretical "capabilities" of the hybrid approach..... Theoretical because mine are still in the box.
Got bored while doors are drying between silicone and filler coats. Skimming back through Nick's thread I remembered to apply sealant to the device boxes around the room. Duct seal is much cheaper than the official putty pads you can buy. I cant see how it would be any less effective. $2.75 a brick and I used 8 in total. 34 boxes... My fingers are sore. For those buying get the gardner bender stuff, not the thomas and betts. Much more spreadable and sticky.
Duct seal on boxes
Had to go to a plumbing specialty store to get a 1" cast floor flange for the mount. Dead centered and ready for my eventual 4K laser projector. (10-15 years counts as eventually. ). Should'nt have any trouble supporting whatever comrs along. The throw distance is a very flexible 15'. Pipe to screen distance is about 15' 8".
Duct seal is much cheaper than the official putty pads you can buy. I cant see how it would be any less effective. $2.75 a brick and I used 8 in total. 34 boxes... My fingers are sore. For those buying get the gardner bender stuff, not the thomas and betts. Much more spreadable and sticky.
I bought some of the putty pads on the first go-round, but I wised up and bought that duct seal stuff for what remained. Either way is a workout for the fingers.
So it looks like I will take the advice of some on the forum and go with an acoustically transparent screen mounting my on wall center speaker behind the screen. Does anyone have an opinion on adding a second center channel? I was thinking of doing so to place one at the listening height for both the front and rear rows of seating.
Short answer is that most of the time 2 center channel speakers isn't as effective as you might think.
Long answer: Don't get me wrong, I've done it myself back with my 1st theater space many years ago, but I did so much experimenting with audio, it was far from normal. I had 2 center, front left, front right, 2 more speakers between the center and the right and left in the front, side surrounds, rear surround, multiple subs. This was all when DVD was just coming out, Dolby 5.1 was new, and DTS 5.1 for the home was barely ever heard of.
I did all sorts of power combinations, and signal combinations/splitting to get an immersive sound, and people that came over really liked it. Then again, nobody else that I knew had a home theater either.
I would trade all of that for a good solid 7.1 setup with a single center speaker, no goofy other add-ons or circuit boards combining and splitting channel signals. Oh wait, I did.
Keep in mind that you need to be able to drive 2 center channels as well. Just plugging them both in to the center channel "jacks" on your receiver may not work.
One last thought. If you get the center channel at listening height (seated ear level) of the first row, you should have (typically) no more than 12 inches of height from that to what would be the 2nd row listening height. From just about any reasonable seating distance, the audio will easily cover both areas very well.
I have a VP180 behind my AT screen. It is on a stand that I made to put the tweeters at ear height of the first row. The 2nd row is 12" taller, and there are no issues at all with the center channel sound quality.
An update of sorts. My wife has given her aesthetic input and we once again have a new render to second guess.... We are moving away from a printed fabric choice to something that will hopefully stand up to our tastes over time a little better. I think I like it. The vertical tubes between the absorber panels are poly diffusers I've been toying with making at some point. Nowhere near done and already thinking of room tweaks.
I still have to find sconces that I like. But something like this would work well I think. I like that they would stand off the fabric panels so heat from the bulbs would not present a safety issue. Probably go LED bulbs at some point anyway. A bonus is they are under 25$ each and are rated for 100W.
Starting to get back in financial shape after Christmas and other renovation expenses. Building a theater is expensive! Tempted to order the drywall and insulation for delivery. Stupid being responsible with money. ::rolls eyes:: I want to do this right, once, so sorry if the progress isn't as fast and furious as it was for a bit there. But about to get back on track soon.
I treat this thread as something to hold me accountable for doing things right and timely. I know you guys will bust me down if I come up short anywhere. Thats a good thing. Already starting to field the "when will the theater be done?" questions from the extended family. Oh joy!
Today was a productive day... and I wasnt even here. My building pal is on days off and took the liberty of coordinating my deliveries and, what the hell, insulating the entire basement as per my constant yammering on. Here I am having walked in the door to find he is done and pretending to work for the camera. Tomorrow is vapour barrier and resilient channel. He is as anxious to see it done as I am. Apparently the pending space is becoming hot gossip in the family. Lol.
It took the drywall delivery guys 2 hours to lug the 65 sheets of 5/8" drywall down the narrow basement stairs. Best $110 I've ever spent.
Agreed. Let the pros deliver it. I got enough drywall that the delivery was included. They would put the sheets in whatever locations and quantities around my basement that I wanted.
108 sheets of 12 foot long (the BIG stuff) drywall. The cost from a drywall only place was significantly less than a big box store, and the drywall is more fresh (yes, look it up if you are wondering), it usually is a better quality, and delivery into the house was included.
This first video isn't very exciting. They told me that if the one tree wasn't there, they could have gotten a LOT closer to my back door in the basement.
Even with the extra walking distance, they were way faster than anything I could have done.
Yes, drywall and insulation was much cheaper through a supplier vs HD. A 5/8" sheet was 10$ vs 17$. Just decided to do the whole basement in 5/8 after finding out my budget based on HD prices just opened up a bit. Bonus!
Nick you must have 2000sq feet or so? Sounds like a big basement with all that sheetrock. I've seen a crew in action with those carts and it is amazing how quick they are. Hard working fellas.
Yeah, it is about 1700sqft finished, but when you add about 7 or 8 additional walls besides just the outside to make rooms, and add double layer drywall in the home theater, it uses more. But, very good in your estimate.
That's OK, once you're finished putting insulation and drywall up, you go buy more insulation and start making acoustic panels.
There is something to be said for stopping when 2/3 of the drywall is up.
True enough, at the 3/4 walls drywalled mark the room actually sounded not too bad. With only 2 walls up the room had a noticable "boing" ring to it. Kinda fun to clap and boing while we worked. All the walls are up and screwed every 8 inches or so to the resilient channel. This stuff is cool. The walls literally float off the studs.
To cut down on the chances of shorting out the channel, thus ruining the sound decoupling, we made up a handy little jig and marked the floor with felt where the studs were. Then we just laid the template between studs and screwed on either side. This was my sunday. Going around the room and earning a drill blister.
This is where things stand after a weekend of work. The walls are channeled and boarded and the ceiling is ready with channel. We put up a sheet of drywall over the door opening just for fun to see just how quiet it got. The furnace, UPS and HRV running 20ft outside the door were completely gone. My wife was yelling from the top of the stairs to help come unload groceries and we couldn't hear her. Awesome.
Another weekend of progress. Ready for seam filling. Scheduled for Wednesday for a quote. Hope he likes filling screw holes..... somewhere between 3-4000 used. If its a go I will be ready for primer in a week or so hopefully. Moving right along. I have to start worrying about picking cabinetry and tiles now for the concession area outside of the theater. Booo! Not a fun task when you want to hoard the entire budget for the inside of the room. Here is the inside of the room.
2 Layers of 5/8" on ceiling and one layer on walls. The perimeter of the room between layers on ceiling was caulked along with as many seams as I could before I ran out of the 7 tubes of silicone. I made sure the front half of the room was priority and went from there. We marked out the studs and channel and snapped chalk lines on the ceiling to aid in hitting the right spots and avoiding the studs. Where did the fancy speaker boxes go?!
Here is the outside of room where the cabinetry will live soon. I have to decide on building them from scratch or buying something that is able to hold a rack or sturdy shelving for the AV cabinet side of things.
Here is a pic of the plan. Following pretty closely still. I have decided to locate the beer fridge in the lower part of the AV cabinet side and just leave 36" or so of cupboard for all the gear. I have an AVR, 2 power amps and some networking hardware to jam into it. Should be OK. Looking into the "cooler guys" product line to aid in the cooling of the cupboard while the doors remain closed. This gear cupboard will not be accessible to theater users when I'm not around. It will simply be the hidden technical side of how the theater will operate. Thank goodness for the easy harmony macros.
I am thinking of extending across from the top of the AV cabinet to the right to meet up with the ductwork bulkhead with some sort of embellished molding. I figure I can add a valence light in there to aid in dim lighting while guests are over for grabbing snacks or running to the restroom. Plus, it will add that wow appeal that makes it seem more elaborate than it really is.
Yes, they are staggered. In a perfect world I should have ran them perpendicular as well. But that would have added more seams kind of negating any benefit. Catch 22. To be honest the ceiling was way easier than the walls. All of the plugs, sconces, speaker terminal boxes and conduit chases made for a full day of messing around last weekend. I'm very lucky to have someone on board who is handy with pretty much all aspects of construction. I have more respect for the guys who hang drywall everyday. Awkward work for sure on ceilings.
Jeeez, Mike. He was feeling good about all the progress and now he has to rip it all down and start again?
Not that it wouldn't suck, but if I mucked up that bad I'd have to suck it up and fix it. You guys would just never hear about it! Doing this myself is saving me a pile of money, and making sure its done right. But all of this is kind of a leap of faith until the room is actually properly sealed and I can measure the noise floor. Virtually flying blind until completion.
I am aiming for an environment of 19db ambient and a total STC average of 55 or so. The biggest weakness is the panel location and the french doors. If I succeed, the projector in eco mode should sound like a jet engine compared to the regular noisefloor of 25-30db in most homes.
I've been urged to skip all this foreplay and just build a hollodeck already!
Very nice. Starting to look a bit like the Diefenbunker, but still very nice.
EDIT -- so I went to the web site to check the spelling of Diefenbunker and found this :
Quote:
CANADIAN WINTER WEATHER NOTICE
Although the Diefenbunker was built to withstand a nuclear blast at the height of the Cold War, sudden winter storms and poor road conditions do occasionally force us to close our blast doors. Over the winter months, we encourage visitors to check our website or call the Museum in advance of any visit to confirm our hours. Thank you!
soooo...could you not have done the first layer perpendicular, and the outer layer vertical?
That would cut down on the seam work, for the walls anyway
Just the ceiling got 2 layers. I cheaped out on the walls as 3 back onto foundation and the other is a double studded wall. But yes, you are right. To be honest just getting the space drywalled feels like a milestone. A chalky, dusty, milestone.
Tapers were here today for day 1 of 4. Wildly varying prices between the 2 quotes I got. 1200+material vs 600+material. To put things into perspective material was 400$. Its not a very big basement. The HT room is half of it. To board, channel and insulate the basement was 1689$ taxes in.... Can you guess which quote I went with? So far so good.
So, I kinda dropped the ball on something and need ideas. Posting up the pie in the sky future pics made me realise I made no provisions for mounting the panels and shelving unit at the rear of the room.
Normally not a big deal. Find studs and badaboom. But in this case I only have resilient channel to use and am not sure I'm comfortable hanging upwards of 200lbs on the drywall assembly.....
The only thing I can think of is putting eye hooks into the ceiling joists right now and hanging the panels and shelf later from cable. This in theory would not affect the drywall decoupling. The other option is just putting the panels and shelf on feet that stand off the floor. This makes them more like freestanding cabinets, but loose the floating on wall feel wich I prefer.
I don't know how it would effect the sound in the room. I know it would not effect the decoupling drywall.
They sell those ez-ancor that work very well in tying a bolt point to drywall. Now the secret is to have enough of them over a large enough area that the force is spread out and not onto a single point. So I suggest using 20 or 30 of them over the area that you have pictured. Now the secret part of it is that you use them to affix a 5/8 piece of plywood that is the size of your shelf to the wall. If you have a bunch of those ez-ancor's at 1' spacing, then any force be it downward or torsion will be spread out over such a large area that each ancor will be pulling at most 1/4 or less of it's designed limit (that has a larger safety factor already. You then attach the shelf to the plywood that had a much stronger holding capacity and all is good.
Done it many a time and it works very well with no issues.
edit: if you want to be really secure, when putting up the plywood, put some of that PL400 industrial adhesive between the plywood and the drywall and it will go nowhere.
Matt, I like your idea, but there is a fair ammount of movement in the channel setup. I guess I'm afraid over time the corner taping will seperate at the ceiling. The drywall is about 1/4" off the floor and the resilient will flex downwards if stressed to much (as its designed to do.)
I think I will just build the center shelf with legs to reach the floor, put an anchor or two to keep it from ever tipping forward, and bolt the tratments to either side like flags. Kind of a compromise, but I really cant of any other way.
Tapers are at the half way point. It really doesn't look all that great, but each time they are here it looks 100% better. I hope they finish strong..... I have a feeling I'll be doing touchups. But what do you want for $600 I guess. If they get me near the cup I can putt from there. Still saved a bunch of cash.
1/4" of water on floor from window well full of rain/melt..... Runoff drain was buried under 5' of snow and frozen solid. Basement on hiatus. Uber impressed. Saved drywall at least.
First spring in new house. Record snowfall. Lessons learned for next year. Next project is probably re-grading the back of the house so the below grade windows are no longer below grade... All for a cursing theater. The melt continues. I literally wept a little.
1/4" of water on floor from window well full of rain/melt..... Runoff drain was buried under 5' of snow and frozen solid.
You can get clear plastic angled covers that fit over the window wells... with every passing year they seem like a better idea. I'm going to pick one up just to keep the migrating toad/frogs out of the window well, but they might help to postpone the next flood too.
Sorry to hear about the water. At least it happened before you completely finished the room... I hope.
We had a leak in our house soon after we bought it. The previous owner had a garden up against the back of the house about a foot LOWER than the surrounding top soil...acted like a funnel. Anyway, you need 6-8" of grade for the first 10 or so ft.
Thanks guys. I guess I'm lucky compared to some here. No permanent damage so far. But a lot of snow to melt yet. We had a concrete pad removed from the back of the house in November last year. It had sluffed down and was grading back to the house. There is now a dirt trench back there where it was and I had a trough cut into it for the rains to make their way out. It is now full of 4" of ice and the water had to go somewhere.
I was lucky to have been able to snowblow a 4' wide trench a few feet off the back of the house last sunday so today I could actually get at the problem areas. I would be screwed without my inlaws here on the island. Winter sucks. Now I have to decide if I modify the existing window wells and excavate the drain system and put styrofoam around it to keep the frostline off it, or just hire a bobcat and take the dirtline down 16" and feather it into the yard to have a gentle swale back there (eliminating the wells altogether.) $$$
Wow... I think I had more "oughta fire up the snowblower" days this year than almost any prior year.
Only difference was that it seemed to snow a moderate amount every day instead of the occasional big dumps, so by leaving the truck in 4WD I could get in and out of the driveway without snowblowing as much as I should, resulting in a half-dome of ice on the driveway and an unexpected slide into a tree while backing out one night.
Helpful hint -- those folding mirrors ? They only fold backwards, not forwards. Ripped the darned thing right off
Sorry to hear guys. Glad you didn't have water damage on your theater build. What a weird year for weather. Our snow is almost gone and I have had my summer tires on for a week already and if not for my steep driveway could have had them on 2 weeks earlier.
Well, progress is still happening, albeit in a different direction. The DIY dors are hung and worked out great. I think they will look cool once they are veneered and stained. The colors for the lobby area are now all decided, so as soon as the snow is officially all gone (and drywall replacement is no longer at risk) it will be full speed ahead with finishing mud touch ups and then sanding/painting. Fingers crossed. 4 1/2' of snow to go.
Well, dont anyone ever tell ya seamfilling is easy or fun work. The room has finally been recoated, sanded with 120 then 220 and finally primed a first coat. I've been trying to think about if saving $600 was worth a couple week set back on the redo, but since I dont have a hard timeline I guess it was still worth it. If I ever was in this position again I would probably go with the guaranteed outcome, even for more money....
Funny thing today, I was using my ipad for music for the first time since our wedding last August. Did you know that crappy U2 album was "gifted" (forced onto) all us lucky itunes users. Holy snap I was mad when my playlist was suddenly interupted by Bono's ridiculously pretentious fluff lyrics of "Iris." And you have to jump through hoops with apple just to delete the crap. Sheesh.
Anyway, primed first coat. After, I stood back and realised just how ludicrous this room is going to be when finished. All the planning and dreaming is finally turning into something tangible. very cool!
Really similar in size to mine: 14' wide x 24' long x 7.8' tall. The extra half foot in width would have been a nice welcome to me vs. having more length, but I couldn't do that.
I hear ya. I wanted 15' wide at smallest but it made more sense to bury the column in the wall. I planned the basement initially from a realtor report when I was back in Calgary. Even bought a sectional to put in there and had it delivered long distance through Sears. Glad it wouldn't fit down the stairs because it wouldnt have worked in the room either at 13' wide! Wont do that again.
I have a few questions with regards to your install of the ceiling. I am looking to start getting mine done.
According to the resilient track manufacturer spec, they say to start the track 6" back from the wall, and for dual layer of drywall, to space it at 12" centres.
What sort of screw spacing did you use for your boards? Did you put in less screws into the second layer of drywall as it also has a layer of the green glue applied to it that will act at an adhesive, did you use less screws to attach that?
Also.. as you will be using a acoustic caulking to finish all the edges around the ceiling, did you put up the wall's first and then butt the ceiling drywall to the walls, or the other way around?
In your installation, I know that you are working from an unfinished basement I believe? Do you have any bulkheads that you needed to deal with HVAC ducting inside of? I am wondering if you added any additional soundproofing to those areas?
Are you planning on Resilient Channel? Most people shy away from that anymore as it isn't as good, consistent, or reliable as the clips and hat channel. The Sound Proofing Company (highly regarded people in the industry) don't like it either. Not just because they don't sell it, but because it doesn't perform as well and has too many variables over clips and hat channel. Is resilient channel OK for sound proofing?
For screws, I actually went a little lighter on the first layer (making careful note of where the clips/joists were as to not drive a screw through the channel and into a joist (defeating the purpose of the clips and channel). I ran one layer one direction, and then the second layer (with Green Glue in the middle) the other direction. This is more for a theoretically better "structural integrity" of the wall or ceiling, although running them all the same way, but offsetting one layer a foot or two from the other seems like a good option as well with minimal acoustical differences. I used the number of screws required by code for my area for the 2nd layer (thus the fewer number on the first layer) since you *need* the screws to go into the channel anyway. The 2nd layer screws were just longer to handle the 2 layers.
It was recommended to me that the ceiling should be last. It should be allows to hang fairly independent from the walls. This made me nervous at first as the ceiling actually could move up and down a little. After the 2nd layer, things settled nicely. Sure, you are "coupling" the ceiling and side walls when you mud/tape the corners, but for some reason it was recommended to do it that way.
Acoustical caulk should go up BETWEEN the 1st and 2nd layer of drywall. Someone told me that I could put it up AFTER the 2nd layer, and dang it was hard to get mud, primer, paint, ANYTHING to stick to the caulk. You just really want to seal up the 1st layer for anything that sneaks through the 2nd layer that you put up.
I had a flat ceiling to work with. I did put in some flexible insulated ductwork for my two HVAC feeds into the room. WOW did that stop sound from coming in or out of the theater. I ran the flexible duct from the vents to about 2 feet outside of the room, and then put up some extra insulation in the ceiling cavity around the duct. Nothing special.
Nick is spot on with how I did things pretty much. I did use resilient channel instead of clips and hat track, just because I could get it locally for $2 per 12' length. I used approx 70 lengths all said and done. I opted not to use green glue to save money. You must be careful during drywall install not to screw through the joists/studs. Clips and hat track make it harder to mess up. The site I am on right now has a resilient install going in and they did it like I did. Phew!
I made a resilient layout height template for my sidewalls and chalk lines on the ceiling for screwing later. I marked wall studs on floor with a marker to avoid. Then marked ceiling joist on drywalled walls with pencil to chalkline and avoid. We put in just enough screws to hold the sheets up at first to speed progress while I had a helper, then I went back and assaulted the walls and ceiling with a screw every 8" max. 2 per stud space (on channel between studs.)
I put the ceiling channel on 16" centers and put the perimeter runs about 2" off of the corners. The first ceiling layer had minimal screws and I calked seams between layers, focusing on the perimeter. Wear glasses, it drips. The second layer was screwed abundantly afterwards (securing both.) Ceiling and bulkheads get 2 layers and are done AFTER the walls are done with a channel setup. All cavities were packed lightly with insulation, and bulkheads were stuffed as well. Ducts should get insulation as well, supply and return vents should be supplied with insulated flex with 2 90 degree bends where possible.
Avoiding HD for drywall material will cut your costs by 40% including taxes and delivery as I experienced. Contact a supplier and take advantage of indoor delivery. Well worth it.
If you are going this route kudos to you! Welcome to the OCD club. Congrats Matt!
Oh yeah. 5/8 drywall was something like 40cents more a sheet through a supplier over 1/2". Heavier to work with, but mass is a good thing for STC ratings.
I will need to do more shopping I guess. The cost to buy from anywhere other than the big box stores here is horrific. for example:
Ultralight 1/2" 9.35 ~ 9.85 HD- $7.47 Firegrade 5/8" 15.80~19.30 HD- $14.57 (that is the only 5/8 that you can buy near me)
Yes. Homedepot charges a load to deliver, but I can rent one of their trucks for $25 and 2 cases of beer will get me all the help on the street to lug it all downstairs.. The drywall wholesalers don't even want to know about you unless you are ordering well over $600 worth of material. For a 16x17' room I needed $500 material with truck rental and beer inclusive.
Nother weeks worth in the books. The remaining doors are hung, entire base,ent is primed and the horrifying floor mess has been scraped, scrubbed and wet vac'd. No longer tracking dust through the house.
Did you ever get your dust situation cleaned up Fred? Nudge nudge for pics. Drywall and mud dust are notoriously bad for travelling everywhere. Should anyone encounter such a task, be sure to plug the vents in the area.
Something kinda neat to share. I found an unlikely product that will serve as cladding for the french doors and as the poly diffuser material. It is 1/4" subfloor plywood. Wierd eh? The neat things about it are it comes in 4x4 handi panels, is cheap, and has a really cool quarter sawn grain on one side. Quarter sawn is when the wood grain falls all in the same direction looking like stripes. I picked one up just to see how it would take a cedar stain and I was quite impressed. The doors, diffusers, stage and shelving unit will be wrapped in this stuff, and it is much cheaper and easier to work with than furniture grade plywood.
We lucked out and scored an old exterior door from someone elses home reno to use on our furnace room. I dont know how old it is but it uses a skeleton key lock wich is kinda cool. So, after seeing it installed and the way the light shines from behind, I was struck with a silly idea. I mentioned it jokingly to my building pal and he said "were so doing that!"....
The door will have decals made up with "LT. Frank Drebin" "Police Squad." My wife is a good sport and it should be hilarious and kitchy when done. Now, to track down a copy of naked gun 2 1/2 or 33 1/3, as the first one didnt have any detail shots of his office door.
... Did you ever get your dust situation cleaned up Fred? Nudge nudge for pics. Drywall and mud dust are notoriously bad for travelling everywhere. Should anyone encounter such a task, be sure to plug the vents in the area....
You know, I almost feel guilty watching you slave away at your theater while I play movies and video games in my mancave. Then I remember that Bob branded me an ahole...
Yeah, I got the dust cleaned up eventually. That stuff is persistent. I had to vacuum my leather couch and then wipe it down and I'd swear there is actually still a little plaster dust in the wrinkles that just won't budge.
I'll post some pictures... just as soon as I kill that dragon...
Well, dont feel too bad. I shouldnt be too much longer now. A few weeks till the space is finished, then into the nitty gritty setup details. That could take a while..... I'll have to reign in the tweak OCD to hurry things along. thinking it might be time to order screen material, or at least start final research looks.
Serenity, have you narrowed down screen manufacturers yet? Going AT or non? Someone pointed me to this UK company Screen Excellence. They have a weave that is supposed to be the most transparent out there. They do sell the material for DIY but if you buy with frame... Price doubles! (???) strange . Falcon seems to be a brand of choice as well. Talk soon.
Screen excellence seems to be the UK arm of Seymour AV. They are big favs of a few users here on the forum and currently the far ahead front runner in my research. There is a white paper comparing various screen materials posted somewhere back in this thread I think. Seymour cleaned up in third party testing. I think Falcon was included and did well. I'll try to repost the link.
Well, its been a few weeks since any updates so heres a pic blast. Getting closer. The lobby\workout\laundry area is almost finished. Down to the trim work and window boxing.
and finally a view from the workout side of the room
Pretty close to where we all started together.
Thank you all for your input so far! It is turning out great.
Here is how the AV pantry turned out. Still needs paint and shelf runners installed, but you get the idea. Auto temp controlled cabinet cooling fans mounted up top. Cant wait to pull a cold one out of the fridge that goes in there!
I am trying to crank out all of my "once in a lifetime" man projects before my wife decides its time to have a baby..... So far we are not having any kids, but at 33 its probably close to the baby alarm going off.
I am trying to crank out all of my "once in a lifetime" man projects before my wife decides its time to have a baby..... So far we are not having any kids, but at 33 its probably close to the baby alarm going off.
Is that just an accidental disagreement of tense, Trevor, or does one of you think one thing and the other think something else? Or is there a "surprise" factor in there that I'm missing?
"Tense" is the word to describe all matters of children in our home. Actually, I'm probably more open to it than she is. Although, I still raise an eyebrow at the pub/restaurant when a little one somewhere fusses at a table.
Then you really should talk to Mark. Just before he and Joyce passed the point of no return, I was out to dinner with them and Mark went all postal on a little kid at the table behind us for kicking the back of the booth. I'd never seen ALL of Mark's teeth before! (I'm kidding. There were 3 kids. A single fork embedded in a single head does not constitute "postal," especially if they were asking for it.)
Andrew (Murph) and Sharon are fast approaching the "purchase only" option. You could ask them. Or you could ask JP about not having kids. He can help you, not only because he's a shrink, but he's never had kids either. Oh, that!? He just THINKS Nolan is his.
I've been there, shouting at someone elses kids. Then when their dad stands up, I punch him in the nose and tell him off as his eyes are watering.... Then I snap out of it and keep chewing my food. . Sorry, watched Walter Mitty recently.
So, I'm hoping to draw from our IT personnel. I have to find a convertor box that takes a 12v trigger input and then transmits an RS232 code that I program. I think I have found one, but the baud rate of the device is 19200. The baud rate of the amplifier I want it to control is 38400. Will this work? Its kind of old tech and not a whole lot of inexpensive options out there.
Here is the device in question. The pic is the module shown from each side. I have the codes for the amplifier, just need to find a 12v or IR activated programmable RS232 controller. I hope this one works. Any help would be greatly appreciated.
A single fork embedded in a single head does not constitute "postal,"
It was a dull spoon.
If you, Joyce and Cam weren't doing so much Coke that night, you would have remembered that correctly. And, for the last time, that cop DID identify himself as such and not "The Merry Mailman".
What the baud?! Its not an issue it turns out. The device has selectable output rates. Ordered. Kinda sucks I had to spend 300$ on something just to turn amps on and off in an equipment closet.
Oh well. I'll absorb the cost somewhere else.
No one ever starts a hobby to save money I guess.... Or do they. Coupon collecting.... Hmmmmm. Interesting....
Speaking of saving money, local home improvement stores are now starting to clear out dimmers and other controls that are not compatible with LED lighting. I picked up a Maestro three way dimmable set of switches for $5 !! I will use halogen lighting with them. The bar area outside of the room is now dimmable so guests dont have to throw the lights on when grabbing a slice or a pee break. Score!
Updates. The chore part of the project is almost done. Then I'm allowed to start going to town on the fun room. The laundry closet, trim and door casings are pretty much done. I still have the tedious job of boxing out and trimming the windows. I've been putting it off because we went through the entire house and I've had my fill of working around windows. They are a slow and finicky thing for sure. Not my cup of tea.
Here is what we figured out for a laundry closet. A stackable washer and dryer live in there. We turned bifold closet doors into louvered hinged doors by biscuit jointing them together. Kind of a pain in the nuts to paint by hand, but they turned out nice.
The bar area is pretty much complete. We hung a pallet wine rack we got as a wedding gift and mounted the workout T.V. at the end of the room. The theater entrance is almost trimmed out now. I have to add a chair rail cap to the top for the crown of the boston header. I splurged for a couple of plinths to dress it up a bit by going with 3.5" MDF for all the trim. Happy with the results so far for $6.20 a length. The trim for all windows, baseboard and doors came to $300 on the nose. Counting pennies now as the budget dwindles.
Finally, here is the room I really care about. It was trimmed out as well this weekend and is awaiting the finish coat of paint and window work as well. I have a couple of spots in the slab I have to address. There are a couple of bumps and a small divot or two I have to chip out and epoxy fill respectively. But otherwise ready for carpet soon after. The color doesn't really show up well in photos for some reason. It looks kind of like a burnt yellow\sunrise kind of hue. The trim and stain color really play well together and it should be a really comforting space. This winter was really really really long here on the Island, so we decided that this room will be the winter oasis. Hence the very warm and sun shiny pallet.
Here is a sneak peak at the 2 overhead lights we went with. Gonna be awesome! Have to find some sconces that fit the design and color theme. The ones I picked before are no longer available to order. Go figure. Inching closer to the finish now. Can't wait to tear into the gear boxes again and start posting measurement plots from bare to various stages of treatment.
For anyone following along, and buildng or planning to build, an hour a night plus every Saturday moves things along nicely without feeling too overwhelming.
I'm starting to reach the point of just wanting to be done already. Burnout. Until now, I've been pretty disciplined with making sure everything is finished 100% before I open up any gear boxes and speakers. But it is starting to get hard. All the gear is piled up in my listening room, so I've had both ends of my audio hobby out of commision since February or so. I'd like to move the gear downstairs into the workout corner, but that is slated for action anytime now. Boo hoo!
Anyway, its time to start thinking about choosing carpet. I know the room pic is a little shifted, but anyone have any thoughts on a complimentary color? The carpet I originally wanted was Harvest Wheat/gold in color, but the paint will be too matchy with it I think. Thoughts? My wife will be the final arbiter I guess, but I'd sure appreciate any input. The sectional will likely be dark brown if that helps.
Carpet picked and ordered. Install booked for 3 weeks from now. We went with a patterned light beige carpet. Should be really nice looking once the room is a put together. Chugging along. Today we got the windows in the theater boxed and trimmed. The electrical devices are 90% installed (waiting on sconce delivery) The ceiling lights are really spectacular. It is definitely worth the extra money and time to plan out lighting properly. Thanks goes out to Nick and Chess for their input. I still have to do caulking and paint touch ups.
I have to track down the cabinet hardware to install hinged doors on the electrical panel and also on the water main\meter in the other side of the basement. Once the doors are installed on those and painted up all that remains is the stair makeover. As soon as the room is carpeted the gear is getting brought back down to the basement and HT cabling will be pulled and readied.
Overhead Lights (without glass shades until finished making mess)
Rear Media\Diffuser wall spotlights (better impression of the wall color)
Thanks guys! Anyone familiar with carpet installs? My installer says he is going to butt the carpet up to the base trim and doesnt need to tuck it under. Does this seem wierd? He is also going to pl premium the smoothedge down the day before, instead of tacking it to the concrete. I dont know enough about it to know if it matters. He is highly recommended, so maybe I should just trust and let be.
I looked into it and the non tucking isnt an issue. Modern homes have transitions from carpet to tile with no transition strip (or tuck) commonly. Also, the PL has an advantage of not spalling the concrete or coming loose over time. Overthinking things led me to worry.
Troy, I wasnt aware you could put vapour barrier directly on a slab. Dont you mean Dricore or the plastic orange corrugated underlay? The concrete must be allowed to breathe or moisture issues might happen afaik. Carpet underlay has a slight membrane on the side that goes down to keep the foam from wicking moisture out of the concrete I think. Not totally sure if that is its purpose.
Oh yeah, so now I have to get a roll of foam crack filler to fill the 7/16" gap between the concrete and trim to reduce sound flanking into the wall cavity. Poo.
Matt, I like your idea, but there is a fair ammount of movement in the channel setup. I guess I'm afraid over time the corner taping will seperate at the ceiling. The drywall is about 1/4" off the floor and the resilient will flex downwards if stressed to much (as its designed to do.)
Back in this thread there was a digression where I went to futureshop to demo ATMOS on a pioneer SC-85 receiver. Had to update it to get it to work yadda yadda yadda.....
Anyway a few months ago it was 1799$. Now it is 1099$. I would guess they will go lower. Once the DTS:X rollout happens ATMOS only AVRs will be clearing out. (Obsolete next to full featured models on the showroom floor.)
Take note peeps! This is an inbetween cycle of misfit gear. They wont do DTS:X or the coming UHD standards properly... BUT if you dont care about that kind of stuff you can get a flagship legacy format AVR now for a very reasonable price.
I had bought the SC1227 for that price. it was initially selling for $1500 some 3 years ago when it first came out. You won't believe the profit magins that they run on those units. I think it's part what the big box marks up and what the OEM will give as a discount.
Spent most of the week tidying up loose ends and getting finishing elements in place. The floor divots have been patched. I found an awesome and convenient product by quickcrete. It is a zip bag with premixed cement and a putty knife attatched. Just add 300ml of water, zip closed and knead for 3 mins. Apply and tool. Throw the whole lot out when finished. No clean up! I also found some 5/8" foam backer rod in the weather stripping section to fill the crack under the base trim where carpet was slated. The intent is to fill this void so sound flanking doesnt occur. Kind of pointless to go all this way and have a weak gap around the entire floor perimeter. It cant hurt anyway I guess.
Wallplates. I'm not a fan of stereo wallplates. They are overpriced. They are usually cheaply made. I am forced to use them for tidyness in this case. They provide a clean, finished look. To minimise any reason to ever have to maintain the connection over time I recommend using an anti oxidization agent. When an electrical connection between dissimilar metals is made oxidization occurs. Gold plated connections arent bulletproof either. When copper or aluminum get an oxide film at a connection their conductivity is reduced. This can get to a dangerous point with aluminum conductors in higher voltages (120V+) and lead to heat and joint failures-- fire.
The neat thing about copper oxide film is it is actually fairly conductive and can be used as a superconductor under low temperatures, thanks internet.
Anyway, to prevent any such performance concern, or future maintenance, I recommend and do this on all copper to banana jack, wallplates and probaby the in ceiling connections. I will never have to worry about an electrical joint becoming a nuissance over time. I dont ever want to dismount speakers to clean connections in the humid place I live. You just skin the wire like normal and apply a dob to the exposed copper. Roll the drop into the strands with two fingers and give the connector a final snug with pliers. Bulletproof forever.
Screen ordered. Decided to go a cheaper route than seymour xd (from domestic source.) Exchange is terrible right now... I purchased the same screen I installed in my brothers setup. It's an AT spandex screen that I know will work great and was under 500$ all in to the door. Not doing the DIY route this time.... Ordered a 106" AT screen from tiger direct.ca
Saw your review newf. Thanks for the tip to stretch the sides first.
Carpet is being installed this coming thursday! Excited.
A pj is an awesome idea for a HT setup. I built 2 as a lark a long time ago then eventually purchased an epson 8345 (futureshop twin of 8350) after coveting it for nearly 3 years.
I have been very happy with it and recently encouraged Tomtuttle to get one. Pretty sure he loves his too, but they are now off the market. I'm not entirely sure what model I'd buy now, but likely another epson. Nowadays you can find fantastic 1080p pjs for under 1000$. I think Tom went the refurb route and had a screen and epson 8345 PJ for under the 1K mark. Hard to beat that.
Normally I would be very wary as well. If I did not have prior experience with this screen, I likely would have passed it over.
One thing about this screen is when wall mounted anything directly behind it can be seen if not the same as the wall color. In my brother's setup, with flat grey walls, the receptacle and chase we roughed in for possible TV mounting could be seen. He had to dismount the screen and paint the devices to match the wall.
Any AT screen setup should have attention paid to this effect. I will have to leave a few inches clearance so the aluminum woofers in my center channel dont mirror the light back through the screen.
Yeah, I'm absolutely LOVING the Epson 8345 and the Silver Ticket screen (although it was a bitch to put together). Really great video fidelity, even in my multi-purpose room. The lens shift and zoom made setup a breeze. You can still find refurbs of the 8350 and 8345 through Epson and Visual Apex. I'm extremely satisfied with the value proposition compared to current flat panels.
Looking good, you have definitely made a lot of progress in a short time. What is the white device at the end of the room. Where is the equipment going to be stored.?
That white box on the wall at the rear is a space heater. Dimplex 2000w convector w/ thermostat. Pumps the heat out pretty good, but will likely hardly switch on.
The gear is going to live in the AV pantry cupboard outside the room. I am using an IR repeater sensor behind the screen wall. It just dawned on me last night after vaccuming I hadn't ordered any of the sub and HDMI cables yet. Doh! Just as I zeroed my visa balance....
Up till 1 am yesterday setting up stereo pair and subs in basement and getting initial impressions. Those initial impressions can take a while. fun stuff. I cannot get my dual sb-12nsd subs to pressurize the new room!! Very little tactile response if at all. Although they are extremely smooth and articulate in this space. At the MLP (a folding chair for now ) there is very little sign of any null issues so far!! Got lucky. The sound isolation also superficially seems to have worked well, but I still have to finish and remount the doors.
The subs are distant thuds directly above on the main floor. Mids and treble are barely audible. I will have to do proper testing later.
So far the bare room RT60 ranges between .57 to .75 seconds, with an overall .62 which is quite long. The install of carpet reigned this in from the near 2 second mark! Big difference. The time averaged pink response with 2 subs and the mains playing is encouraging so far. Definitely need to bring down the decay times in the low frequencies as they dominate to around 300hz.
Mains with subs pink noise averaged over 30 seconds. (Standing wave test.)
Messing around in the avr settings, trusty tape measure and calculator nearby I realised a couple key things.
A stereo integrated amp with speakers/sub is just outclassed by a properly dialed in AVR/Processor with a sub. I own both types of setup. Being able to dial in speaker distances and subwoofer crossovers and hear the effect of the signal sliding out of phase then return as the other channel is matched is ridiculous.
I didnt even come close to getting the subs right in the listening room with the manual dials. Night and day.
The HT room is literally empty with a folding chair and I can already hear its potential. I love this stuff.
Sad to say that my room is not as far along as yours. I have the ceiling done and 3 of the 4 walls. Still have to do all the metal edging and lots of plaster work. Doing it DIY in my free time is taking quite a bit longer.
I am not going to be as acoustically perfect as yours is. I am having an engineered hardwood floor as I like that, so I guess I will need more absorption on the walls to compensate. It is going to be what it is going to be. As long as it's comfortable for me, then that is really all that matters.
Yikes this thread has ballooned. Might take me awhile to chug through it, but a great documented adventure on building a HT room!
We stopped short of adding too much sound control material. After all, i wanted a sound controlled area, not a sound proof one. If i ever had a heart attack down there after ingesting all the buttery popcorn, i would like someone to hear my squeaks for help.
I figure the STC of our room is between 40-45 (if i recall correctly), with a standard room (2x4 walls and one drywall layer) being under 35. The dB drops by 30 outside the room just by closing the french doors and only the bass is easily distinguishable in the rest of the house (hard to control bass energy when the living room is ony 16 inches above the media room).
Ironically with all the science in this house, i still have yet to do any frequency sweeps of the room. But i still need a laptop to start, or i'll have to wheel my desktop comp down the hall....yeeesh.
I was hoping for 50ish with an ambient noisefloor of <20dba. I'll wait and see I guess. Judging so far we will not be able to leave kids unattended in there. No way we would hear if something was wrong. Would make a good band practice room.
All the cabling is here now and the screen is somehow still shipping. Well over a week now (must be coming from the states.) Shout out to blue jeans cable for 3 business day shipping.
I feel brwsaw's pain of breaking down gear/speaker boxes... My OCD said to let them go this time. I never throw out boxes. Big step. Lol.
I feel brwsaw's pain of breaking down gear/speaker boxes... My OCD said to let them go this time. I never throw out boxes. Big step. Lol.
I'm the same way but have actually kept all my boxes and have not broken them down. Having bought and sold audio gear over the years, it pays to keep the original packaging. That being said, you can get boxes from Axiom again in the future if you needed them so i'm very much considering taking mine out of the rafters in the garage and putting them into the recycle. After 13 years with the speakers, there is a high probability i'll be keeping them.
After 13 years with the speakers, there is a high probability i'll be keeping them.
I thought the same thing after about my first 5 years and I got rid of mine. We moved the next year and I wish that I had the boxes...
On my 1 work trip to Toronto this past February, I made the trek up to Axiom and got a VP150 box and two QS8 boxes and the packing materials. I brought a whole separate suitcase to get them home (was free luggage for me). Now I have boxes for my VP150, four QS8s, four on-wall M3s, VP180. I do not have boxes for my M60s...
Why the boxes earlier this year? 1) Axiom is awesome, so I got them for free while there, 2) I am sure that we will move again at some point, or 3) the VP150 and QS8s may make their way back up to Dwight for trade in on some more M3s for Atmos/DTS:X and I will need the boxes.
Just doing my part to have you second guessing to keep or throw them away. Glad I could help.
Went hard this weekend. We are operational. Pulled, terminated, mounted, temp calibrated.
Wife is jazzed. Now just waiting on the screen (tigerdirect dropped the ball into the grand canyon) and our sectional delivery. The rest of the finishing awaits.
Pulling chases
Why 2" conduit minimum is a must
AV shelf starting to fill up
Looking rear from front
Looking front from rear
Sconces temp mounted before acoustic panels
Ghetto Screening (see the chase and TV outlet? )
So far the room is working out great. Great input during the planning stages. The Harmony has been integrated with the oppo and the sconce lighting reacts as follows.
Play dim to off Pause dim to preset stop dim to preset
Amazing! Totally worth the extra hour to figure out how to add macro sequences to the Harmony remote buttons and 70$ to add Lutron Maestro IR dimming switches. A must do IMO for the price.
The remote is set up to one button everything on for:
The sectional is here. It fits the room nicely and is comfortable.
From bare room to sectional the sound got "better" but now there is a distinct "boing" to the handclap echo in the front of the room, and my voice sounds wierd as I walk and talk to someone in the mlp. Doh! Must investigate further. Thought for a minute the nice response curve would persist once the room was furnished a bit....
Well, at the spurring of Mojo, bass traps are now in front corners. Floor to ceiling 1' wide on the diagonal. They are 90" tall 3" deep 5/8" frames of MDF, lined with roxul and 6mil Poly wrapped on one side (facing into room) to help reject high frequencies. This room needs bass absorbtion while leaving energy in higher frequencies.
With couch and bass traps the overall rt60 is 0.41 seconds (down from 0.61 bare) In real world terms, this means there is better definition in bass and percussion and no noticable ringing or "boing" anymore. The room is starting to sound like it is under some control. The longest decaying octave is still the lowest. But the critical midrange 250hz to 4khz is all very well behaved spanning 0.42-0.45 seconds. I still need to bring it down a bit. I'm thinking I may not need first and second reflection broadband absorbtion. I may turn the second reflection points into poly faced traps to limit high frequency absorbtion. The first reflections will still get broadband traps.
After the traps were installed and some testing and demos, we watched Pacific Rim at reference........ Yeah... So..... More treatment needed. Lol. What a bass heavy gongshow that movie is. Grin fest. My ears hurt. Reference is too loud. But when an actor shouts, its like they are shouting at realistic levels. Kinda neat, but not an everyday thing for me.
According to a fancy reference book I own (have not looked at it in three or four years) RT60 is only relevant for very large commercial spaces. I don't remember the details any more though.
Either way, if the traps are working for you, that's good.
Hey Fred, thanks for the heads up. Old habit to call it RT60.
In small rooms were supposed to refer to this metric as simply T60 as there is no reverb in household dimension rooms. You are right. I found this out from a white paper I read recently to brush up on what I need to do to establish a target of performance. This is where I came up with the "goals."
Only 1 foot wide bass traps? Some of the acoustical crazies would say that isn't a bass trap, but a mid-bass trap, but if it works, then
I have the luxury of having mine hidden, so they are bigger.
I think that it was the right choice acoustically to treat the front side corners as they tend to be the most problematic with bass wave amplification (and muddying).
Yeah... I only went 1 foot wide to use the bag of Roxul most efficiently. 8 Batts. 6 reserved for sidewall panels. 2 left. Decided to go tall and get the whole corner instead of wide and getting top or bottom. Time will tell if it was the right choice. Right now the measurements don't really show much of a difference below 200Hz. But somehow it does sound better. Maybe the corners becoming angles helped with something.... dunno.
I do plan on rear wall bass absorbtion hidden in the media shelving unit. A future adventure.
The screen finally arrived today!!! Now I have to decide on the speaker cloth for the fabric wall. Thoughts Nick? I'm leaning towards the Mellotone Fabric from Parts express. I like that it is super black and fire retardant.
Pics are in order I guess. Was too lazy on weekend.
Side facing into corner before fabric wrap.
The room from rear corner birds eye.
Front wall.
The following measurements were taken at 1/12 octave scale with the same volume setting on the AVR.
Bare Room
Sectional Added (notice high frequencies lowering and overall db decreases.)
Bass Traps added. Overall response valleys decreased in severity. Bass slightly flatter. Room Db slightly lower. The valley developing between 2-4Khz will be something to keep and eye on as the room is treated further. I dont want to lose energy there!! Bad!
Do you find that the colour of the room effects your listening? I ponder if a bright coloured room will make the speakers sound brighter? Trying to figure out what colour to paint my walls. I was thinking of a slightly blueish grey toned down 10% darker. Now I wonder if for a music/movie room if you would still want to paint the ceiling and all the trim white? All white surfaces are just another source for light refection?
Color doesn't matter but temperature and humidity make a huge difference. So I discard anyone's blind listen tests that aren't conducted in an environmental chamber.
I think so long as the room is pleasing to be in the results will be positive towards listening/watching/hanging out in there. I dont think wall color and sound are linked in the brain, but who knows. We chose colors that will make the room less gloomy when were in our 4th month of being snow bound to the house. We wanted it to feel less basementy.
The paint in the room is suede finish and has zero sheen. We put it on the ceiling too.
Its too matchy right now, but the poly diffusers and wall treatments are about to change that.
Looks like the valley I'm seeing is due to a steep off axis notch in that area. Looking at the response in the link I'm not too far off what should be expected.
Will retest frequency response plot and update. Initial impressions seem as though there should be very little change if any. Good news.
Finishing items are:
Finish screen wall. Veneer Doors and install hardware and glass. Panel cover for electrical. Sidewall absorbtion panels. Rear wall media shelf and diffusers.
Do some seating tests before you get too far further... The screen looks way too low to the floor for extended comfort. Your eyes in a seated position should be around 1/3 up from the bottom of the screen.
The pictures make it look like your eyes will be around lined up with the middle of the screen... Eek!
Will do. I've never heard that guideline before. I thought THX said the axis should be 0-15 degrees above eye level. The planned bar stool row will be way lower by comparison. Right now the midpoint of the screen is just above the tweeters sitting at 39". I think defacto seating eye level is 40". The screen is pretty close to directly on viewing axis.
I left more room above the screen for the planned arch. The screen is cheated 4" or so lower than room height center.
Btw, its 106" diagonal and the seating row is around 140" back.
We watched a few eps of Game of thrones and the screen position seems fine. I think the 1/3 guideline is a sensible one to follow, but in my room we got away with on axis. Did that Idea sprout in a forum. Cant find a legit source for it. Curious.
Since the screen is in place I now have a firm boundary to work with for speaker placement tweaking. I toed in the speakers from 8" off centerline at mlp to 5" off centerline at mlp. So, the speaker's direct on axis energy spread at the mlp went from a 16" spread to 10".
To paint the picture very clearly, this is a miniscule change of maybe 2 degrees or so over the distance from speaker to listener. I also turned the sub level down a little for 2 channel sources. (Music gets 7db less subs than do movies now.). The result is a more present vocalist and overall balance to the phantom image.
Here is the result to date. The 2-4khz valley is better. The rest is up to treatments now. Chasing the last few dbs of flatness.
Screen installed, with bass traps, sofa and speakers and subs dialed in. 1/12 octave measurement, pink noise averaged over 30seconds. (I average the tests because the exact position of the mic on the ipad wavers as I hold it-- super accurate I know, but the trends between tests show it is consistent and predictable. )
Will do. I've never heard that guideline before. I thought THX said the axis should be 0-15 degrees above eye level. The planned bar stool row will be way lower by comparison. Right now the midpoint of the screen is just above the tweeters sitting at 39". I think defacto seating eye level is 40". The screen is pretty close to directly on viewing axis.
15 degrees is for the maximum you should have to look up from your seated position, but it doesn't take into account "looking down".
Going with THX specs, your viewing angle, seating distance, and screen size all line up nicely. Many people go a little bigger screen wise than THX (like I am at 138" screen at 12 feet (eyes to screen) and everyone loves it). Keep in mind that THX is NOT about the "big movie experience" of IMAX, Cinemark XD, etc, and I am not saying to go that route, but you may find that you like being a little closer to the 106" screen than 11.667 feet too. My previous theater had 104" and I sat 14.5 feet back and liked it, so no worries either way. (Here is a nice little THX calculator from many years ago that is easy to use: THX Calculator )
Here is something on the 15 degree that I found with a quick Google search... I can't imagine being in the front row with my eyes lined up almost with the bottom of the image, but that is how it is drawn, not that the 15 degree rule is bad (it isn't bad).
Back to the "eyes at about 1/3 from the bottom of the screen" thing... I just hit up Google...
The following is from AudioCircle.com originally from some woodworking site for hosting. Just from Google...
Home Theater Shack says 1/3 as well (some bozo jumps in and talks about a 50" plasma, but for larger projection screens it is 1/3: HTS Height of Fixed Screen discussion
They say the same in this conversation from AVForums... 1/3 from the bottom is eye height: AVF Screen Height conversation
So on and so forth. Several mentions on AVS as well.
The only "mainstream" website that should know this stuff that doesn't seem to say 1/3 is Audioholics, and we know what kind of people are over there. LOL
Maybe it is an illusion of the photos as well. The general rule of thumb is 1/3 from the bottom of the screen should be around 38" off the floor (average human eyeball height when seated).
Of course, lots of leeway here too. If someone reclines or slouches, then their eyes are lower (which would put the screen lower too *in theory*) HOWEVER, they are now no longer looking straight ahead, but are looking more upward, which screws the 15 degree rule and then would say that the screen needs to be higher.
Thanks for a great reply. If I was employing a second row of seating with leg room I would definitely need to reconsider the calculator and move the screen higher. Part of the decision to go this screen size and seating distance was to meet audio criteria first. The speakers and mlp within room serve to satisfy best modal behaviour and 2ch setup ratios. Pretty much the entire build was audio centric in the design phase.
I had to decide if all LCR speakers would live behind the screen and go bigger, but space the LR channels narrower, or go smaller and land the LR speakers closer to a 2ch configuration outside of the screen envelope. I chickened out when I considered the tower speakers interaction with the screen frame and support structure. Smaller screen, wider placement won out. In the end it all is panning out, but making those decisions wasn't easy at the time.
I'm noticing a lot of light bleeding through the AT screen. I'm guessing this isnt very good for image contrast as the light bounces back through the screen. I know most people paint the entire area behind the AT false wall flat black. This isnt an option for me. Has anyone tried just masking the back of the screen frame, or mounting frame, with black speaker cloth?
I know Nick covered his entire front wall with black cloth, but I'm trying to save money where possible. I figured masking the back of the screen frame would have the same effect with little negative affect to the center channel.
I'm ordering fire retardant speaker cloth for the screen wall, so I would need to get this sorted first. Thoughts anyone?
Black bed sheet, or black fabric from a fabric store (suck up your pride and step in their doors) is actually pretty cheap. Heck, Amazon.ca has a 60" x 102" polyester black tablecloth for CDN$ 10.99 (Amazon Prime eligible too) and that was just the first search result. Just don't put it RIGHT behind the screen, but behind your speakers and work with the projector angle a little bit for placement of the cloth (black cloth may need to be higher or lower than the screen itself once looking at from your seating position) and you should be golden.
I'm the type of wierdo that likes going to the fabric store. Lol. I'm like Jamie and Adam of Mythbusters. If the mission calls for it, I'm in. fire retardant fabric is special order there.
Saving my next trip to the fabric store till my better half can attend (see: right mood to humour tedious theater details.) I'm thinking I will just over order fabric from parts express to put it directly behind the screen. A few threads over at AVS suggest doing this leads to better contrast and blocks light in one step. Was curious if anyone here had first hand experience with it.
The next trip to the fabric store will be for the sidewall panels material. Need to pick something in contrast to the rest of the sandy brown and pale yellow tones in the rest of the room. Might go red/gold. Might go copper tones. Need blinds too.
Sitting in the room listening to some old Moby. Wondering just how much better it can sound. Nervous my over analyzing details will implode in a sudden loss of spaciousness.... Trust my ears I have to remind myself. The machine can measure flatness and decay times, but cant grin. All the books suggest I'm just not there yet. Need to go over the checklist in the acoustical frontiers paper.
I think we can all agree that sound quality is the end goal of why we fuss over speakers and hang out in forums. Is it better to use correction, or tune with treatments, or both?
This video touches on a lot of issues with a playback system I've been considering in my HT setup. Changing the physical acoustic conditions of the room is one step, but is correcting the system to "perfection" removing the reason we pick out specific speakers altogether? Thought provoking I think.
Great video thanks for sharing it with us. I can say I really love my Dirac live , its not a swiss army knife of room correction but used with treatments it is damn good. I have only had Audyssey XT and not XT32 but Dirac is on a whole other level. For those who don't want to replace their receiver the Minidsp is a great way to get Dirac Live and honestly you only want it for movies so best imho is to use it between your BD player and receiver. Emotiva says Unison will be available on the XMC-1 when it is released so that's good news if you are considering buying an XMC-1, our dollar on the other hand is the bad news
Very glad someone found use in it. One of the subjects covered in detail was the concept of the ratio between direct sound vs early and late reflections. I am strongly considering the value of impulse response correction.
If you own Axiom speakers, early reflections are more forgiving in your setups, as they have a very flat off axis response. This is not to say early reflections arent supposed to be controlled. In my case, where my speakers are more directional, early reflections are better absorbed.
Early reflections add a sense of intimacy or liveliness. They are considered detrimental to imaging and clarity. Late reflections do not harm imaging, and increase spaciousness. A music centric system has a stronger ratio of early reflections and direct sound. A multichannel audio HT system has a greater ratio of late reflections and direct sound. This decreases liveliness in favor of speech intelligibility and clarity.
Floyd Toole tested the effect of lateral reflections using a mono source and a speaker representing the reflection point of a wall. A direct radiating speaker and a speaker located at the theoretical wall reflection point were placed and listeners were able to adjust the level of the speaker representing the first reflection. Listeners prefered a first reflection as strong as the direct sound.
Lateral reflections should not be completely absorbed, but should be controlled based on their off axis response and intended use. At AVS someone mentioned the words of Mathias contradicted Floyde Toole, but in fact, they agree on many fundamental audio concerns.
Room treatments are always better than electronical trickery, however getting a room "perfect" is nearly impossible. But, some things can't ever be fixed by electronic room correction, or at least not without causing other problems... So a combination of the two is a great fix. If you can truly fix some of the big hitters in your particular room (echo is a big one for most), then you also tend to tame some of the room modes, which in turn make electronic correction much better and with fewer compromises.
I only have experience with 2 room corrections. MCACC from Pioneer, which honestly is a joke. I currently use Audyssey XT32 and it is really good, but I have heard that Dirac is amazing. (Then again, for $725 USD for the 8 channel software plus needing to buy a $100+ microphone for room measurements, it better sound good. They do have a 14 day trial if you have a microphone already to give it a shot.) With Atmos and DTS:X I am not sure how critical it is to have correction for all speakers in a 7.2.4 setup as they currently don't have that level, but I am sure that pretty soon they will.
Home Theater Geeks just posted a video about Dirac. It gets mixed "reviews" from the viewers, and I haven't watched it yet, but.... here is the link to the video
After watching a bunch of movies I can safely say the center channel is interacting with the AT screen audibly. I think the screen isn't an issue for db drop or frequency filtering so much, but creates a parallel surface to the front wall creating a very weak boxy sounding echo. I would describe the sound as someone talking to you then cupping their hands around their face (not just mouth) and talking. Subtle but noticeable. I might just be hearing the difference of its response at ear height, instead of below the screen as I was accustomed to. I might try to put something behind the center channel temporarily and see if the effect is negated.
Cranking away (slowly) on the to do list. Blinds installed. Electrical panel cover finished and mounted (my!cabinetry!skills!suck!)
The doors, the doors! (not- The Doors.) Don't you love 'em madly? I sure do. Turning out great. Still need to wrap the recessed parts in fabric, insert glass and cap with trim, but hey, been a while without doors, so I'm excited. The inside edges are getting weather stripping kits instead of Jambs. I have to install lapping weather stripping where they meet in the middle. We left a 1/4" gap to allow for this. Hope it works. Should help keep the sound in\out very well. I estimate the doors at approx 70lbs each pre-glass. Fat bitches (bottomed girls.)
Outside the room is a birch veneer with a "latte" water stain. Very french looking gate hardware.
Inside the room is a birch veneer with a "terracotta" water stain. The frames for the absorbers, screen wall trim, and poly diffusers will get the same stain.
We purchased an extra sheet of 1/8" birch veneer we put on the inside of the doors. Polys are now installed and waiting for filler to dry for sanding and touchups. I'm not sure how I'll be able to quantify the difference (likely small) they make. They sure look neat though.
I havent put anything behind them yet. Going to wait and see what the absorbers do first. They are next up.
The new response plot isnt really anything revelatory, as expected. The combination of the doors on the room and polys has made the room sound "worse". I think its the doors just holding energy in the room more and not a lot of absorbtion yet. Dont get me wrong, it doesn't sound bad, just not as defined as before. I wonder if the rt60 went up. Should test.
After tweaking stuff a little more, cutting the bass a few db, putting spikes on speakers and finalizing their position listening for a while to test tracks I use, I think the room is getting into pretty good shape.
The ETC (impulse) plots are nearly identical from left to right channels. The rt60 is high-ish still, but no noticable room echo or ring (thanks in no small part to the polys ). Well worth the < $60 and time staining and installing.
It is unfair to show a comparison plot between the before and after poly install. Too many variables have changed. What I can say is they seem to offer "air" or smoothing in the high/extended treble ranges. The response plot shows an increase above 4khz right to 8khz of about 5 db. This is great! My speakers are no Axioms...... Their off axis response is kinda ugly. I can only magine what can be accomplished with an Axiom setup.
This is with front corner traps, polys, screen and "good" speaker positioning. I say good because they are toed in to sound like a singer is on a barstool in front of me in the mlp.
Interestingly enough, moving to the next seat over in either direction yields pretty much the same results. Not exact, but the trends are similar over the mid to high frequencies. Bass is almost identical from chair to chair. I attribute this to setting up the row of seating following room mode avoidance rules.
I'm hoping the absorber panels will start to flatten the region below 400Hz or so. This stuff is cool! any predictions? I'm hoping Nick isn't right and I have to redo the front corner traps. Historically..... he's usually right. Lol. I may cover the absorbers right off with 6mil vapour barrier to focus on lower frequencies only. We'll see.
Anyways here we go so far. 1/12th octave scale. Pink noise averaged, yadda yadda yadda.
Had to run to dinner but thought I'd get a pic up before I forgot and got onto something else. This is an N23 QRD diffuser. It still needs fins and assembly. Its supposed to diffuse down to 450Hz and scatter down to 230Hz IIRC. It was calculated with the QRDude software available online.
The deepest well is 9 11/16" and it is just over 6' wide and 37" tall. They are styrofoam blocks salvaged from a construction site garbage pile. One mans trash....
I plan on using it on the front wall behind the screen. My hope is it will help eliminate the center channel boxiness/echo (still havent pinned that down, as some material has no issue) mid bass response slightly and most importantly, make it sound like there is no front wall behind the screen. I've always tried to connect people's descriptions of the qrd's spacious effect with a use that can apply to our visual perception. One day in the shower, where my aha moments happen, I decided behind the screen might make the image sound like it has deepth. Kind of like a theatrical stage more than a flat screen. See how it works I guess. Always wanted to make one.
Busy weekend. Lots accomplished. Probably pushing too hard, and I'm making mistakes. Today I started cutting the mdf and planking down to make the absorber frames. 3 of 4 assembled before I borked it!
First mistake, bought just enough material to build 4 frames. Second mistake, cut 2 of the 45 degree corners backwards and now I'm short material. Buying "select" stain grade lumber adds up when you make mistakes.... Doh! At least its only pine.
I also went into auto pilot mode and built the mdf inner frames to fit a batt of roxul exactly..... Instead of going a batt and a half wide as originally planned. Doh! Should work out fine and look ok. Was on the third of 4 frames when I noticed.
What can ya do! My talented helper wasn't around to babysit today. Lol.
Speaker cloth has arrived for screen wall. I plan on making large frames, wrapping them, and filling top, bottom, then sides of screen. I have to add blocking on the walls and sides of the screen goal posts to attach the frames to.
How is it best accomplished to attach the removable frames? Velcro? I saw in the newest htotm at AVS the guy used speaker grille snap fittings. Seems great, but not sure if it is adding anything over Velcro....
Magnets? Sticky backed Velcro can be a pain to get to stay stuck over time. I've had the paint pull off the wall in one place (crappy paint job) and the Velcro backing let go in another where I used it to hold up my home made window blind.
Friction. That is how my top, bottom, and side panels that flank my screen on my false wall work. Nice and snug, but still easy to remove. I just use the "goal post" frame to provide a solid stopping point vertically, and then added a couple of 2x2 strips to the side walls to keep the left and right panel in line with the screen.
Getting over flu bug... Even had to miss the beerfest event tonight. Think I got the center channel issue sorted. The artificial boxiness seems to have been reduced.
I tried a couple things, cant be sure which one was the magic bullet. First, I tightened up the driver and tweeter screws. Got a big quarter turn out of em, so I did all the other speakers too. Why not. Then I put sticky tac between it and the plywood tripod stand I made up. I'm not sure the sticky tac made a big difference, but I do think it may help damp any existing cabinet resonances.
Hopefully tomorrow will bring some actual progress. Sure would be cool to get the screen wall panels made/installed.
Thanks guys. We watched about an hour of different stuff to test it out last night. It takes some getting used to. I'm so used to seeing speakers it's hard not to think I'm just watching a huge TV now. Here's how I ended up dealing with the light bleed through. I jusy stretched fabric across the goal posts frame.
Does anyone out there know the "optimal" colour settings for an oppo 103? I changed the hdmi colour space to 4:4:4 and depth to 36bit undithered. I'm not sure if I should have done that or not. My PJ is an epson 8345 and accepts 12bit colour (not sure it can produce it though.)
Not sure if its the black backing behind the screen, or the settings, but something seems a little off. Maybe I'vejustnever seen blacks like this out of my PJ before.
Preliminary 2ch listening tests with fabric wall indicate if 2ch sound is important to you, a fabric wall isn't going to do you any favours. The wall is high quality speaker fabric from parts express. I'm not sure if it's the best you can buy, but it's priced that way! Lol.
Anyway, the effect is the phantom image is now not as tightly focused and liveley, like a singer on a stool. Now it sounds more like a recording. The image went from a tight surreal object, to an oblong blur. It still sounds good, but I'm already thinking of ways to unmake the screen wall and replace it so the side panels are behind the main channels. Or, and this is totally crazy, I have to start using the center channel as a fixed phantom, and listen to stereo with multichannel processing. Could be interestng. Jury is out and it hasn't even been a week.
A screen wall should be used knowing HT use is the priority.
Ouch! Wanna lend me some $. 7 m100s and 2 ep600s oughta do it!
If Axioms showed up at the door I would be shot. But don't think I havent been thinking of ways to get away with it....
So, I think my whining about the screen wall shows how my listener bias and testing habits may be a little narrow in scope. Turns out the screen wall has only done wonders so far as the measurements show. The RT60 time has fallen to an overall average of 0.36 seconds. I think this is down from 0.42 or so. Acoustically transparent you say?! No way.
The mains and subs new meaured frequency response in room at the mlp is improved as well. Flatter response overall. Why? I would guess the speakers' toe in vs the screen wall is killing most off axis energy before it hits the walls and reflects to the mlp. This could also explain why the soundstage suddenly sounds different. The spatial cues have changed. Freaking acoustics, eh?
Honestly its all about the acoustics. a bad room will ruin the best speakers made. I have moved more times than I care to recall and had the same speakers for 30 plus years and they sounded different every time I moved. Keep working at it, it takes time but the payoff is huge. I would look at rew and a minidsp module. My axioms with the XMC-1 with Dirac and a few wall treatments sound better than they have a right too.
If you have power amps around, or find a honey of a deal on one, ensure they have either remote control function or 12v trigger startup before planning your system around them.
I own 2 power amps without such features and have to frankenstein a work around to integrate them into my system so they turn on and off with the AVR. Its a long story, but in the end I'll have spent hours emailing, rs232 programming, reading manuals, and spending waay too much money to get stuff working I already own. I broke up a 5ch seperates amplifier system, only to find out the pieces talk to eachother and wont remain powered on as standalone components.
This wouldn't be a big deal if the language used was rs232 based (as their manual states) but alas, I have to buy a go between interface box that transcodes rs232 to their internal coding. And guess what, its arbitrarily expensive, proprietary, and my amps are bricks without it. (Of course). Cant even sell them as a working system without selling all the pieces together. Blurgh!
The many hoops to jump through in this hobby. Should'a became a videophile. (Cause video calibration gear is always trouble free.... )
Okay, this is gonna be a lot of pics. So 56K modem users beware
The panels are completed and installed. It took a couple of weekends to get them made, but it was worth it in the end. They turned out fantastic and, more importantly, put me right in the zone for acoustic concerns. The rooms decay time is in the butter zone across all frequencies. The frequency response is smoother still, and the high frequencies came up a little while bass flattened a little.
It was a bit of a production to make the panels. Half the battle was deciding just what the heck to do. Put poly facing on the insulation, leave them be with fabric only, or use diffusion instead. I stuck with the tried and true broadband absorbers after starting a thread at AVS and getting a PM from Ethan Winer. (felt kinda special)
Anyhow, the basic crux of the build was the same ol' 3" Roxul Safe 'N Sound everyone uses, but I had to deal with the problem of integrating lighting into them..... hmmmm.
I didn't want to put any more holes into walls for anchors and the like, so I had to figure out how to mount them, and the lights to them somehow..... I came up with making frames around the insulation that would house an inner panel frame with a rough opening for an octagon extension ring. Since the panels were 3" thick, I used two 1 1/2" extension rings ganged up. The result was this:
I then had to perform minor surgery on my otherwise routine panels. The tablesaw made for a great exam table. Nurse, Scalpel! You can kinda see the wood runners that would sandwich along the top and bottom of the octagon extension rings, and serve to give a solid backing for the fixture to snug up to. Roxul cuts like cake.
The fixtures came with a mounting plate instead of a strap that I thought would bite enough on the wood runners to secure the panel. Wrong. I had to add some 3/8" fender washers to add some overlap in the key areas. With the plate tightened up to the extension rings the panels were sandwiched tight against the wall. I gave them a stress test and they are solid.
Then it was pretty much a typical fixture install. The first one was a bitch, but after I found out what was involved the rest weren't too bad.
Here is how the room shaped up. Pretty slick for a DIY job.
So what was the end result sound wise. Well, I can't really show you with fancy words or adjectives but boy can I measure!
The RT60 times are now great. I think I am done with adding any absorbtion in the room. I think I will leave the 1ft bass traps in the front corners alone as well. Good enough I figure.
Here is the 1/3 Octave RT60 graph. The program doesn't give screencaps in this module, so a pic has to suffice. I test RT60 with a balloon pop at the front loudspeaker locations and measure at the MLP. Absorber panels are magic!
Here is the new frequency response of the main loudspeakers with subs. 1/12 octave resolution pink noise averaged over 30 seconds. 1/3 octave measurements look pretty flat now, with a bump into the bass territory. I could tame this by cutting the sub output, but I perceive it as sounding just right where it is. Not too much and not too little. As a note, the sound power of the room\system was reduced by 2db with the install of the panels. I had to increase the AVR's volume governor to reach a 75db test level.
The front wall QRD diffuser and rear media shelf remain.... The saga continues!
Your implementation of the wall panels looks really nice and add to the esthetics of the room, well done sir. After reading about Nick's experience with absorption I knew I had to try it and I know exactly what you are saying, they perform wonders. I don't know if there is any money in building and designing rooms but you definitely have a knack for it, perhaps a business venture even. Now you can start enjoying that room , you have only a few days left until your deadline, so get to work
Thanks guys! Suggesting I could make a living at this is high praise. It's been a dream of mine for some time. Maybe someday.
Mojo, no refunds!
Fred, one of the reasons I've tried to resist descriptive sound explanations and instead providing data is it seems, online anyway, that results in photo or data form are more credible. It is very easy to fall into a trap of emotional gushing over system performance, and looking over some of my posts from the olden days, it reads that way too. . I agree, and can attest, whatever is measured isn't always better or heard.
What I can say is I've been an avid online AV hobbyist for almost ten years now. The real jump for me getting serious was buying books and reading white papers starting just over a year ago. I base decisions on math ratios and try to predict outcomes without too much experimenting. The online learning experience prior was fun, but the last year counts for 90% of what I practice now. So saying that, lets get descriptive!
I use the HT system for both movies and music listening. I also own a seperate 2ch system in a semi-dedicated room on the main floor. I will compare the two systems in general terms to give you some idea.
The basement room has an overall RT60 time of 0.34 seconds or so, most of it at 0.3seconds after 125hz or so. The 2ch room has an overall RT60 of 0.4-0.45 seconds. Both systems measure relatively flat, with even decay times vs frequency, and have no obvious coloration or problems as far as measurements would indicate. But they sound completely different.
The 2ch system does not have treated sidewalls, but does have front and rear wall treatments to calm flutter echo in the space. It sounds spacious and very live. The singer phantom is eerily realistic and the soundstage is wide and well defined. Treatment in this room was to eliminate echo, not really focusing on reducing RT60 times.
The basement HT setup is fairly heavily treated. It has the panels just installed, bass traps and poly diffusers. I will count the screen wall and area behind as a membrane absorber, as it definitely has an impact on bass response. I'm pretty sure it was doubling up the screen with a speaker cloth backer aided this. The basement sounds less lively and spacious when compared to the 2ch system. It doesn't have an eerie realistic singer quality either. But what it does do better is pinpoint imaging, clarity, and low level resolution. It is also far more dynamic sounding, partly due to the subwoofers.
The benefits of the panels in the HT are 2 fold. They act as lateral early reflection reducers, improving clarity, and they reduce RT60 times, reducing "room sound" and increasing perceived dynamics. Reducing decay times also benefits our perception of low level sounds within a song/soundtrack.
To see what I mean, go into an echoey room like a bathroom (long/uneven RT60 > 0.8s). Hold both hands out at armslength in front of you. Snap your fingers on one and rub your other fingers together. Then stop snapping and listen to the low level rub. With a well treated room you can hear low level sounds like this clearly, even when loud sounds are in and out of the mix like this test. Its incredible what detail we can hear when our brain is not forced to reconcile the tail of one sound with the onset of another. Its waiting in the mix.
I guess to sum it up they are very different sounding systems, but measure with similar trends. Which one do I prefer for music? The basement by a long shot. For movies it's a given.
Sanding and milling down old reclaimed wood for media shelf.... Kinda neat story. They were old shoring material from an old record store downtown. 3" x 11" rough cut lumber. When wood was wood. From a music store into a music cave.
Well, 12 hours spread over 4 days netted this lunker! The wood was in the shed being stored for about a year. Been collecting in spurts when I come across material slated for the dumpster. This media stand cost me time + $25 for another can of stain and some 6" lag screws.
Thanks. Its been a haul, but almost there. The QRD diffuser remains. It's getting colder by the day, so I wanna pound it out this week and get my garage half sane for parking two cars again. Hate scraping morning frost.
Room is 99% done. Need to install weather stripping around door.
The QRD diffuser is on hold until time allows to do it right. Was a hectic week and rest of basement loose ends took priority..... Staircase. Gotta get all the last minute evidence cleaned up before the big reveal for thanksgiving.
Planning to get real pics done too. Should be posted early next week or so.
Here's the noise floor with a gaggle of wives directly overhead in the kitchen after a thanksgiving dinner. Silence achievement unlocked! The door seals made a night and day difference. With a Dire Straits concert playing at around 65db the sound is virtually inaudible just outside the door.
When watching Big Hero 6 it was reported bass still shreds through the house. (Of course)
Only thing to stop (or I should say "limit") the bass is more mass. It takes quite a lot in order to keep it from permiating through the house. Mine is more of a light rumble, but I went into the soundproofing pretty heavily (pun intended).
Your room still benefits from reducing outside noise, and imagine what it would be like if you just left it wide open? LOL
Writing this as I plow leftover turkey down. So good.
Shred was a bad description, more like muffled rumble like you said. But the really low stuff at reference still cuts through more than enough to get people too lazy to walk a flight of stairs curious.... HT goodness is just lost on some people. One visitor sat with hands clamped on her ears fearing the worst till I reminded her she could turn it down as she sat next to the remote. (The system wasn't even powered on yet. Lol.)
I'm trying to figure out just how much more it would have taken to dull down the sub 20hz bass to match the rest of the transmission loss. The only way I can figure it is to frame an entirely seperate structure within the basement and have it sitting on a neoprene gasket. Then do the typical dd/gg/clips and track with r19 roxul on the floating structure and drywall mount device boxes with putty pads. Then you'd have to insulate the neighboring structure as well with additional drywall in the joist cavities. Some guys go that far I guess.
Interesting food for thought, literally. Still eating.
Shred was a bad description, more like muffled rumble like you said. But the really low stuff at reference still cuts through more than enough to get people too lazy to walk a flight of stairs curious.... HT goodness is just lost on some people. One visitor sat with hands clamped on her ears fearing the worst till I reminded her she could turn it down as she sat next to the remote. (The system wasn't even powered on yet. Lol.)
I came upstairs after she left the demo to find she "booked" the room with my wife for her own get together weeks from now. When asked I replied "that's what it's there for."
Love converting the uninitiated.
Does anyone hold a regular drop in movie night? I've been getting requests and am trying to decide how (if) to organize it.
For fellow Canadians on the board, it was even suggested the room becomes the official "Corrie" spot. If you dont know what "Corrie" is, consider youself spared.
I can hear the simpering trumpet now...... And see the cat on the roof..... THE HORROR! Lol.
Well the QRD is almost done. It just needs time to dry a little more and then to mount behind the screen on the front wall and support with some in-situ bracing. Might be a little tricky given it is 76" wide, 37" tall and weighs roughly 60lbs. Doh! Probably going to have to remove the left channel and center channel to do it without risking a calamity.
This project started as many of mine do. Useful junk (literally) falls into my lap. This stuff was packing dunnage for insulated wall panels. They are the types of panels used for the exterior of modern food processing plants, warehouses etc. These were in abundance and headed for the dumpster. My fater in law scored 23 of them for me, so naturally the wheels began turning on how to use them in the basement. Originally, we were going to use them as two flanking diffusers on the back wall on either side of the media shelf, but once I saw how rough it was going to turn out it made sense to use it behind the screen.
I found a program called QRDude a couple of years ago and started to read up and lust after building one of these monsters.
I decided the best use of all the material was to build a single diffuser rather than several repeating periods together. It made for an interesting build.....
At first I planned out the build using the software and made a cheat sheet for use in the garage.
Then I got to work cutting down the blocks with a table saw. This soon became a horribly dangerous proposition, as the foam would chatter and eventually kicked back dragging my hand perilously close to the blade..... I almost pooped.
So, Olfa knife it was! I had to cut one side along a straight edge and flip it to finish the cut. It took an hour or so, but I had all my fingers in the end.
Here's were step 1 ended up. There were more interesting things in the works (the absorber panels) so it sat like this for a month or so.
Then I had to decide on a thin but sturdy material to act as the well dividers. It had to be cheap as well. This is a bonus round item and the funds for the theater are long spent...
I ended up choosing MDF wall paneling from HD and ripped them down to 9 11/16"- the max depth of the wells. Gluing them up was a couple step process. I only had enough clamps to do them in sections, so I split it up into 3 pieces and did one at a time. I had to use left over cut off pieces to shore the very deep wells up while the glue dried. 7 Tubes of PL Premium later... This was starting to become a not so cheap project.... lol.
Once the smaller sections were glued up and set for 24 hours I got set to glue them together onto 2 backing runners I will screw to the wall.
The next morning I test sprayed a small area with flat black spray paint. Not a good result. I guessed it would happen. Spray paint and styrofoam do not play nice together. It melts. I had a tin of water based flat black left over from painting the screen goal posts so away I went. A sprayer would'a been a lot quicker, but it was a nice lazy Saturday morning putter. We'll see what happens, but this monster might get installed tomorrow. Excited to see how it "sounds" or better yet, smooths out some mid to high frequency valleys it's supposed to do. We'll see.
Impressive amount of work and planning there, Trevor. It's funny. When you first got here I thought you were a hipster, not a nerd. You hid it well. Still impressed.
Lol. Depends who you ask I guess. I'm too fashion and fad blind to be a full fledged hipster. Because of the indie thread? I just lke off the norm music... whatever that means.
Getting this thing down the stairs will be a treat.
It's been an exciting morning. A "wow" audio moment that rarely happens happened today. Diffusers are a game changer. I had to call in a witness to verify I wasn't imagining things. "Thats Fucking Amazing" was the witnesses input.....
The day started out with me trying to figure out how to get the QRD to fit down the stairs in one piece. I had to trim back the back rails a bit before I drug it in the house. It was around 80" long including the back rails. It made the stairs in the end. Phew!
The first stop was the 2ch listening room. Afterall, I would likely never have the opportunity to do a test like this again, and I wanted to see if the QRD was all it was cracked up to be. I was hopeful but realistic. I set it between my 2 speakers and aligned with the centerline of the room and my listening chair.
Ok, so, it's huge it turns out. I sat and listened to a few tracks I've heard too many times with testing and I thought something was amiss. I moved the QRD back out of the way, an awkward bastard with some chunk to it, and sat for another listen. Holy shit! The QRD makes the front wall sound like a single huge speaker in some ways. The front soundstage became huge, deep, seamless, enveloping, razor sharp and reach out and touch it right there. I thought I was imagining things. I mean this thing was a huge battleship of an eyesore, yet it produced an emotional response I have not had since I can't remember when from music. I was choked up. Crazy!
I had to measure. I had to figure out why. Here is the measurement with the QRD in place from the listening position.
Here is the same measurement with the QRD removed from the room completely.
The frequency response showed no obvious clues of the euphonic soundfield created in the room. I thought for sure some peak would have been produced right in the presence region from what I was hearing. Strange.
I was forbidden from trying to lug this thing down the stairs by myself (thank goodness I didn't try) so I made a call to the father in law, a proud owner of some Axiom speakers, to come and help out. I busied myself taking apart the screen wall downstairs and getting speakers out of the way while marking speaker positions with tape carefully.
He arrived just as I had obliterated the basement. I played it cool and said "Hey, tell me what you think of this." This was "garbage" he got me afterall, so he was a key shareholder. I sat him down with the QRD in place and played a song he was familiar with. The song played through and he thought it sounded great. His usual "Yep, it sounds great, Trev." Then I had him stay put and drug the QRD back out of the room with my wife. Same volume, same position same everything, just no QRD. We replayed the song.....
I had resisted the urge to say anything at all. He was feeling me out for what was going to happen. I told him I didn't want to bias his opinion and let him finish listening to the track again. He didn't make it all the way through the second time. "Oh my god, that's fucking amazing. Fucking incredible." It was a success.
The difference between a recording and live event had seemed to be blurred. It was frankly astounding and beautiful.
He was super pumped to get it lugged down the stairs and chucked behind the screen. I had to slow up the process to get a gameplan going. It was going to be a snug fit afterall....
With the room apart we got started and made it down the stairs. We went in through the left side of the screen and I only had to remove one speaker. Speaker setup is a pain in the butt for me (HT neurotic perfectionist) so I only wanted to touch one channel.
Anyone who's moved a sofa around a tight corner can see what we were up against. A tilt, hook and push and we were in place. Gently threading the lunker behind the center channel. How is it you get 25% stronger while you hold your breath? lol. There's a lot less room back there now!
We sat and listened to the same track downstairs and agreed we had stumbled upon something quite special. With only 2 channels playing the entire front wall was a massive floor to ceiling, wall to wall, soundstage.
I had to try out the center channel and threw in Pink Floyd's SACD of the DSOTM. It has a pristine Stereo and 5.1Ch mix so it was great to do a quick A/B test in tracks. The center channel has came alive in a way that's hard to describe. I'm not sure if its proximity to the diffuser has something to do with it, but it was like no sound I've ever heard it produce.
I know it sounds stupid. It reads stupid. It is stupid. Stupid good somehow. It sounds like a "real" voice is behind there.
After the high fiving stopped (jk) I settled in to take some new measurements of the basement with 2ch and subs. This time I wanted to see how the sweet spot improved off axis and how frequency response was affected across several listening positions. Again, like absorbers, diffusion can be magic. Here's a rough roadmap of the measured positions followed with their individual responses at each seat.
I wasn't sure what to expect when messing with diffusion. The poly diffusers on the sidewalls look cool, but they were no where near as dramatic as the front wall diffuser. I have yet to watch any movies down there with it. But I can't wait to hear how dialogue in movies is affected.
Next to Dual Subs and Absorbtion, Diffusion is a must have IMO and I'd encourage anyone to try it. Very cool! I'll do a more sterile report once my excitement calms down a little.
Absorption is better "Bang for the buck" improvement in a room, so since you started with diffusion first, I think that you will really like it when you mess with absorption. Absorption is actually easier to implement too.
A perfect solution has a combination of absorption, diffusion, and reflection of course, but you are well on your way to some really nice sound.
The sidewall reflections have absorbtion and front corners. I have 2 batts of Roxul left. Any suggestions on where to put them?
I have room on either side of the front diffuser if thats what you were getting at before. I am flirting with a dry room if I add much more absorbtion I fear.
It would be nice to flatten out the lower frequencies more (below 500hz) but it sounds VERY good now where its at.
I deleted my last post but I should have left part of it.
I think the suckout on axis centered at 180hz could be due to SBIR effects. Looking at the measurements across the listening area the suckout disappears as the measurements are closer to on axis of a single speaker.
I originally posted the formula from acoustic frontiers
Sbir frequency = speed of sound/(2x(direct path-reflected path))
In my room the front wall reflection adds 38" of travel (the distance from the front baffle to the wall)
So sbir frequency = 1130/(3.2x2) = 176hz.
BUT
The vanilla formula for sbir, not taking into account the reflected path is
SBIR= speed of sound/(4xdistance to boundry) This uses the 1/4 wave distance cancellation due to phase interaction -but doesnt take into account listener angle. I think the original formula I posted is better for this instance and the 1/4 wave formula better for subwoofer modal predictions.
Since we are talking about adding absorbtion to the front wall, I'm trying to predict the best outcome and share the results with you guys. I'll try absorbtion directly behind the main speakers on the front wall. We'll see.
Remaining 2 corner traps are deployed on front wall straddling the inside of the corner traps. Noticable improvement in bass tightness during movies. Kick drums sound very tight as well.
New RT60 dropped across the board by a slight ammount. Now at 0.27 at the high treble descending to 0.32 at lower midrange. The lowest octave is now at 0.49s. Good improvement.
Still evaluating QRD. Can't wrap my mind around how it does what it does. Crazy.
Very impressive effort, but it would be way too much tweeking & science for me. I'm just lazy I guess & don't obsess over this stuff anymore.
I set up my system so that it fits the room & is visually appealing, do minimal adjusting & then enjoy. I haven't changed anything in a year except turned Audyssey Off to take out its EQ that it added to the higher freqs (unnecessary IMO).
Its a game of inches.... But when it all comes together it's miles better.
I'm almost finished. Out of insulation and room decay headroom. I'll probably put diffusion on the rear wall at some point. I enjoy the theory meets reality part of our hobby, but it doesn't always work out that way. It's fun as long as I'm learning something.
Still evaluating QRD. Can't wrap my mind around how it does what it does. Crazy.
If you felt really brave, you could try putting an equal amount of regular styrofoam (or whatever you used) across the wall instead of the QRD and see what that does.
I wouldn't, though. It works. Be happy.
When you were building the QRD, did you put pieces of wood across the bottom of each well between the dividers, or is that just foam at the bottom ? I have seen them built both ways with nary a mention of why one would or would not do it.
I may have to make one of these as a winter project. With a bit of luck (and some really big-ass hinges) I could turn it into a pair of double-pane shutters for the big window that makes up most of my front wall.
Thanks very much for posting your work and your results. It's a real help for anyone trying to achieve similar results, and probably a great source of amusement for the ones who are not.
Each piece of foam is the full height of the well required. They are sandwiched together like an oreo cookie. The "0" height wells have a piece of well dividing material as the bottom. The well dividing material I used is 1/8" thuck. There is no backer sheet of plywood (to save weight) but two pieces of straight 5" jamb stock instead.
The top and bottom of the wells are open except where it rests on the support shelf (about 4' wide.) I should mention I went out of my way to build all supports in close proximity to the subs at non right angles (45 degrees angled away) where possible. This in theory reduces the problem of subs humps/coloration (like placing near a corner). I have messed around with a pb12-nsd and a JBL sub beside ikea besta units at my brothers places. Learned some lessons there.
Mostly for Bridgman so he can decide if a qrd is right for his preferences.
Ok, initial impressions of QRD after a few hours of music listening and The Hobbit Five Armies. The QRD didnt exist in place for very long without the front wall absorbers added, so they are part of this impression as well. Remember the sidewalls and front corners were treated but the front wall was bare.
Two major things happened with addition of the QRD/Bass traps. They both made a positive benefit in their own way -But the QRD is still far and away the most dramatic improvement to listening experience (built on the foundation of proper placement and sidewall control.)
The general response of the room didn't change in the mlp as far as measurements go, but the system's off axis response is now very smooth and consistent. I will say as a net result I turned the sub level down for stereo sources, as the soundfield is seemingly more dynamic and impactful with the corner traps I think.
First Major Change: The center image doesn't fall apart when you move your head, in fact the center phantom is not really the same at all. It is more fleshed out and robust. Instead of a tight ball of sound fixed in place it's more like you're seated a few rows back from center stage. Vocals sound like they are coming from a person and not laser tight. The phantom now has dimension and depth, texture and even height somehow. Mono recordings from Louis Armstrong sound like he is singing through his trumpet. Really. You can hear his gravelly breath in each note. There really isn't a clearly defined ball of sound in the middle at all. Each individual element that used to be smashed into that ball is decompressed and clearly formed in its own space.
It seems the phantom is now created as much by the re-direction of sound from the diffuser as much as it's created by my ear/brain. This would explain in part why it seems there is a giant wall wide speaker in the room. It is re-emitting sound at a slight delay and phase shifted from the input sound. One of my books calls this a "passive surround" effect.
Second Major Change:
The ENTIRE width of the front wall is now part of the sounstage. In Jazz recordings where players are set into sections (right left center back etc.) the furthest right/left player appear to be coming from the corner where the screenwall meets the wall. The back sounds like its in back. I used John Coltrane's Love Supreme (which I actually have never been able to sit through) for testing. Super wide. I messed with a bunch of material with complex drum tracks. LCD Soundsystem/Barenaked Ladies/Phil Collins/Vampire Weekend/Tears for Fears/etc. Lots of synthy fast beats mixed with hand percussion and the occasional cowbell. Each little transient was a seperate and detailed with robust body and texture, especially bongos I noticed. There was now space and shape associated with each impulse. Cool.
The increased level of texture and space really benefits every aspect of the music I have tested. The detail is incredible. Eg. The Raconteurs "Consolers of the lonely" has very low level talking in the lead track through the song. At 0:30 you can clearly hear someone say "double track that."
I will admit, it is not really fair to compare it head to head with absorbers so far as overall audio impact, they are different tools- but I don't think it would be as pleasant of an effect in a room without somewhat "controlled" decay behaviour. Diffusers should be mated with absorbers. Absorbers still should come first. I think you can get the same clean, textured and seperated sound with absorbtion only, but you need a lot and spaciousness suffers. The QRD puts space back in spades.
If you saw the state of mess that mine is in. There is nothing like yours so I'd rather tuck tail and hide in shame.
I did get my Panasonic working with Netflix. (then proceeded in 4 days to almost max out the bandwith allocation for the month with a some House of Cards 2-3 episode marathons. That 4k tv sure does eat up your bandwidth.
The hard part with the 4K TV is it's hard to really say if the picture quality is better than 1080. It's not like I can do a blind test as I have 2 TV's in different rooms, as well as they are different sizes. The picture quality on the new Panasonic puts what we were happy with on the Samsun 46D6450 to shame.
But as it upconverts everything a 1080p source us upressed to 4K and looks great. I don't have any video in both 4k and 2k to do an A/B test on the TV. House of Cards season 1 was all in 1080, and season 2 onwards is in 4k. I can't really say that there is a mind-blowing difference between picture quality of the two seasons.
The TV can also do HDR when the next or some future firmware comes out. I think they were waiting for the Ultra HD Blu-ray standard to be released and the players to come out. I think that will be in December from what I have read. The panel is 10bit and is has 98% DCI colour space but I don't think it's the quantum dot to reach into the newer REC2020.
I have to get some more of the wall covers finished on the back around the TV. I have a panel that I have to install to cover the water meter and shutoff. Figured out how I will do it, just not got around to it.
When it starts to look more pretty, I will consider posting some photo's
Just as long as you can figure out how to get this darn ATI card to play nice with the 4k TV. Still trying to figure out how to control the overscan so I can see the missing 1.5" on the left and right side of the screen. Nothing quite like when the start menu and option bar are hidden by a screen overscan to the sides.
Serenity - This is a terrific read, and your room looks like a great place to spend a few thousand nights watching movies and enjoying adult beverages. Well done!
Ok, hot off the digital presses. Sorry for those who have trouble viewing the photos. They are largish format and about 5mb each. Hopefully I can put them up sized the way they are. The pano shots are already downsized to 25% of original.
The colors are pretty close now. They are light level dependant so I'll label them as to the sconce brightness.
Lobby with Equipment Rack cabinet. (Still need a popcorn machine. )
Looking back out to lobby with lights at dimmed 'listen to music' preset level. Pretty accurate to in room feel.
Landscape pano shots stitched from many photos. If geometry seems off, that's why. Forgot to get shots taken of the screen in action with a movie playing. Doh!
Sconces up to full blast. Colors off a bit, but a good representation of bright lights on.
From reverse angle. Sconce lights full on with rear media shelf potlights on.
I'm on the right joined my extremely helpful and patient Father in Law on the left. Now, we look to the horizon for the next project. Adventure and mishaps await! Maybe a photo studio for him.
A trained ear with a music degree and recording experience is coming over tonight for a show. I've asked him to bring some of his bands' material he was involved in recording to critique it. His band won an ecma, so I'm kinda nervous, and excited. He was interested when I mentioned a design goal was an accurate and natural presentation. In theory, the room could be used for a recording studio, so I'll have a lot of questions for him about his experience.
I've tentatively decided on making leanfusers from Arqen to go beside the rear wall media shelf on either side. They seem easy to make and won't be ugly if I make em right. The pub row is almost finished, but I'll hold off on pics till the diffusers are done too.
Looks like the diffusers are a spring thing now. Might as well share the bar stool row.
Here's how you can cheat a second row if your room isnt quite long enough. The swivel stools are pretty comfy. Not so great for being in the surround field for 5.1 movies though. Never catch me in that row. Back to crappy camera.
I wish I had a little more garage time to get the diffusers done. Sounds like 15cm of blowing now overnight. Here, 15cm can be anything from a trace to a couple feet. Please not another winter like last year......
Hope you guys over there have a mild one this year. Over here in van. it was actually 0 to-4 and dry for a few days, now were back to the normal 10ish and rain rain rain.
I might have missed it somewhere, but have you noticed much improvement after adding the poly diffusers? I know that you added them on 08/30/2015 and there were other treatments, but I am not sure if there was ever a "yeah, I think that they were worth it" or not comment from you.
Whoa! The thread awakens. Thought my spring rear wall diffuser update would be it.
The sidewall polys were installed prior to the sidewall absorbers. The absorbers made a much more impactful benefit to listening. That said, I am happy I went with the polys for esthetic reasons. At the time it was hard for me to quantify with measurements or give a definitive subjective impression. The room was still pretty lively.
One thing the polys did do was take the ring out of that sidewall to sidewall area in the room when testing rt60 with balloon pops. It was impressive actually how much it improved flutter issues. Gone even before absorbers.
If I revisit these areas I will do a shallow QRD design for the sidewalls and wrap in AT fabric. People say QRD diffusers dont work in small rooms, or they arent beneficial compared to absorbtion. In my experience they are a great solution when trying to preserve room energy. They sure are a lot of work compared to polys though.
If you are thinking of an overhaul while shifting your sidewalls and mains around I would encourage any diffusion. A deep front wall QRD was an incredible improvement for my setup.
I'm not very good at concise answers.... If you are ever on the island you are welcome for a listen.
Not that you need a primer, Nick, but here is a good vid for those interested directly comparing and explaining different diffusers vs absorbers. Headphones work best when viewing the vid for comparison. Hope it's helpful.
I am planning an slight overhaul in my theater. Mainly to get my front main speakers a little bit wider (which means tearing down the false wall and moving it about a foot further into the room), and then the moving of my side surround a bit more forward, and the rear surrounds a bit wider too. At the same time I plan to map out a different wall panel layout. Something that is a bit more aesthetic as well as functional, and it will require me adding two more 2 foot x 4 foot panels that are 3.5" thick.
This is where I am toying with adding diffusion. 3.5" isn't very thick, and most QRD diffusers need at least 7-8" of depth, so those are out. I was thinking about a poly diffuser because I can work with the size to get a 30 degree arc and if sized right still have it fit in that 3.5" space. I just don't know how much it will help. Not saying that diffusion doesn't help, but that due to the restriction in depth, it could be a waste.
Of course, I could make the 2 additional panels absorption like the others, but I am really getting close to that 20% max absorption number so I thought that I would look back into diffusion.
I just watched Ethan's video over my lunch break just today, but have a bit of planning to figure out. He says that 3" is the minimum depth, but also that they should be further away from the MLP than what might work for me, so we'll see. As he mentions, absorption can solve all acoustical problems, but also make the room seem smaller.
The new panels will be the last thing that I do, so I am in no rush, but I will be looking to tackle everything else in about 10 days when I have a 3 day weekend.
Back for an update. How are y'all? Missed yous guys.
Here is how the back wall shaped up.
In the end I went ahead with a modified fractal design from Arqen (A1-LF). I used foamular EPS insulation from home depot and made a hot wire foam cutter to dice it up. This made the project affordable and not weigh a ton. The slices are glued together with 3M super 77 spray adhesive. Wow what a time saver. Had to wear gloves, specs and a mask though. Almost as intense as the spray foam day!
Mocked up before gluing on hot wire bench.
Spraying.
Pretty happy with the way it turned out. Building the hot wire foam cutter was fun too. Now to see how it all sounds....
Here's a shot to give an idea of the "texture" and depth of these things. They weigh a whopping 3 pounds each I'm guessing. Learned to cut the weight when building the other QRD.
Nice. I always wanted to build some, but never go around to it, plus my current room design doesn't work well for that depth of diffusion. If only I had that time machine...
These things were the right choice. I made the mistake of listening to the DSOTM SACD last night before bed. Now I'm back in here before work this morning. Sick day?..... Must.. Discipline.... Doh! Lol
The movie isnt horrible. We made it half way through before I got nervous about temps and shut down. It is an action fantasy kinda thing so if you dont take it seriously it is at least entertaining. It was much better than "30 minutes or less" we watched right before it. After that flick we were at 32 degrees.
I use an AC infinity airplate 7 setup mounted in the top of the cabinet exhausting air out. I have to order an additional dual fan plate to bring the total exhaust to 4 120mm fans pulling air out. I will probably pick up a grill and cut a hole in the side at the bottom of the cabinet for a passive intake. Right now the air comes in wherever it can through the door seams etc. Pic later. It isnt a problem unless the basement is warm. First summer with the 3 amps in cabinet.
By popular demand here is a look inside the AV cabinet. I would be adding a fan unit to the left hand side at the top. And, yes, I do have the gear mounted ass out. I tinker too much not to.
My diy urge is creeping up again. I have to decide between a couple projects. It will be an either or choice and will set the other further away budget wise. Both will happen eventually I hope. Time to start budgeting for one.
After messing with an uber pro amp I have decided my mains just arent able to handle the massive dynamics I am craving without stupendous power. I would like to see if my current amps will fare better with more dynamic speakers.
Choice 1.
Buy refurbs here or build new LCR loudspeakers for my mains. Statement IIs considered. $2500 estimated cost.
Choice 2.
Upgrade to an Atmos setup. This will mean upgrading my AVR and installing in ceiling speakers I have roughed in for with Nick's help. Likely M3s. $3000-$3500 estimated cost.
I am leaning towards the first choice as it will benefit all source material (including 2ch.). And its cheaper.
If I go with choice 1 it will lead to another ridiculous adventure for you to follow eventually. Lol. If I go with choice 2 it will cost more money and I will still be lacking the dynamics I want. But I will have immersive audio.
Mains are Mezzo 6. Center is Mezzo 5. Surround channels will stay as is. I cannot move my wall mounted side surrounds position lower on wall unfortunately. As shown here but in black oak:
You've heard my setup in my old room. (Albeit with messed up sub levels :p) Should I settle?
I wont know conclusively until I try. I want to push further. I have read up on the statements quite a bit and found a DIY event vid where after hearing a few full range DIY projects a group of men were transformed into giddy boys when the statements played last... Lol. I want that.
How know thou that Statement IIs will give thee the macro and micro dynamics thou seeks?
Dunno, but SerenityNow seems to knoweth more than I about these things...
Hmm... so Statement II's are DIY speakers with 2x8", 2x4" and a ribbon. Initial impression from looking at the drivers is that it probably sounds really good but isn't what you want if you're looking for dynamics.
Bottom line is that you need surface area -- 12" or 15" woofers or equivalent in smaller drivers. Two 8" drivers (roughly equivalent to three 6.5") could probably handle it if they were designed for high power but my impression is that the Dayton woofers are not. I could be wrong though...
Yet another edit - wow, 142 guests and one registered user. C'mon folks, it's a nice place here, sign up and start posting
I tried Dirac. Mixed results. I downloaded the trial version and have been playing with it all afternoon. The best result was letting it handle just the low frequency region (light blue in image.) If I went with a full spectrum calibration it shrunk the soundstage width considerably and flattened it out. I think I've got one of those "if it aint broke" scenarios. I was contemplating factoring in an 8 channel MiniDSP DDRC-88A but I dont think I want to anymore. I think I might consider the DDRC-24 and let it handle the subwoofer range only. Kind of bummed it wasn't as spectacular for me as it seems to be for everyone else.
Anyone know any tricks to getting the best out of the DL software? It really crushed the enveloping feeling my room has. I went with the default 9 point measuring pattern but kept the total width of the area at 5' or so. I'll have to play with it some more for sure. Powerful software.
I have always believed that if it aint broke don't fix it. all the measuring mics and software can not replicate what the human ear can hear. Honestly if it sounds good to you that is what matters not what all the squiggley lines are trying to tell you. I have Dirac live full and since I treated my room I really don't feel the need for it and have not run it since moving. There are many purists that believe RC software is not necessary and maybe even harmful. In all honesty and this is just me , but using REW and a good mic will get you 90% of the way there using speaker positioning and treatments . The Minidsp 2x4 is a great tool especially with multiple subs that are not symmetrical. As for Dirac I found that having the mic too close to the wall when measuring can really skew the results. Also I try to keep the mic close to the MLP, most people that watch with me don't know the difference or care.
Dirac isn't for me in the end for the entry price. I A/B tested with my wife, with several different filters, each less intrusive than the next. The best attribute we were able to achieve was tight, dry bass. But if you have heard really, really tight, dry bass, well, it sounds weird and unnatural. MINIMAL processing was my preferred setup for all filters. Toggling the filters on and off quickly showed obvious, although not always better changes. I was only EQing most of the range by a few DB -and it was too much. I could never get every region sounding "just right."
My experience with the Dirac Calibration software was great. It is very intuitive and quick to generate and save filters. The companion Dirac Audio Processor Controller on PC is less than bug free. I have new found respect for those who run an HTPC or a computer audiophile rig. What a pain in the nutz it is to get everything to play well together. Had a few "just walk away" moments for sure....
All in all this was a great experience. I learned about how my speakers react to EQing. Extending the high end treble range causes obvious problems. Flattening out the midrange seemed to change the feeling of envelopment in the space. Tightening up the subwoofer response yielded pretty good results, but there was now a pronounced "Hi, I'm a subwoofer" sound to every bassline. The mains and subs were no longer seamless.
I think the tried and true passive acoustic treatment methods are less intrusive and natural sounding than my experience with Dirac -but in a bare room the results may have been very different. I could have probably spent more time with the filters, but it seemed there was no way to EQ small portions of the frequency range and leave the rest alone. The sliders only allow a low\high pass filter arrangement. I would like to try another PEQ that lets the user focus on key ranges and leave the rest alone. I have determined my room has comparatively minor issues. They measure much worse than they sound. Chasing the remaining issues down with Dirac software was two things for me.
1. Enlightening 2. Soul suckingly un-fun
I learned a valuable lesson. Boiling results down to raw numbers and graphs with Dirac boiled me down to a frustrated person. So thankful for the free software trial. Moving on!
Man I spent hours and hours with REW and Dirac and running sweeps and comparing them and reading and reading at REW forum and Emo forum trying to do god knows what. In the end I put up some panels waited for a quiet night ,we had a lot of street noise and ran dirac and sat back and watched movies and stopped with all the fussing. The biggest change was the panels, I read about clapping in the room and listening to how it reverbs and the panels cured a lot of echo. I may do a bit with subs once the winter blues settle in. Maybe build some traps just to see if it sounds better or just different. I don't think it was a waste of time but I just found I kept going farther down the rabbit hole so I just stopped.
I may end up eventually trying the mini dsp 2x4 or the dspeaker antimode 8033. I do have ringing in my room at 25hz and modest ringing at its harmonic at 50hz. These are length modes and affect the entire width of the listening area fairly evenly. Part of why the 8033 is appealing to me is it is a black box standalone solution. No licenses, computer hookups or time pouring over graphs and making adjustments. There just comes a point where analysis paralysis starts to set in.
A terrified face met me at the bottom of the stairs. She was relieved to see I wasnt in the room. She was disheartened to hear 6 more sweeps were coming....
Testing commences on the DSPeaker Antimode 8033SII subwoofer correction device! Socketman had one free'd up when his secondary system was under some maintenance and offered to ship it my way for a spin. What a nice guy!!
I've spent the morning playing around with it and am pleased with it's performance. It is simple to use and works as intended. The frequency sweeps were thrilling to say the least... from outside the room. I was able to measure (after listening tests) it was only affecting the room resonance region I would expect given my room's dimensions. Good news!
I need to spend more time with it to dial in the phase and levels post DSP applied to get a better indication of what is possible when tweaked using calibration tools. My initial listening impressions are positive and are as follows.
-It produces tight bass without sounding overly dry when engaged. -It reduces overall tactile room response when engaged vs bypass mode. -It does not shrink or modify the soundstage in any way I could discern. -The overall perceived bass output is reduced slightly while couch rumble is reduced considerably. -It is nice to have a simple one box solution that just works. -It wasn't a pain in the neck like the Dirac computer trial. No handshake or format issues.
I used a bunch of music and a few movie sequences for testing I am very familiar with.
The music sequences were the first minute or so of Prince's Controversy, Michael Jackson's Billie Jean, and Mackelmore's Thrift Shop. For fun I threw on some old school Jamiroquai to listen to Stuart Zender's funky basslines.
Movie sequences were the "Beelzeboss Showdown" Chapter of Tenacious D in the Pick of Destiny and "The Falcon Flies Again" in Star Wars the Force Awakens. Both scenes use extremely dynamic and impactful bass swings.
Initial cursory measurements with pink noise show it is only affecting the low bass region. You can see the modes at 25hz and 50hz in my room are reduced in the plot. I will take a battery of plots later when I really get things dialed in with the DSPeaker engaged. Curious to see what the waterfall plots say.
Yep, that's how I'm hooked up. I should probably mention the subwoofer's cutoff dial is at max and all bass management is done via the AVR. Since the tones are generated by the DSPeaker, corrections stored in the device are probably covering a range all the way up to 200hz or so.
I wanted to verify that the DSPeaker is only active on the incoming source frequencies and isn't creating any spurious corrections outside the incoming source frequency range. Good to go.
I watched the new Ghostbusters this morning and noticed the DSPeaker definitely reduces tactile room response. On the other hand I can turn up the volume to loud levels without having bass bloom issues in the room. It's a tradeoff it seems.
I am going to re-tune the levels to match the +5-8db rise in bass output I had pre-dsp and set the distance to compensate for the processing time. They recommend adding 3 feet in the manual. I will test and see.
It is already seeming like I can make some conclusions, but I will hold off for more testing and data to present.
Ok. Ready to call it. I would want one. There's a caveat.....
The DSPeaker Antimode 8033SII is a great little box. It does what it says, it does it well, and it doesn't do what you don't want it to. It doesn't alter the sound in a negative way an audiophile may object to. BUT.... here's where you might go wrong in getting one.
My current pair of sealed subwoofers (SVS SB12-NSD) were perfect for my old room @1428cu ft. They rocket it. Hard. Enter the new space built in this thread @2392cu ft. They barely load it to being tactile.
So the issue is my current subwoofers don't have the mustard to get the job done when DSP is applied to take away room support. If I had a pair of larger subs, capable of tactile experience in larger rooms without room support, it would be bass nirvana.
Here we can see the DSP is cutting the measured first order length mode energy in room by 12.5db (lower left corner in pic.) Since this mode is centered on 25hz this really hurts LFE effects in movies, but is almost never an issue in music content. Hmmm.
Frequency response of DSP corrected and DSP bypassed subwoofers(grey bypassed)
The DSPeaker really did make a meaningful change to the low bass decay energy in room. Bass really tightened up in a measurable and perceptual way. This was a great benefit as it reduced room blooming during sustained loud bass passages.
ETC plot of subwoofer decay measured in room (grey bypassed)
Lastly, the DSPeaker improved the impulse response of the subwoofers as a pair. The results aren't as striking as Dirac measured, but they don't sound as artificially dry either.
Dual Subwoofer Measured Impulse Response in room (grey bypassed)
So what does all this mean? The DSPeaker is a very capable unit and does what it claims to do. What it cannot do is give you more net output than you begin with. It cuts problem resonance frequencies, leaving you with less room support. So I know what you are saying, just turn the sub levels up you dummy with the DSP applied. Here's the rub. With lowish displacement subwoofers, like mine, tactile LFE energy is dependent on room resonance support... Turning up the gross bass levels creates an imbalance in overall frequency response to restore some tactile sensation. I was able to sneak the bass up +4db before I was at the perceived level pre-dsp. That doesn't begin to replace the 12.5db removed at the room's most kinetic frequency...
If you have a dual setup with plenty of subwoofage to spare, the DSPeaker Antimode is a great idea. If you are barely making ends meet with your subs (like me) stay put and enjoy the bass support you have. DSP means less. Less can be more if you start out with tons!!
All in all it's a great little tool if you have the right circumstances. This was a great learning experience and an awesome way to spend part of a chilly weekend. Thanks Socketman.
I went into a viewing of the new Ghostbusters movie through the eyes of my 17 year old daughter, who never saw the original. I went in with a blank slate and low expectations. There were several things (and some characters) that annoyed me, but if I blocked out all memory of the (better) original, it was at least entertaining.
On a technical note, I likes how during some scenes, on my 16:9 screen, the "streams" from the proton packs would actually go "outside" of the main movie aspect ratio and into the black bars above and below the movie image. That was actually kind of cool.
All that said, I don't plan to watch it again anytime soon.
I would rather be poked in the eye with a sharp stick than have to sit through another movie with Melissa McCarthy. The produces could have had a good movie if they had not chosen her.
So what does all this mean? The DSPeaker is a very capable unit and does what it claims to do. What it cannot do is give you more net output than you begin with. It cuts problem resonance frequencies, leaving you with less room support.
Can you make it only partially adjust, ie somewhat improve tightness but still leave you with some room support ? I'm kinda guessing that's the best you would get from bass trapping anyways.
Are you pretty sure that the 25 Hz peak is what is giving you the boomy / not-as-tight-as-you-would like bass ? IOW any benefit from just knocking down the 50 Hz peak ?
If you could make it avoid boosting the dip between 25 and 50 I wonder if that would give you enough headroom to make up for having 25 & 50 peaks cut down ? Looks like filling that dip could be costing you up to 5dB of headroom ?
I would rather be poked in the eye with a sharp stick than have to sit through another movie with Melissa McCarthy. The produces could have had a good movie if they had not chosen her.
Avoid her movie The Boss. Brutal!
Bridgman, it does have a boost 25hz and 35hz mode that I only superficially messed with. I didnt take measurements in those modes. The 25hz peak is definitely responsible for the bass grunt in my room (there is a moment in Battle for Los Angeles where a helicopter takes off that really grips the room, I measured it at 25hz right after finishing the movie to be sure, no one seemed to mind. Lol.)
I was present in the room taking these measurements with the sweeps (wearing earplugs) but I wasnt in the mlp or seating row. A slow sweep downward from 200-10hz revealed strong room vibrations at both resonant frequencies. With the DSPeaker, these vibrations were reduced considerably.
Putting energy back into 25hz with the boost function didn't restore the tactile feeling pre-dsp while testing with the Star Wars falcon scene. I will test a little more if I have time soon. Christmas season is here.... not decorated yet. Yikes!
Here is my takeaway from my use of the Antimode. I personally tend to favor exaggeration of bass especially the range that pound you in the chest, or back if your in the car. Now it takes a good amount of power and some 12s to load a midsize sedan so loading a 200sq/ft room will need much bigger drivers than the pair of 10s u have in my bedroom where I used the Antimode. What I did find was that the bass was consistently tighter and much more realistic than without it. The boomy room modes that are caused by the bass waves coming back on themselves was removed. It took a while to just accept that's the way it should sound and after that I really appreciated having it. This is a great set it and forget it device. If you need to directly attack certain frequencies then you need to measure with a good mic and software and get your self a minidsp 2x4. I will say this, room correction is great, but do it after you treat your room, and if you cant treat the room give RC a try , some likey some don't .
I would rather be poked in the eye with a sharp stick than have to sit through another movie with Melissa McCarthy. The produces could have had a good movie if they had not chosen her.
Actually, it was Kate McKinnon's character that annoyed the snot out of me. LOL
But yeah, Melissa McCarthy's "standard" character that she seems to always play in movies does annoy me too, just not so much in this movie.
Hmm I thought maybe I was just becoming a crotchety old man, good to know. It wasn't a horrible movie but I was there for the first one and it was Soooooooo much better, I was unable to look past the fact none of the original cast was present. I just wont watch movies cast for Millenials there something wrong with this generation, even gen x is better but not by much.
I liked Kevin and Benny the most. "I just remembered, I hate coffee." Lol.
The effects creeping into the widescreen masks was awesome. The guys with the auto masking screen setups would'a missed out. +1 for us I guess. I also really liked the aspect ratio change to 16:9 when they went into the ghost realm to save... Spoiler!
Hmm I thought maybe I was just becoming a crotchety old man, good to know. It wasn't a horrible movie but I was there for the first one and it was Soooooooo much better, I was unable to look past the fact none of the original cast was present. I just wont watch movies cast for Millenials there something wrong with this generation, even gen x is better but not by much.
Yeah I saw the original when I was a kid and loved it too.
Also, and maybe I am reading your post wrong, but pretty much the whole original cast was there (minus Moranis who doesn't act any more, and Ramis who passed away). Although their cameos seems a bit forced for sure.
Nick I have rented far too many movies where I was screwed by the leading actor appearing strictly in a cameo. To me the whole cast was a bunch of hacks. I am being forced to live in the past. Sadly my heroes are getting too old and or dying.
Most times I watch a sequel I try to watch the previous movie for context and a refresher. Honestly deviating the cast for Ghostbusters was a huge mistake. They could have had a few from the old cast and then introduce a few new members to carry the story line forward. But that's just my opinion. I mean really , having Axle Rose singling for ACDC is not ACDC anymore than Sammy Hagar singling for Van Halen is really Van Halen,more like Van Hagar or something. David Lee Roth was Van Halen, even though Eddie and Alex could play guitar and drum it was still all David Lee. And the Ghostbusters was Bill Murray et el. Just a cash grab by the film industry. Rant over
Hey, I am right there with you. It is FAR from the original, and really NOT a quality movie. I was just stating that they had the cameos of (most of) the original cast, but they were shoe-horned in.
I just built an emulator for my son-in-law that plays old NES, SNES, Sega Genesis, and a couple of other systems (more from the 90's) that fits all inside an old NES game cartridge.
Here is a picture of the one that I am building with some fresh hot glue. I used thin double-sided 3M foam tape under the USB hub board and Raspberry Pi Zero, but locked everything in place with hot glue.
Here is a picture of someone else's completed project.
It was actually pretty easy to make. Lots of step by step videos on YouTube including links to all of the parts.
Download the software, and it does all of the work. Then it just takes a little searching to get the ROMs (easy downloads there too) and finding the Raspberry Pi Zero can be a challenge. A lot of people buy them for $5 and then sell them for more than the Pi 3.
Micro Center had a Pi Zero kit with the correct power supply, and a couple of the cables for like $25, the other cables and controllers were found on Amazon. If you want to put it in a gaming case, then the real sucky part is that the screws are very specialized and need special tools, or some creative way to remove the screws (saw a video of someone using a melted toothbrush (yeah) to make a mold of the top of one of the screws.
Or just get a different box, a Pi 3 (which needs fewer cables) and follow the same directions. You can play more game systems, have fewer cables, and have things like build in networking and bluetooth for wireless gaming.
Yeah, Photobucket has become a pain. I only use it if I am wanting to share an image while I am at work (on my lunch break of course)....
I was looking into imgur.com for a possible new place moving forward. If I just shut down my Photobucket, then a number of images will just vanish from posts (here mainly, but some on AVS). I just hate when I am google searching something, it takes me to a forum talking about exactly what I want to find out, and the image links are broken because it is old.
Photobucket has become so over run with ads it takes forever to get to your library. I started over at Imgur and it seems decent so far. I also grabbed a copy of everything I had on Photobucket to put on imgur but will leave behind a copy at photobucket. Like nick says, no fun going through a thread with broken links.
Building commences on new diy LCR super towers. Material cut today. Assembly starts tomorrow. Pics later. Need beer. January blahs hit me hard so I couldnt wait till spring. Lol.
Thanks to Mojo and Socketman for urging this forward in their own ways.
So are these your own design or are they based on a kit. I wish i could get something going out in the shop but i have no need for anymore speakers and no money but plenty of BLAH LOL. Looking forward to following along with ya.
So are these your own design or are they based on a kit. I wish i could get something going out in the shop but i have no need for anymore speakers and no money but plenty of BLAH LOL. Looking forward to following along with ya.
Are you kidding? I am far too cowardly, cheap, skeptical and did I mention green, to embark on such a courageous mission. Actually, I have been looking at DIY kit designs for years and almost made some a while back. So this will be a modified kit build. Being the overthinker I am, I asked for the book Acoustics:Sound Fields and Transducers for Christmas. It definitely underlined that fact I wouldn't have a sober clue of where to start on my own for now. Cold fusion level math on those pages..... I know enough to know I just don't know enough yet. And they gotta just work without an iterative process (I am already on the wall pleading with the firing line )
So here we go. We are building a tried, tested and perhaps a little tired, forum favourite, Jim Holtz's Statement IIs. Das a lotta imitation lumba!
Princess Auto finally came to the Island. So my rack got a remix! They sell bearing platters there that are suitable for a bunch of weight. We field tested in the store Chubby Checker style and I could twist no prob. So a few zips of the saw with my existing shelving, a few laughs and beers, some leftover paint and $14 later...
A spinning AV rack that allows access to the gear's rear without cable fear. A bit of a sidebar quest, but if anyone wants to make one I can recommend this part.
A spinning AV rack that allows access to the gear's rear without cable fear. A bit of a sidebar quest, but if anyone wants to make one I can recommend this part.
I see a *big* spinning DVD/BR rack in my future... thanks !
The Statement II's look like really nice speakers. I had a brief "OMG do I tell him ?" moment when the first link I clicked on said "hey the Dayton woofers for Statement II are no longer available and mfg says reduce the cabinet volume and raise the tuning by 3 Hz"... but on further investigation I found posts from Jim Holz saying that the new woofers work fine in the original cabinet.
Thats so funny to read. I have the loudspeaker design cookbook and a book on tube amp design and my head bounced off the desk after the first page reading the tube book.Those books made me feel stupid LOL. I started building a set of Thor speakers which use Seas drivers and i got the cabinets all built but could never afford the drivers so i had to abandon that project. Turns out there were so many variations of the original design i decided it was not worth the gamble. I have heard a lot of good things about the statements , whether you will like them better than what you have will remain to be seen but it will be a fun project i am sure.
Yeah I spotted that too before any of this started. The driver issue was solved so we're OK. I'm building the ver II so there were crossover and midrange changes as well. I'm glad his stuff is well documented.
I haven't found anyone else who has made them and took a battery of measurements, but everyone seems to love them. They seemed like a safe choice for a build. We'll see..... I want dread remember. If this works out the end game will be migrating to an all 8" woofer based immersive system that Socketman knows a little about. But that comes later and will also have a large DIY component where the speakers are also modular acoustic panels. Baby steps.
Honestly, it's just great to be setting out into the unknown with my father in law again. So much fun! and sawdust!
I should've gone with a nuetral color. I like what I have but the wife never goes in there...bwahahaha Your towers are bigger...lol My room is dark dark...I literally have a flashlight that always sits in the same spot.
Are you building 3 of them ? I cant be certain but the center channel may block the tv unfavorably
Yep. Triplets. I took the screen wall out of the render to give a better sense of proportion. The image will go in front of everything. I'm not sure I'd choose these guys if they were exposed to the audience. I think they would make some people a little nervous. Perfect!!
Hey brwsaw, for your new room in a couple years I would say involve your wife in color picking. I know the purists will stomp around angry, but I found the front wall is the most important to be dark. During the build part we went back and forth and came to a solution we both like. She spends more time in there than I do... watching cooking shows on netflix recently. Totally worthy of the setup..... lol.
Ok mechanically inclined types. Thinking caps needed.
I'm trying to engineer a solution for the inevitable setup dilemma we all deal with-spiking heavy speakers, testing, moving, testing, cursing etc.
There has to be a better way. The speakers once completed will be north of 125lbs each. I want to be able to test without having to walk the speakers on spikes across the carpet, but dont want to omit spikes during testing.
The best I can come up with is oversizing the base so sharpened brass rods can be inserted from above and thread through an insert and into carpet. Kind of like a screw jack post idea. Then I can get a nice knurled knob for each spike top to dress them up.
Focal does this with their Sopra towers. Pretty heavy too I guess.
Wheels that lock up and down. I've seen them under islands on kitchens so you can move them if/when needed then you step on the tab and they drop down and the cabinet rests on the floor. Very solid, very convenient. Not sure how you'd hide them though.
I've never been very good at soldering, and I'm kinda nervous I'm gonna overheat a component for the crossover while putting it together. I picked up a Weller WES51 soldering station with an Amazon gift card I had. I had always used a 25W pencil style solder iron for random use when LED under cabinet lights needed leads attached or fixing broken joints in random stuff around jobs. Pretty seldom, and pretty random.
If you have ever needed to solder when it matters I whole heartedly recommend a Weller WES51 station with a helping hands stand. Or just a quality station at all. Holy smokes so much easier. I wasnt to blame, it was the crappy soldering iron I was using before. What a difference!
I totally agree, nothing worse than working with an under powered POS solder iron. I bought myself a Sigma station from Amazon since i cant afford Weller. Dont be afraid to add sold right away when you solder it will carry the heat to the inner wires and keep from melting the plastic casing and always use plenty of flux paste. At work i use muriatic acid to clean copper wires that have turned black, mostly on Chevy's for some reason.
I did a few test solders to practice on various sizes of wire connections. I think most of the components have an 18awg lead so I will probably use twinned 18awg to keep things easy if I need to add tails to components to make them reach connections. I was messing around with 600F and it boils the solder into the joint by heating the wire underneath and applying solder on top. Super strong joint but it sure gets the wire hot in doing so.
Any idea on the temps you solder at? I should probably go lower and leave the leads long and solder towards the components and cut the extra off. Soldering is fun. Makes me feel like a mad scientist. lol.
I solder at 450 , at least thats whats indicated on the display. I was soldering 18g wire. That is fine to do it that way but i find it gets the components pretty hot so i start with the tip on top add solder and thenmove the tip underneath to draw the solder through. Nothing wrong with how your doing it , maybe im wrong lol.
I'll try 450 out with melting the solder into the joint with direct heat. I'm not sure there's a right or wrong way. Just what works.
I watched a bunch of vids and practiced a bit. Some of the vids I saw were Naval grade repairs.... Overkill soldering for what we are into. I just dont wanna buy capacitors again. Visa needs to heal.
Edit: Tried it your way with 600F (450 wont melt this 60/40 solder quick enough when tinning the iron.) Great stuff. Not as hot outside of joint and solder still boiled right into this 14 stranded test. Perfect. Thanks!
that looks perfect to me. Were just trying to make the solder stick to the wire and flux is your friend.Real sense of satisfaction when you solder up a crossover and you get beautiful music.
Also watch your tip at that temp, i find it gets a black coating which will insulate the tip and make soldering difficult. I usually dip the tip in the flux and then rub it on my jeans. Sometimes i even need a little sand paper to clean the tip up.
Wow, brings back memories of my early days in electronics, back when we would actually repair devices, PCB's, etc.
Not sure if this is still a valid tip, but a trick I used decades ago to protect a component from heat damage by placing a heat sink between the joint and the component. This can be as simple as an alligator clip.
Some parts came. Crossovers built. Still waiting on drivers.
The crossovers will be external and I plan on building cigar boxes for them that will sit on the floor behind the towers. I will probably tart up the boxes to make them all purdy so I have the option later to have them out in the open. It will be like a kid dragging a wagon kinda setup. Toying with the idea of a mirror finish on all this stuff. A once in a life grievance! lol.
I opted to mount the components to rubber mat rather than the traditional scrap of wood or cardboard so I can test fit them in the boxes and remove as needed. I will glue the mat in when ready with GE silicone II. FWIW the Solen stuff is all higher quality than the Dayton and ERSE stuff I ordered from parts express. Solen just didn't have all the values I needed.
These mats are pretty sweet for vibration reduction I would think. The knobby side will face down. $8 Canadian Tire. My index finger looks like the very hungry caterpillar in the pic. Good stuff!
Here is what a hole in the wallet looks like.
And the assembled crossovers. Does anyone else know how to read a schematic to double check em for me? Would appreciate it. Will send better pics and schematic.
I screwed up on the first crossover i built for my center channel. I didnt catch it until much later when i ran Dirac and i kept getting a weird dip in my midrange. It turned out i had soldered 2 caps in series which is a no no. What a difference that made im here to tell ya. This is how we learn though. Post the parts list and the diagram and i will have a look,always good to have a second opinion or even a third if someone else wants to take a look see. I see you got a circle guide, those are so handy. That damn MDF is brutal on router bits, i really had to learn to slow down on my impatience .
Awesome! I was hoping you would offer but I didn't want to impose. The solder tips like sanding the tip and alligator clips worked great you guys.
Here are the pics. Best I could do to make the parts values visible with schematics in a way that was usable. The pics scaled weird when loaded into the forum but you can zoom using control and +. To go back control and -.
yeah, bit different looking at it with pics as well. Also the fact they are running mids out of phase, i thought you went right off the rails at first LOL. I had no doubt you would have it right, i see you do your homework . How are the cabinets coming along?
Yeah, building the brain was a part I wanted to be sure on so I paid close attention. Plus, there are a few builds out there where people messed up so I had the opportunity to learn from them.
So everyone can follow along if they want to here are the build plans.
Yesterday we got busy making circles with the Jasper Jig. This thing is a must have and my build pal was sure to run away with it at the end of the day. It is just great. We're taking our time to make sure all angles are covered and making it a buddy project. More fun that way. Time to stop and smell the MDF. mmmmmmmm.
Anyway, here is where we are at. The panels are all cut and marked out for holes. We might hold off on the baffle cutouts; not wanting to rely on the shop drawings being 100% accurate.
Here are the lower base cutouts to accommodate the bottom firing port. Part D on sheet 4 of the drawings. We cut out the back to allow the port to breath better so sitting high off the carpet wasn't an essential thing to do.
Here is the upper base section where the port mounts. Part E in the drawing. The port mounts in it and passes up through part G into the cabinet. Nice flush mount. Where there is space behind between the port plastic and cutouts should I fill with resin or something? Foam?
And here are the shelf braces, Part H. We decided to double the thickness of them and router the top and bottom edges. The idea is to beef up the longest span of cabinet without altering the plan or volume too much. Part L is shown in the pic as well. The woofer facing edge is rounded on these braces.
Now to lightly sand all the edges to de-burr before dry fitting everything. Almost time to glue these monsters up. To save time and sanity we are going to glue, clamp and air nail these suckers so we don't have to make gluing a lifestyle for a couple weeks.
Today is a holiday so I might get started on building the spike feet. Pics on this later.
Fun project for sure. Heck, I liked building my larger 4cuft sub, and it wasn't nearly as involved as this. You will surely have a sense of accomplishment when you first fire these things up.
Trev, i dont want to sound like an F'n knowit all but one thing i thought about when you talked about cutting the holes that really pissed me off on my first build was that when i sanded the fronts around the cutouts i didnt use a long enough sanding board and it rounded the edges over just slightly and the end result did not look as good as it could. Just a long random thought . LOL
Someone mentioned online they glued a piece of 1/4" glass to a chunk of wood to use as a block. Thats dedication. I'm wondering if a palm or orbital sander is a no no once past the primer stage? Also, the front baffle will be faced with maple and ebonized. Can I sand the standing grain down after the initial stain before lacquer? Getting ahead of myself perhaps.
The whole purpose of the primer with MDF is to seal the compressed wood cells to slow the absorption. The most common mistake in finishing MDF is that you don't leave the primer enough time to dry.
Sanding, use either 180 or 220 and you are just trying to knock of any nibs or bumps that will have raised on the surface. You are not trying to remove and sand back down smooth. Over sanding will likely do you more harm that good.
I would suggest that you put on at least 2 coats of primer onto MDF with 4 hours between the first and second coat. Then give it a good 12 hours before you start to apply any finish over the primer. Are you using a HVLP sprayer to apply the finish?
As for sanding. You need to know your palm or orbital sander to know if you going to get a problem. It is the stroke of the sander that you really need to know. This is the amount of displacement the sander pad has off center. I have had several sanders. If its crap work that I am doing then I'd grab my Ridgid sander as it is quite aggressive and had a large stroke. For my finer work i use my Festool sanders. I have a large ES150-5 with a 5 mm stoke that is used to flatten and remove material. I also have an ES125-2 with a 2mm stoke that is purely for finishing. It removed very little material but needs to be moved around with a light touch so not to get burn in swirls.
I use Abranet - Mesh Sanding rather than sand paper. with my Festool it picks up about all of the dust particles and gives a much smoother finish. Again, don't over sand.
Thanks Matt. I hear MDF is a bear to finish so my works cut out. I have a lemmer airless but thats more for painting large scale stuff and the seals cant do lacquer. Fences, exteriors, ceilings etc. I was honestly thinking rattle cans might be the cheapest way to go. About $150 is what I would hope to spend on material for the paper, masking, stain, paint and clear coat. No idea if thats doable.
When I painted my subs I used all automotive finish's. High build primer then basecoat/ clearcoat. Its the only way to get that high gloss finish unless you have the time and patience to do a lacquer paint job which requires a ton of sanding painting and waiting . Even on the speakers I veneered I used automotive clear coat. As for the question about sanding the front. If you want a shiny clear coat smooth finish you need to sand as smooth as you can or it will take many coats of clear with sanding in between coats to get it level. Stain will cause the grain to swell and become uneven as well, i have never sanded after staining so you on your own there. The finish is the hardest part of the project by far. I am in the automotive sector so I have friends at the local parts store and I have picked up paint that was mixed incorrectly for free a few times but the rest I pay for myself and even with my discount it can easily top 300 bux. I tried the urethane from a hardware store and it just doesn't dry quick enough and spraying it is next to impossible .
If you have sanded properly to begin with (on wood) then the amount of sanding you need during the finishing stage isn't so bad.
My point with MDF is that most of the surfaces on the MDF are press heat rolled flat. The case hardening on the smooth surface will still give a bit of absorption but not too much. You don't want to sand back to the point that you break through the hardening and start to expose the fine particles below. Then you have a dogs breakfast to deal with.
The cut sections you need to seal first. I would even look into coating them with a waxless shellac. Zimmer might be good but I would look into getting some flake from either Lee Valley or WoodEssence. Have not played with Target waterbased shellac. If you give WoodEssence a call and explain the project they are great in the advice department of what will work best for you. You can use shellac as a primer for the whole thing. Start with a heavy cut coat and then built it up from there. I would also recommend that you seal the inside of the box as well.
Good tips matt, keep em comin . One other thing that came to mind after reading matts tips was that any spot that you fill with putty is hard as hell to hide after the fact it will show right through the primer and paint. Keep the number of holes to a minimum, i used countersunk screws to hold my subs together and then filled with body filler and if you look close even after highbuild primer and paint you can see where the filler was used. The average person would never see it but i know its there and it bothered me for quite some time.
Is there a way I could use my sprayer with an oil based sealer/primer like Killz and then a high gloss oil based enamel and then cut and polish it out. I would sand between coats of primer (probably 3 coats) and do 3 coats enamel before buffing it out. This way I might stay on budget. I would fill all cut edges with drywall compond first and sand I guess.
What do you guys think? Can I turn high quality house paint into a gloss mirror finish?
High Gloss finish is hard to do even with a very high budget. The biggest problem is that it reflects light back at you. Any surface imperfection is broadcast with flashing neon lights.
The second thing that I have learnt is that you see every imperfection in the work that you do. Everyone else just admires and thinks what a wonderful job that you have done.
My experience is that airless sprayers are great for painting fences. I would build them , listen to them and if you really like what you hear then decide how to finish them. I see guys smearing on duratex coatings and it galls the shit outta me, lazy man short cut imho. Either invest in a HVLP which are not that expensive anymore, the down side is cleanup is a bitch. I spent 150 on a 10 gallon can of gun wash, cause if the gun aint clean you dont get results. The speakers are too big to spray out of a aerosol can so thats out. I say get wood veneer its the best all around covering and not real hard to do. Have a look at what Axiom charges for their premium finishes , there is a reason its so expensive, it takes a lot of work and equipment.
Agreed. When I built my sub a couple of years ago, I wanted something with a nice finish. I took the time to do the groove-cuts for each seam, fill with bondo, sand smooth, skim coat the whole thing with a thin layer of bondo, and made that smooth as glass. Primed and painted all with HVLP and the finish was great. Looking back, an automotive finish would have been a touch nicer, but I have something that doesn't look like a $20 sub box from Radio Shack like the Duratex stuff looks like (to me). Then again, a lot of the Duratex coated speakers you can still see where the person building it didn't line things up, sand imperfections, etc. They still show through. People just want to get it built, but are too lazy on the fit/finish.
I would only even remotely consider something like Duratex if the speakers/subs were going to always be hidden, but even then you would be limited in never wanting to change them to be visible down the road. That is why when I upgraded my VP150 to a VP180 I still got the wood finished to match the other speakers even though I could have gotten one that didn't match for a little less in the outlet store. Mine are all behind my screen/false wall, but who knows what the future holds. That may not always be the case.
Nick i followed your build and someone like you would never opt for a crap finish and i knew that long before you started the project. Your theater speaks to your dedication to do things right. When i was a teen i spent hours installing a stereo in my car my kids they throw a deck on the floor and have the sub floating around the back seat and it really piks my ass LOL. I like the sense of accomplishment of a job well done. As for hvlp, there is tons of info on how to use one and how to set it up and a little practice is all thats required.
Yeah, HVLP really isn't "hard" it just takes patience when you don't use it very often. I've learned to over-buy on paint, and practice, tweak the spray, etc on cardboard before every putting paint on the project and it will turn out nicely.
Hey guys thanks for your interest and chewing through this a bit. I'm learning a lot and I sure appreciate it. There may be a very interesting development on the horizon. A new material may have popped up to wrap or redo the enclosures with. One of those right place at right time things. I dont want to get my hopes up, but if it works out you'll be the first to know. Assembly is on hold for the short term while this develops, or doesnt.
That's the only real problem if you fudge a spot most will never be aware of it. But you know exactly where it is and what it looks like. Congrats Trevor looks great so far hope the wrap is a go sounds much easier.
I know right! I was starting to make the rounds locally for what was available, how to and how much. I find online project shopping totally misleading when it comes to staying on budget so I like to verify what things cost where I will actually buy them. Assembly and finish are kinda linked, because how I finish may affect the strategy for assembly order. I can finish the base and baffle seperately from the enclosure if it makes sense to, then assemble.
After pricing out an Alkylid primer, oil based Tremclad high gloss, and Circa Nuluster-55 combo a local paint tech suggested (an interesting epoxy resin I hadnt considered) I really realized just how much potential there is to attack this finish from any angle. A blow torch to help finish a speaker box? That's just cool.
Then I got home and the phone rang..... "Hey, I might be able to get us some of this for free. You interested?"
Little progress today. I got shipping notification on my drivers from Solen so now I'm done with wait and see. Tomorrow I might keep on going and see if I can't get the cabinets together without the front baffles. I have some sanding to do to make sure everything fits right for when the baffle gets clamped on.
Today I worked alone so I chose to glue, pin with brads, pre-drill then screw using 2" coarse thread drywall screws. These will likely be wrapped in the mystery meat I was referring to before- 1" Baltic Birch plywood. Score! It's not a done deal yet, but the options for staining with a real wood finish are exciting. I hope it works out. They will be ballpark 200lbs if it happens. lol.
Yeah... Too heavy maybe. Started off this morning all ready to pound these out and had a mishap. A sign to slow down. One of the cabinets fell from the table and broke the corner. Luckily it was minor. I should be able to fill it when I am filling the screw head holes and flushing up the cabinet edges.
Had all the MDF parts prepped now and was starting to get things finalized for fit. A palm sander with 80 grit made short work of flushing the edges up.
Then it was time to test fit to ensure nothing would buldge or leave a gap. Goldilocks syndrome. Test, sand, test sand.
And here is the first one all glued up. I'm 6'1" 230lbs and these guys look big beside me. Gonna be awesome once there are 3! Gotta go get more wood glue and screws. More later.
Wow those are gonna be an S.O.B. to move around. that looks almost 5 foot tall. Luckily you plan well enough that you probably have the placement set up with out to much relocating.
Sorry we kinda jinxed you with the stories of mishaps that only the builder knows the real flaws. Here's hoping you can fix that to your satisfaction, even if you know it's there yourself. Every one else is still going to be in aw of your accomplishment.
Mdf is horrible for chipped corners etc thats why we have wood filler or in my case i used bondo when i F'd up my M80 on the table saw Damn i had totally forgotten about that now im depressed. JK> Good progress , and keep the mask on that MDF dust is so nasty.
Little stuff on the big ship as they say. A little patch on the back should be out of sight I hope.
Good weekend. The cabinets are together and the baffles are gluing up. The plan calls for a 3/4" and 1/2" MDF piece to be laminated together for the baffles. It seemed best to glue them all at once stacked up to save on clamps. There is only 8 on hand here. It was all going well until I noticed 8 clamps wasn't covering enough real estate. Aha! I could shift the clamps around and drive long screws through all the layers where the driver cutouts will be. It was going very well until the last screwhead broke off driven in all the way. lol. A future adventure.
I forgot to post up a pic of the 3/8" threaded rod DIY spikes. These will thread through the bases from above to jack up the speakers and level them. There were some decent wood knobs at the local craft store that should work well to dress the top up. Have to decide on gloss black or stain to match the cabinet sides or metallic brass paint to match the threaded rod and hardware. hmmmm. Sharpening the rod was a 3 step process. Angle grinder, belt sander and a modified "drill doctor" drill bit sharpener. I think I invalidated the warranty when I bored a hole through the side to use like a pencil sharpener. Worked great though. If you ever do this clamp your workpiece down!! Kinda dangerous.
DIY 7" Spikes closeup
Another weekend in the books. I'm pumped. Fun stuff.
They are primed one coat inside and out. I'll sand lightly and patch with autobody filler and add another coat of primer on the outside tomorrow. Heating the garage with space heaters and a fan is a bitch. Could only get it up to 12C or so. Gotta be patient and let the primer do its thing.... Darn the cold.
The baltic birch is a go. Looks like we'll be cutting strips 1" wide on 45 degree angles and using the laminations as a feature to wrap the sides and back before applying the high gloss clear. Should be sharp if we dont muck it up. Similar to this without the inlay.
Thats not really warm enough. Maybe rent a herman nelson for a few days. Even in summer up here when its not sunny out the my shop was not warm enough . Keep up the good work and keep the pics coming.
New to this forum. seriously thinking Axiom speakers for new theater in basement.18'widex25'deep x 8'3'' high, all drywalled. Epson 5040 4K compat. with 135" fixed Elunevision 4k Studio Research fixed Screen. Looking to go 5.2.4 atmos.2-M80,v180 and 2-Ep500 with 2-Qs10 on rear with 4-M3 in ceiling. Does this sound reasonable. I cant put 4 surround on rear as i only have 2 of 3 walls to mount on for my seating area,and would have to go extra amp for 7.2.4.
Welcome Copper. If you start a new thread with details about your space/budget/goals you will get lots of good help. Fwiw, your idea so far sounds reasonable but I might add a larger amp(s) and might choose larger speakers if you sit far away and want to hit tactile reference levels with low distortion in that space. If your screen setup is acoustically transparent we can go really crazy with what is possible.
Another weekend gone by. Yesterday was eaten up by prep, sealing up the garage to heat it better and waiting for primer to dry. Holy fumy stuff! Alkyd primer with extra stink included! By this morning they were dry enough to start to work with without gumming my hands up.
They have been sanded down so the baffle should fit without having to drill into it a bunch like the other panels getting wrapped. A level on its side is a pretty good tool to check for high spots and get them perfectly flush with the outside of the cabinet. I have a couple places to patch on them anyway but I dont want more holes if I can help it. I might end up putting a few screws in just for piece of mind.
Here is the bottom with the lower port section installed. I drilled a 3/4" hole for the individual driver leads that will run out the bottom into the crossover boxes. This way it is concealed better than out the back.
I had a 5" hole saw on the shelf so I thought I would save some time and knock the midrange tunnels out of the back. MDF doesn't really get along with holesaws. Burned a bit but got it. Pretty hard on my cordless drill. I should pick up a corded one for this kind of stuff.
The cabinets are pretty much ready to be insulated and wired so I started cutting out the baffle for the drivers. Measuring the drivers on site was a good idea. They varied from the plans by a bit. An 1/8" or so in one case. The Jasper Jig is awesome and things went smoothly. I didn't quite get finished though. The MDF was hard on the bit and I stopped when it started stalling and cutting roughly. I will have to pick up a new 1/4" straight bit to finish.
And here is where we are at. Through the week I might get the guts of the speakers in order and be ready to glue the baffles on. If all goes well I might have them on and ready for real paint next weekend. Hopefully it warms up a bit for it.
Thanks Matt for the idea of sealing the inside of the cabinets. Probably a good idea to reduce future warping or twisting from moisture. This weekends MVP was the shop vac. What an invaluable tool! Must have.
Why did you feel you needed to open up the backs of the midrange box's? That MDF is brutal on hole saws HA HA . i went through a couple cutting port holes and using the router requires a patient hand for sure. It not only ruins the bits the hole gets mishappen and oversize if you move to fast. Its a steep learning curve and it gets expensive fast, helps you realize why its so expensive to buy a set of speakers already made.
Cool, i only briefly looked at the plans. M80's just use a cup behind the speaker to protect it from the waves of the larger driver so it doesnt act like a passive radiator for the lower bass.
The old house i used to live in had a small shop on it (20x20 and someone had put in a barrel stove and man i could get that shop so hot you couldnt stand to be in it even at -30 with no insulation. My new shop is bigger and insulated and nicer but putting in a wood stove up here has so many regulations and insurance would be killer i cant do it. I use a kerosene heater when is around -5 but it just doenst cut it. Once my kids hand is better he is going to weld up a waste oil burner ,see how my neighbors like that. Its a bitch having a shop you cant use in the winter and boredom sets in.
Yeah heat is a must. Boring cooped up these days and as time goes on I just cant stay still anymore. I'll have to keep my eyes open for a 3kw forceflow heater. The tablesaw is rigged for 240v so it wouldnt be hard to share the receptacle for both uses. (Not at the same time of course. ) The worst part is only having one circuit in this garage. A heater and lights and I'm at full load. Two heaters, forget it. I've been running a heavy cord from the outside plug into the garage for tool use and extra heat. Lol.
I grew up in my dads back shop so theres always a way. Just have to cook up the workarounds.
The guy who built this shop ran 100amp service so i have a compressor 220 and a stick welder but i just unplug compressor and run welder. I can just get another breaker one day but i dont weld much any way.He did a great job on the shop but cheaped out on the height, would have liked a higher ceiling,maybe in my next life.
Sorry, but don't have any photo's of my shop and the NG radiant heater installed. But, it does a wonderful job of keeping my toes warm when it gets cold outside.
Sorry, but don't have any photo's of my shop and the NG radiant heater installed. But, it does a wonderful job of keeping my toes warm when it gets cold outside.
I have looked at one on amazon that runs on propane, i have reservations though since we had radiant heat in our shop and it left the cement floor cold as hell and damn near set a guy on fire when under it. How big is your shop
I can't wait to see the family of curves for those. You have built an anechoic chamber, right?
Actually, yes!
What a lot of people do is lay the speaker flat on the ground and take measurements from above. Then you subtract the boundary loading effect from the bass. We wont be doing that this time.... Room measurements are the best I got. Since I will have 3 of these, identical in every way, and a room that is arguably approaching "ideal", we will have a chance to collect some real data. I can actually measure the before and after speaker break in. Heck I can even measure a new crossover vs a broken in crossover on a new vs broken in speaker. Lots of iterations to chase if we wanted to get silly. And we might? I'm willing to turn my theater into a lab\museum for a couple weeks. Why not. If someone is willing to design the test I can collect the data and share it.
There are too many independent variables you'd have to control to gauge speaker break-in. Variables like temperature and humidity would be impossible to keep constant without a very expensive environmental chamber.
My shop is a detached double car garage. I have an Easy Radiant HeatWave. it has 8' of combustion chamber that does a wonderful job of adding a bit of warmth to the shop. As for the floor, I laid down some dimple waterproof membrane and then two layers of 5/8" OSB. The floor is cool, but never cold on the feet. The dimple gives an air break between the cold cement and the warmer wood ontop. As a bonus, it is also waterproof so any moisture that might wick up from the concrete can easily evaporate or re-absorb into the concrete pad.
My shop is a detached double car garage. I have an Easy Radiant HeatWave. it has 8' of combustion chamber that does a wonderful job of adding a bit of warmth to the shop. As for the floor, I laid down some dimple waterproof membrane and then two layers of 5/8" OSB. The floor is cool, but never cold on the feet. The dimple gives an air break between the cold cement and the warmer wood ontop. As a bonus, it is also waterproof so any moisture that might wick up from the concrete can easily evaporate or re-absorb into the concrete pad.
It all comes down to fore thought in design.
I should look into that flooring, i have no plans to put a car in there ne way. The floor is so smooth when you go into it in the winter it is alot like ice skating.
i did the same thing with my basement floor as it worked so well. I thought that i might have a problem with the weight of my big tools, but it was explained to me that you put this up against the outside of your house and backfill it with dirt. that can add up to easily a thousand pounds of force from the weight of the earth pushing up to it and it doesn't crush so why would it have a problem with some machines
Wire roughed in. 108' of cable used. Wow. Insulating soon hopefully tomorrow night. Found a great solution in Canada for those wanting 703 but cant find it. Use Knauf 2.25 PCF insulation board. Product 5003355. 60$ a case locally. Will report on its work ability soon.
If you wanna build broadband panels use foil facing wall. If you wanna build lower frequency concentrated panels face foil into room. Using foil facing wall dramatically reduces effectiveness at low frequencies (by 1/2 or so). If you wanna build 4" super panels use 2 stacked with foil in middle. Better than safe and sound but more depth and $.
They look blue and cold. Poor things. Need insulation.
I dont know what you call it but it looks like stuff from inside a pillow. Dacron or some such, white and not too dense. solen should have some. I used a pillow from walmart. i also bought a big bunch from solen now that i think back.
Cool, thanks. I am trying to fugure out why the designer recommends 2" wedge foam or 2" OC703 as a preferred alternative. I've never seen speakers with such robust damping. Isnt the purpose to artificially increase the volume to extend response lower? Seems as though in this case its being used to absorb the woofer backwave and reduce internal issues. I wonder if a different cabinet shape would change things. With so many builders doing things slighly differently with damping, its probably safe to assume its less critical than other factors to the end performance.
I'm starting to realise all of these decisions added up would make a design like this impractical for production without some compromises to reduce weight and cost. It makes me wonder what the retail cost of these would have to be to make it commercially viable, and if anyone would buy them when Axiom and others would be cheaper and perform similarly good. I wish someone with M100s was nearby.
This is a complex subject. The fundamental recipe for the cabinet after choosing the material and shape is to brace, glue, screw and add absorption. The devil of all of this is in the details.
The purpose of a cabinet is to prevent the sound from the back of the drivers from escaping into the room. One can say choosing MDF sucks because most of the sound goes right through it. Hardwood appears to solve that problem by trapping the sound but now the back pressure has to go somewhere so, presuming the cabinet is epoxied, screwed and sealed, it escapes out the drivers which of course interferes with the sound. Hence some type of damping is added to absorb the sound.
Usually the damping is loose but not necessarily. Gluing heavy damping material to the cabinet increases absorption but increases mass which increases the cabinet's resonant frequency. Bracing can then be added to further increase the resonant frequency so it's not objectionable but this has to be carefully designed as well because you can't just brace anywhere and with anything.
Using hardwood usually means having to add heavy damping that is glued to the walls and multiple hardwood braces to get the resonant frequency above 1 KHz. This of course is very expensive. Hence why MDF is chosen - less mass, lower resonant frequency and a bit of fill.
The bottom line is the designer should have considered all of this and selected the right materials and construction methods to optimize the speaker as a system. So don't mess with it...yet. Build this baseline design and then build others if you want to compare with the baseline.
There is nothing that Mojo said that i can disagree with, i am not a speaker designer but i did stay at the Holiday Inn. Here's the thing about speakers, there is no formula for the perfect speaker. They all sound different to different people, in different rooms. I can not even grasp how many drivers that are available for purchase never mind the ones that are proprietary. Speaker design has come a long way what with modeling software and lessons learned from previous models and god knows how many hours someone like Ian spent in the anechoic chamber. At what point is enough , enough. Is the wood dense enough, too dense do i have enough stuffing the list is endless. Mojo mentioned resonance, now does the cabinet resonance detract from your enjoyment or add to it or is it hidden in the music. I think it depends on how critical of a listener you are. I mean how i listen to music and how my dad does/did are entirely different. Different music requires different listening styles.
I built with axiom driver because i was familiar with them and knew i couldnt F" it up to bad. I did end up putting quite a bit of poly in to bolster the low end as it was a bit thin, but also i did not port them. I dont think a lot of stuffing is needed for a ported design. My M80's have only a few ounces of poly in them. Honestly i say build them listen to them and then start with samll amounts of poly and work your way up.
The talk about solid wood is interesting but also misses a mark totally.
Being a woodworker, I get to work with the stuff on a constant basis and as a result have gleamed quite a bit from that. Beyond staying at the Holiday Inn. Building speakers out of solid wood would be a step towards impossible. I have yet to find two boards of wood that are the same. It's a living thing and as such each part of the tree has grown up differently. I have had boards that came from the same tree, bookmatched so I know they are consecutive cuts, and yet when you work with them, they have different stresses and move in slightly different ways.
MDF is consistant. It has the same density throughout. It doesn't expand, contract, or move in un-uniform manner depending on direction of the grain as it has none.
You talk about resonance of the wood. Think about a Stradivarius, no two sound identical. It's wood and so it will give a different sound even if they are made identical.
Something that would be enlightening. Build multiple speakers from different materials.Make one out of MDF, another from Baltic Birch and then one from hardwood. The hardwood thing would be questionable since like matt said, different densities etc but also joining the pieces together. Lots of good food for thought. My big complaint, MDF is so messy and it really is hard on bits and blades etc.cant wait to start my new project if the weather ever clears.
It is an interesting design. I can understand the desire to put your mark on the world and build you own stuff. But sometimes I wonder if it's worth re-inventing the wheel.
Bake your own DIY cake. YES. Most store bought ones are pretty awful.
Build your own car. NO. just becuase you can strap some wheels behind an engines doesn't make it better.
Here is where the cabinets are at with insulation. The ports are also fully assembled though not shown in the pic. The top flare is flush with the bottom of the window brace.
The baffles are ready to be glued and screwed on. I'm just hesitating for the final seal. This is the I hope I didn't forget anything moment. lol.
And test fitted to make sure everything makes sense and I didn't screw up. Seems ok.
My big complaint, MDF is so messy and it really is hard on bits and blades etc.cant wait to start my new project if the weather ever clears.
Ditto! And do tell.
Someone mentioned a swivel base from Princess Auto and i got to thinking about my record collection. I plan to build a rotating cabinet with dividers to put my records in . I will build it high enough so i dont have to bend over and leaf through them to find what i want. I will slot a round table with multiple slots so i can slide the dividers in and out. Maybe build a sub in the bottom to raise it up and have a rechargeable light that can sit on top that turns with it.
You boys are certainly great at offering unsolicited advice and opinion. There is room for all mediums and its really none of your business what i do with my time and money.
This usually a nice place to visit and most people are helpful and or interesting and try to be a good denizen then people such as yourself have to come along. I would ask you to go hangout with your friends instead of coming here but i doubt you have any.
Fwiw I think the rack is a cool idea and it was me that stumbled upon the heavy duty turntable swivel. I am pretty thrifty, so when DIY is possible it's usually the way I like to go. It would be sweet to put a turntable under the record player, counterspun, so the record appeared stationary when playing. My wife plays our records more than me these days, but all the younger apprentices I work with have tables with built in speakers. Always a gift from their girlfriend. The ladies like it. Business time. "Wink wink say no more."
Low ambition today. Need a coffee to see where I'm at.... Thinking ahead a bit, do you guys solder the drivers on or use stakons? I'd like to solder but its kind of a done deal once you do that.
Yep labelled and pulled one at a time. Ringing them out is a good idea right before I solder them on. Good call.
I would be tempted to temporarily connect the wires to the drivers and power them before final assembly of the cabinet. As I see the cabling is tied into a harness, if you discover a bad cable it will not be easy to remove/replace. Any additional would be fished through the enclosure hap-hazardly.
You're totally right. I should test each driver too.
I forgot to mention I didn't use typical speaker wire. The weird licorice looking cables are twisted 18/4 securex. They will be parallel internally with a quad setup. This gives an awg size of 15/2 per driver and redundancy built in. If the audiophile world took to it like they did Roxul..... It is awesome stuff. Fire alarm cable. Not very sexy though.
Coordinating the connector specifications with the cable insulation and conductor specifications, proper tool, clean tool, proper use of the tool. This last part is important. If you don't use the tool properly, you won't get the micro-welding that was intended. I trust myself to solder properly more than to crimp properly.
That wasnt what I was expecting. Its not a high voltage line! Were not risking a corona.....
Here is where we sit, literally, after another good weekend. Could have working towers at any time. Patience and discipline have to come into play now. Uh oh.
Someone mentioned a swivel base from Princess Auto and i got to thinking about my record collection. I plan to build a rotating cabinet with dividers to put my records in . I will build it high enough so i dont have to bend over and leaf through them to find what i want.
Holy crap, you're right... a 1000 pound swivel base is enough for a tall rotating LP rack, not just the ultimate DVD/BR rack.
I was going to start with the design posted on audiokarma but now you've got me re-thinking that.
You boys are certainly great at offering unsolicited advice and opinion. There is room for all mediums and its really none of your business what i do with my time and money.
sorry if my 32bit192 sarcasm didn't come across. I don't mind old school vinyl. it has a different sound to it.
I just prefer not to hijack Serenity's thread with a this vs that argument about music medium. I see this all too often where a thread just screws off in a thousand directions and not fair to the OP.
An LP emulator is a product opportunity for Axiom.
All you have to do is attenuate the bass below 100Hz and add a brick wall filter around 35Hz, add rumble, wow and flutter, decrease the dynamic range and decrease the signal to noise ratio, add some dust, add some static, add disc warping, make the track more lossy as it is played and make successive tracks on "each side" sound progressively worse than the first (due to angular speed differences).
Put all these settings in an iThing interface and let listeners twiddle to their hearts' content.
One thing I would suggest with the swivel platter is to design it so your load is balanced on top. It is only about 12" wide so if you have a tall unbalanced load it may get tippy.
Putting some outer lower rollers would eliminate any wobble I guess.
I think it will be ok since it will essentially be 24 inches across give or take , enough for 2 albums opposite each other. If it is a problem i could fashion way to put a few rollers or wheels on the outside edge for balance. I made my own barn door roller and rail so this will be childs play.
The saw got a workout this weekend and so did the shop broom. What a load of wood shrapnel. I am very lucky to have good help and a bit of networking within the local trades. A lot of good material comes my way, usually for free, and this is one of those cases. Bonus!
Anyway, here is what 2 1/2 sheets of surplus 3/4" baltic birch looks like ripped to 3/4" cubes, chopped and beveled to become a speaker jacket. On top of the speaker baffle is a mockup of what the speaker spike setup might be. I have to trim down the threaded rod a bit and decide if sinking the T nuts is something I would rather do. I kinda like them with the tangs showing. Reminds me of talons clutching an orb on a scepter or something.
I never took an official count, but it is pretty much a lot... I don't know how much it weighs, but it is pretty much a lot... Added to each speaker will be about 30lbs I would guess. To tell the truth it would be sweet to have a pic of a speaker on the scale over 150lbs! I'm hoping the baffle chamfer of 45 degrees into the baltic birch angle of about 15 degrees will reduce diffraction without altering the baffle step compensation the crossover would have taken into account.
I probably have to finish priming, filling and do an intial sand before I can attach the birch ply. Might be a bit before anything interesting happens. Getting closer now.
Polyuerethane glue sucks. It foams and expands out everywhere you dont want it it. Live and learn. Never again. I might have to start the spikes over. Shit!
Put some fancy marketing material together that reads "sweet highs", "blissful mids", "soul-penetrating lows", "all natural sound" and you'll unload them at $20K/pair. Sell a pair a month and you are all set!
How many can I put ya down for? I can do custom ones wrapped in carpet for the cat lovers out there.
Now that they are taking shape, the back,top, base and front baffles will be black. The sides will get a light stain. Then high gloss over it all. Hope it is easier to visualize now.
It was a pain in the butt to get glue coverage and reduce leaking at the beveled end. The wood is oversized 1/8" to leave me room to shape it with a belt sander and sand it out. Should be out of glue seep by then. I will pre condition it first and any glue issues should show up then I'm thinking.
This process was pretty time consuming. But damn all the pics I found online look good. Oh yeah, there was a bit left over so they were joined up to see if they will make matching crossover boxes. Those are the pieces on top of the box.
If you wash it off as many would think to do, the water and force embeds it into the grain of the wood and then you are stuck to get it out easily. You are better off to let it harden and then cut it off as it would be just sitting on the surface of the wood and not embedded into the grain.
The best solution is not to have any. Easier said than done. Controlling the amount of glue so you don't put so much you have extreem excess squeezing out and running down the side of the wood. That comes with practice. Another thing you could do is to painters tape up the exposed edge so that glue rolls onto the taped face and not the wood.
Threw one on the scale. Had to stand it on the corner to let it balance itself without me supporting it. 156.2lbs. No drivers yet......
WOW...so one of these will roughly weigh the same as 2 LFR1100's and more than an EP800!!
I cant move them easily by myself anymore. Everything is strategic now for fewest moves. Lol. It looks like getting them into the basement will require an appliance dolly and moving pads. They will be around 170 when finished.
Is this one of those cases where a plane makes sense ? I'm just starting to discover how useful they can be (and how dangerous :)).
In this case No, but you have the right idea.
The tricky part about letting it harden, especially when it is a big blob is that the outside starts to harden but the inside is still pure liquid. You want to get it at the point of hardening but not cured.
Now I would say you'd have a far better chance of removal with a good sharp chisel. But even then you will likely leave a thin layer on the wood. Try too hard and you will gouge the surface trying to get it off. This is where a nice sharp plane can save the day. EXCEPT IN THIS CASE. Why you ask. Well it's baltic birch 'plywood' and that just doesn't plane. it will just tare and you'd make a further mess of it.
A belt sander is a sure fire way of removing way more material than you'd ever want to. Great if you were trying to shape into an organic rounded form. Not great if your trying to keep the shape. Your going to be stuck with multiple levels of grit (start with 100 if you've managed to remove most of it with a chisel) other wise you'll need 80. wrap the sand paper around a small piece of mdf to make a sanding block. Try to be gentle and take your time rather than gouge
I always thought of a belt sander as a relatively fast way to destroy something I spent a lot of time working on, popular in the past but displaced recently by Tannerite and similar products.
So far I've been lucky and havent formulated Tannerite.
An OLFA knife as a razor blade has dealt with all the squeeze out up until now. It scrapes off MDF pretty easily once hardened. There was no way to clean as I went with water and still get it all done in a day. Too much work. Since the ply edge is exposed it will have to be sanded anyway I figured. Whenever I belt sand I just cover the entire area with pencil shade, go over to remove shade, repeat, repeat etc. till smooth. It is fast and pretty consistent when levelling out uneven surfaces.
By the way the lepage "pro carpenters glue" I'm using grabs quick and starts to gum in a few minutes. Pretty nice stuff to work with. Time to mask all of the holes now before things get dusty.
What a messy weekend. You know how in The Evil Dead Ash's arm gets a chainsaw mod, well, it was a belt sander for me this weekend.
It all started out ok 6am Saturday morning. Garage was heating up. Coffee and Eggs on the go. Then I took a stroll to the speaker room to get geared up and shift stuff into the garage. WTF?!! All the work from last weekend was starting to show signs of shrinking up... Some fool forgot to bring the plywood strips inside for a week to let it dry from the humid snow melt from cars in the garage. Boo-erns!
So it looks like yet another step is added to the adventure. Wood filler and careful sanding. No biggie. The more sanding the merrier at this point. And merry it was. A couple drywall benches and an old table cloth (well, it became an old table cloth... a sore spot for a couple days. lol) and we were on our way. Here is what the before looked like after the first pass with the belt sander with 50 grit. It took 3 passes with 50 then a slow pass with 120 to get them all leveled out and ready for the orbital. Not too bad. Bad ass belt sanders don't really do slow well. Good thing I was looking for fast.
And leveled out ready for the filler and the next sanding stage.
A blessing in disguise happened as my palm sander died. I was forced to buy a new one and remembered Matt was good enough to comment earlier about what to look for in a decent one. I picked up a Dewalt random orbital with 2.6mm diameter travel (think thats good?) and it works great. It is awesome to deal with the velcro backed discs instead of ripping up Norton paper to fold into the old palm sander.
Anyway, after a solid 10 hours or so over 2 days of industrial sanding and messing around, here is how they are finally starting to take shape. Some minor wood filling and a final sand over everything should put us in good shape to get into the fun stuff. Color!
Come on warm weather!! They need to stay in the garage on weeknights to cure finishes..... Moving them back and forth takes planning now. Adding paint wont help. Doh!
I don't post a lot in this thread because the only word that keeps coming to mind is "awesome !" and I don't like repeating myself that much. The speakers are looking great.
Belt sanders always seem like something you should put on the floor and run around the house with a remote control. I bet they would go really fast.
I'm trying to decide between System Three Mirror Coat pour on epoxy vs their Clear Coat Top Coat products. If anyone has an opinion your thoughts would be appreciated. I'm trying to spend more on the finish product to save time in this step. I can brush on poly and sand. But that will tack on a lot of time. Doing a high gloss mirror finish on these cabinets on all surfaces but the bottom. It will be painted gloss black and left at that step. A 1.5 Gallon kit will be required for this project in either choice.
Pour on resin- 2 part product cures hard. Easy application. Perfectly flat mirror finish in one go. No sanding. Have to do one side at a time. Have to babysit edges to prevent drips from rolling over sides. Must do a thinner coat than they recommend to prevent issues. Must ensure surface is perfectly clean and level. Results are stunning from online pics. http://www.woodessence.com/MirrorCoat-P145C41.aspx
Clear coat resin- 2 part product cures hard. Brush or roll on. Water clear finish. Deep grain penetrating. Can apply multiple coats to thicken up. No sanding. Cures faster than mirror coat. Is 100% solids with crosslink hardener so it is super strong and basically sealed forever. A perfectly prepared surface is not required. Open grain ok. http://www.woodessence.com/Clear-Coat-P146C41.aspx
Both products should allow me to work indoors where it is warm\consistent and I wont have to move speakers back and forth. I can also control the dust levels better inside. They are not fumey from what I have read but Wood Essence will have to advise.
I do like WoodEssence and have never gone wrong with anything they have sold me. They give good advice.
But I make wooden charcuterie boards and use epoxy to fill in cracks and features on live edge boards. Epoxy can get rather expensive and I don't have a whole load to throw around. Especially when people are not willing to pay fare market value for my time and want dollar store from china prices.
So have you used that product? There is very little info on their site so if you have can I ask a couple questions?
Does it stink when you use it? (Solent based or Indoors ok?) Does it cure completely clear, or cloudy? At what temp? Have you used it over water based stain or urethane paint before?
I like the idea of saving money (almost 50% vs system three) but the plastic world stuff has almost zero info. No msds or material sheet. I might end up going system three just because the product is so well reviewed and documented.
The guy at wood essence was zero help. He basically said I would just have to try it out and experiment. I guess its fair to not recommend a product for an improvised use.
I've been at church bazaar for the past 8 hours, so sorry I could not get back to you sooner.
It is expoxy, so it does have a smell to it, but not very much. I am sure it is a low VOC. By comparison, I do use the System Three 5 min expoxy and that has a pretty strong odor to it. But then again, it is 5min and not a 6-7h harden that a self levelling would be.
Yes it does cure water clear. The colder you use it, the slower it hardens. I have used it in my shop in the winter time and that is only 14-16c. I mainly use it in the summer time though.
I have used it over water based stain without any issues.
They do have quite a few different ones that offer. But i see you have gone with the system three. I might have looked at Aristocrat High Gloss Coating as they have some with a UV additive. I haven't used that though so I can't say how good it would be.
No worries! There are a lot of choices. I was considering your previous recommendation, or the system three mirror coat, but then found a video of a guy finishing turned bowls. He used the clear coat applied with a scrap of towel and nitrile gloves. Looked pretty good and he showed how much control he had on a curved surface. I was sold. At this point I'm afraid of screwing something up after all this time invested. Taking the cautious route. You saved me $50 though vs woodessence.
Got rolling on further sanding and bondo patching mdf screw holes. Nothing pic worthy. Might get into color tomorrow.....
there are so many ways to get to the end result that you are looking for. The hardest bit however is getting over your own ability to see all the things that screwed up. You are the only one that will see them.
The youtube video i posted for one real point. If you get bubbles in your finish, the best way to get rid of them is something you probably would not think off. A blow torch. It will warm up the air in the bubble far faster than the liquid and will pop. Really a good trick but scary the first few times you do it.
I think the hardest part of these projects is waiting for that just right day when the sun is warm and the wind is still. Up here we call that day summer and we have a picnic.
The hardest bit however is getting over your own ability to see all the things that screwed up.
Its hard to let things go. I know exactly what you mean. Two whole weekends sanding and spot patching. Eventually I came to settle, as they will never be perfect. I technically could have stained yesterday, but my wife made me stop. I guess I looked wiped but my mind still wanted me to push on. Getting old. Lol.
Not familiar with that one Matt. This one must be pretty much the same from the look of it. Mine is the 4512. Wired for 240v operation. Smooth as silk. I'm not a big fan of tablesaws. This one is sturdy and quiet so it makes it seem safer somehow.
Well. I may have spoke too soon. The first signs of uh oh are showing up. The exposed MDF edges are resisting taking paint evenly. This is the first cover coat after a quick initial dust coating and they are still not sealing and flowing like the other areas. I'm going to give it the night with the garage heaters going to see if I can get some better coverage tomorrow..... Not encouraging. Hmmm. MDF is no fun. It looks worse in the photo than it is, but how it looks is how I feel about it. lol. Like shit.
Sounds like a plan! Got the garage up to 25. Cooking now. Cure Cure Cure.
This weekend was not as great as I hoped, but pretty darn good. Right now I'm trying to decide if I need to sand and recoat again or if I can go right to sealer and clear coat. After the bondo dried it didn't take more than an hour or so of careful hand sanding with 220 to get them ready for another coat. I think this round I will do 400 and recoat without a double coat. (I snuck a quick second cheater coat in each time as the 1hr recoat window would allow.) It never seems to lay as clean when you sneak another in before the flash. I should probably coat again anyhow so there is more material to work towards 1000 grit. BTW, 2 cans does all 3 a single spray with the cigar boxes. Pretty not too bad (an Islander saying.)
I have abandoned the epoxy route. Gasp! There was an issue getting the system three from plastic world (-they are great to deal with and communicated right away there was stock problems) and wood essence is a little pricey. It looks like things happen for a reason anyhow. Yesterday my wife thoroughly cleaned up the listening room and now it's no longer a speaker clean room workspace. lol. I lost the epoxy route from all angles. "What, the listening room isn't a work site?!"
This will likely be the last project in the garage in it's current state. We are going to give it a makeover this summer. I spend a lot of time in there so it really should be a little more workshop oriented. A mud room style air lock to change shoes and hang coats will be a great way to cut down on dust going into the house too. Gears turning.....
Always wait and give the paint plenty of time to flash off, trapped solvents will come back to haunt you especially if the speakers are in the sun and the temp comes up and releases the solvents. BTW the weekend is only half over so get busy already.
I'll have to pick away at sanding them through the week so they can be recoated and ready for sealing and clear coat next weekend. I REALLY wanted to peel the masking off to see how they look. Gotta wait. . Its funny how the gloss really highlights all the things that drive you nuts. Luckily at this point things can still be sanded out.
i peel masking off after every coat while its still wet so it doesnt flake as it comes off. What are you going to clear coat with. Also solvents in paint make the tape extra gooey and it gets hard to take off if left too long. IMHO
To tie the wood finish with the black I think I will seal/shellac the wood with Zinsser Bullseye amber. Then I will spray tremclad clear gloss (same line as the black) over the whole thing with three coats. Then polish.
From what I have read as long as the black has cured for at least a few days the clear should go over both without issue. It will be way cheaper than epoxy. If anyone knows different please comment. Thanks.
Was a little worried you had covered the trim outright in the last pics, the 2 tone is quite nice. Cant wait to hear your thoughts and see them in your H.T. room.
I still have a bit to go before they go into the HT. Today I plan on shellac'ing the wood areas and taking a final look at all the touch ups and minor fixes before clear coat the works.
I was kinda bummed when I unmasked them honestly. The masking line was pretty good and sharp, but wet sanding let the tiniest bit seep through on the edge. Its not really noticable unless you get really close and are looking for it. Also, I didnt consider the orientation of the heaters. The wood trim side closest to the heaters on one speaker is split all to f-ing hell. It will be filled when I shellac, but kinda bummed about it too. It will be the center channel by default now behind the screen. Lol.
Oh yeah, the wires are getting sleeved with techspan. All good.
It was a weekend of ups and downs. I fully intended to be finished painting this weekend. Friday was a long day at work. My plan to get a jump on the weekend with a Friday night coat went awol. After meeting with a sidejob client, picking up supplies and making the 45min drive back to the office to file timecards.... to the pub!
Saturday morning started well, and early. By 5:30 I was tucking into breakfast and by 6:45 the garage was under a blanket of beautifying fumes. Glad the organic respirator from spray foaming the basement wasnt lost in the shuffle. By Saturday at 2 the paint was solid and it was time to remove masking.
One of the towers exhibited flaws that made it the guinea pig speaker, so I experimented with the best strategy to remove the mask on it. Pulling back at 45, pulling towards at 45... nope. The best way to remove mask and not hurt the paint, while keeping the mask from tearing is straight back -perpendicular to the work surface. Unmasking the towers was like opening a present from an aunt. I wasnt sure what it was, and I wasnt sure I was going to like it.
All in all it was OK. There were some issues to resolve caused by overheating one side of a tower, and general tape bleed to look past. To reduce the visibility of the split face required a small craft brush and some spot detailing with stain.
SHELLAC. It cures, saves and hides missteps What a great product. Once it started going on I was rewarded with that familiar golden glow. You know, like the trophy case in your junior high, or your first project in wood shop. A loon piggy bank for me, got a B-. The best I can describe the process was fast and non threatening. Brush it in and it wicks to where it should and tacks up in seconds. There wasnt even a strong odor, but I still wore the Vader respirator.
It was a good weekend and I learned a lot. The impending finishline is tantalizingly close. Patience is key now.
I'm really enjoying watching this. When I build speakers I never seem to make time to finish them other than maybe a coat of black paint - get the drivers in the box and that's it.
My ultimate question will be when the units are finished.. how do their compare to factory bought ones in both sound and price? add up the amount of time that you spent on them and try and work out how much you ended up working for?
I have learnt from my own experience in woodworking that you don't go out and make something to save money. I found that I do it either for the enjoyment of making it, or that I just cannot readily find anything that fits my needs on the market and have to custom make to get what I want.
I am curious as to why you decided to make these speakers?
Because I love doing it. I love the science of sound. I find it intensely gratifying and important to know why, how, and to execute a hypothesis to strive for exceptional results. There was a lot of thought about strategy and where to go next with my evolution. Building loudspeakers offered the most opportunity to expand my general knowledge of electro acoustics.
If I counted all the time I spent doing anything my life would become about accounting and not about living. I try to do my best, and live my best. Kind of being self aware as far as my personal growth. I makes me the best person I can be.
Agree with the amount of reading and helping others design their rooms, that you have experience with. This is the best next step.
Plus it's a hobby who cares about the time, as long as you enjoy and learn something new, that's the whole point {Gain more Knowledge} growth all around.
I have learned quite a bit reading your insights the last couple years. A major plus for us Axiom heads is having more knowledgeable forum members willing to share.
Can't wait to hear your thought's upon completion.
They are ever so close to done. Today they were put on their backs and the bottoms got sealed with shellac. Then it was soldering time. Double and triple checked all phasing. Fifteen drivers worth of screwdriver goodness. Ouch! Forearm was locking up.
Each driver was soldered carefully. So glad to have a proper soldering station now. A must for repetitive work. Saves a lot of frustration for sure.
And after all the pulsating parts were installed. Was pretty excited at this point. Bouncing around with a grin as I cleaned up.
And finally drug down to the basement lobby. Here is one standing beside the heavy DIY isolation doors we made, 3" thick. These towers are big, serious, heavy, monoliths!!
Just have to solder to the crossovers and fire them up. But not today.....
The room is blown apart and I'm starting to solder everything up. One speaker lives. No smoke came out. Good news....
So far sounds decent. There was a definite shift in the first few minutes. Sounded terrible at first startup. Strident and shreaky. Should settle down a bit more by other builders accounts.
come on where's some pics already sheesh. and yeah my experience though limited , the speakers need a bit of time and i dont want to argue with anyone else just my experience and it makes no sense.
Soldering setup at ground level. Perfect for the core muscles.
Closeup of first completed crossover. Soldering #10 stranded is a bitch. Hot hot hot.
The displaced...
From the bar stool listening row. Which btw is not a good match for the ribbon tweeters. Sitting at proper height is a must with them. My wife came in for a quick listen and did the lean forward "might fart" pose to listen. Lol.
If my posting style comes off lazy recently it's because I'm using my phone. A proper post might come this weekend if there's time to finish up and start testing/tuning. My Saturday is shot with an install. Another Atmos install for someone else.....
That reminds of a moment I had with a support person a long time ago in another company. The support person was talking to the customer on one phone and one of our software engineers on another phone trying to help the customer with an issue. After a bit of back and forth that was over her head, she simply reversed one handset and held the phones together so that the engineer could talk directly with the customer. Obviously the call did not go well and the support person did not last very long in that role. One of those, 'Really? That just happened!' moments
Back on thread track - The speakers look gorgeous, I hope they sound as good as they look after break in.
Its been baking for a few days and I tried a piece. Tasty!
The best way to describe the changes may be to compare it to the prior towers. They were Mordaunt Short Mezzo 6s. I was expecting a massive change moving to the new super towers, but all the improvements, across the board, were incremental. I haven't had time to test with multichannel content, so impressions so far are 2.0 music in 2.0 listening. I am running them full range without subs for stereo use.
The most interesting change to note is how they interact with the room. LFR owners take note. The open back midranges resulted in changing the room treatments slightly. The SBIR traps located directly behing the old towers had to be removed. With them installed the midrange energy was decreased to a point where the upoer bass was perceived as heavy. Once removed the midrange balance improved considerably. I would suspect removing all surrounding absorbtion would further improve overall balance and spaciousness at the expense of clarity. Based on this experience I would suggest NOT treating immediate areas around LFR towers with absorption. It will cause a frequency imbalance not intended by the designer's DSP/crossover network.
The overall balance of the new towers is a 7db tilt up towards the bass region roughly hinged on 250hz. The measured -3db point in room was 18hz without sub assist. These are true full range'rs. Above 250hz the response is very flat with a couple db reduction per octave above 4khz until almost 20khz. This is a marked difference from the old towers. They did not exhibit much bass energy below 40hz and rolled off sharply after 12khz. The new towers exhibit more "air" and extended decay or sustain of cymbals, strings etc. They also handle low frequencies without the aid of a subwoofer and sound extremely tight and natural when doing so -similar to applying Socketman's dsp antimode 8033 in my experience. Bass is enveloping yet does not bloom. This is an improvement for music when compared to the old towers/sub combo. There is also a stronger definition of tones within the overall bass note. Further textured bass.
I was expecting the new towers to be a "thor's hammer" experience when it comes to their presentation. Not so. They are incredibly tight and precise sounding over most of their range without being overbearing. The exception is on recordings with sustained droning bass. Peter Gabriel's "blood of eden" begins with an enveloping, but heavy and sustained bassline. It was this track that highlighted the need to remove the SBIR traps to improve the balance of midrange to upper bass energy. You have to be careful about these towers' surroundings. They dont need help to make bass. M100 owners can probably relate.
The new towers have no volume limit, at least with my amplifier. It can now play painfully loud without sounding strained. The old towers would start to exhibit a tonal shift and the soundstage would collapse when pushed really hard. These dont. I have to be mindful of this as I increase the volume to feel a bassline -which is now possible at upper bass frequencies. Fun.
The overall soundstage/spacial impression of these towers is comparable the the towers I moved from. The difference with the larger towers is images are larger, broader and have more perceived physical presence. They are slighly more tangible but never a "sound ball". The nearby QRD diffuser prevents that sort of presentation anyway.
More thoughts once I get into multichannel content. So far so good. The old towers aren't going back in.
The new towers exhibit more "air" and extended decay or sustain of cymbals, strings etc. They also handle low frequencies without the aid of a subwoofer and sound extremely tight and natural when doing so -similar to applying Socketman's dsp antimode 8033 in my experience. Bass is enveloping yet does not bloom. This is an improvement for music when compared to the old towers/sub combo. There is also a stronger definition of tones within the overall bass note. Further textured bass.
Yep, that sounds like success for sure
Any kind of "Thor's hammer" experience would be a negative IMO. Really good speakers don't sound like anything, they just get out of the way.
Spent the afternoon being lazy and watching movies. After a little bit of tweaking I found the system is elevated into uncharted territory by using the subs as well as the towers with a crossover of 60hz. The tower's strong upper bass blends very well into the subwoofers and provides plenty of tactile response. John Wick's gun blasts were each felt at the couch with more presence than I have ever been able to achieve in this room without artificially bloating the bass. The machine gun was really fun. I just ended up rewatching the whole thing. The cannon battle scene (Ch4) from Master and Commander can now be played sat reference without a hint of strain. What? I can't hear you.... What is already entirely apparent is just how capable and natural these babies sound. No strain. No sweat.
I still have to play around with dialing everything in and spiking the towers. For now I'm taking a breather to just enjoy them without analyzing them to death yet. They are pretty awesome. New toys, right! I expect once they are lifted off the carpet slightly the bass will improve further at the expense of extension. They are bottom ported with a vent cutout out of the back of the bottom base. Right now the port length may be artificially lengthened due to sitting on the carpet. They are only supposed to be tuned to 25hz and they are hitting 18hz no prob.
Here is an earlier pic showing what is sitting directly on the carpet. It will be interesting to see how raising them slightly off the carpet with spikes changes things -if at all.
Here is an earlier pic showing what is sitting directly on the carpet. It will be interesting to see how raising them slightly off the carpet with spikes changes things -if at all.
P.S. The final tower weight is over 170lbs.
Ooh, ooh, I know !!
Spike-shaped holes in your floor and zero change in sound
I've been following this thread over the past year as new posts come to my inbox. Aside from some crazy man's talk about speaker break-in, this has been quite a phenomenal thread. Serenity, you are one industrious mofo! Fantastic job not only on the basement room and speakers, but also on the quantity and quality of the posts to keep everyone updated.
The towers are aligned, spiked, levelled and spatially symmetrical in the room. Getting them off the floor definitely helped. Suprisingly how much actually. Low frequencies stop on a dime. Tightest I've heard in this room. Stellar. My wife is sick and in bed already so I cant push them hard with a film score. So far music is in the superlative realm. Wow. Spooky how real vocals are.
My takeaways from this build are a couple of things. First, you can definitely have too much speaker for a room. These are technically too much when ran full range. They cannot be positioned far enough from room boundaries to satisfy both reducing bass output and ideal spatial position. They need to be crossed over to the subs in order to maintain balance over all frequencies at all volumes. By themselves they run away with bass when pushed to higher levels when boundary gain compounds.
2nd, having too much speaker in a small room allows you to load the room with almost no distortion. In this case, having dual 8" drivers per tower, and 12" subs creates a pseudo 4 way passive/active setup. The result is fantastic. There is a huge improvement from 6 1/2" drivers with tweeters to a true 3 way tower with subs. These towers dummy the old setup now their dialed in. Ribbon tweeters are definitely amazing.
3rd, its fun to have unlimited power. Dynamic songs and soundtracks have legit startle factor. The sudden loud rock guitar strum in Dire Straits "private investigations" made me jump. Literally, I flinched. It would be neat to find music with over 20db of dynamic range.
Its early to say, but once these are paired with the right film score.... they may be dreadful. Awesome.
This was a fun project. Best sound I have heard in this room yet. Hope you had fun following.
"When you build or create something in a logical way, choosing the best parts and making the best choices, logically its invariably perceived as the best you've experienced."
I cant remember the exact wording. But all makers suffer a little of it I think.
I found a few new ATMOS titles crackle when I send the audio via hdmi bitstream to my AVR. When LPCM is sent the crackle is gone. This means the AVR is not able to properly downmix or unpack some new ATMOS titles.
It sucks ATMOS is not fully backward compatable as promised, but time marches on. A new AVR is on the horizon I guess.
I have been doing some testing with a denon 3300 I recently installed in a setup. I might go back to mainstream AVRs, maybe a 6300/7400. Not sure I like the idea after having an Arcam. The new Arcam AVR supporting immersive audio is ridiculously overpriced.
In other news the completed towers are doing great. A wide dispersion setup like these are making me rethink my setup. Changes on the horizon.
I found a few new ATMOS titles crackle when I send the audio via hdmi bitstream to my AVR. When LPCM is sent the crackle is gone. This means the AVR is not able to properly downmix or unpack some new ATMOS titles.
It sucks ATMOS is not fully backward compatable as promised, but time marches on. A new AVR is on the horizon I guess.
I was also hurt when I found out that ATMOS is not fully backward compatable. But that's the way life is.
Not sure what isn't backwards compatible. Every Atmos track contains a Dolby True-HD (also capable with Dolby Digital 5.1) core track that plays if you don't have Atmos capable gear. If it playing with crackles in it, then it is a setup or gear problem. Maybe there is a firmware upgrade that solves the issue.
Glad you are still around. This should probably be my last post in this thread.
I'm not really in forum activity anymore. You are right, a software update may solve the issue. Unfortunately, my AVR is pretty tired and Arcam are not supporting it anymore in terms of new firmware.
Luckily the OPPO 103 will transcode to PCM properly (so far) so it is a viable workaround.
In the last couple of years I have left the consumer realm and have gone professional. I now co-own a firm that does custom installs and design consulting. Its tough going but rewarding.
Lots of math, drafting and hard work in the shop. I just don't pursue audio the same way I used to. Cheers all! Thanks for reading the thread. Hope you enjoyed the ride.
Glad you are still around. This should probably be my last post in this thread.
I'm not really in forum activity anymore. You are right, a software update may solve the issue. Unfortunately, my AVR is pretty tired and Arcam are not supporting it anymore in terms of new firmware.
Luckily the OPPO 103 will transcode to PCM properly (so far) so it is a viable workaround.
In the last couple of years I have left the consumer realm and have gone professional. I now read phenq reviews at skinnvibes co-own a firm that does custom installs and design consulting. Its tough going but rewarding.
Lots of math, drafting and hard work in the shop. I just don't pursue audio the same way I used to. Cheers all! Thanks for reading the thread. Hope you enjoyed the ride.
How know thou that Statement IIs will give thee the macro and micro dynamics thou seeks?
Dunno, but SerenityNow seems to knoweth more than I about these things...
Hmm... so Statement II's are DIY speakers with 2x8", 2x4" and a ribbon. Initial impression from looking at the drivers is that it probably sounds really good but isn't what you want if you're looking for dynamics.
Bottom line is that you need surface area -- 12" or 15" woofers or equivalent in smaller drivers. Two 8" drivers (roughly equivalent to three 6.5") could probably handle it if they were designed for high power but my impression is that the Dayton woofers are not. I could be wrong though...
Yet another edit - wow, 142 guests and one registered user. C'mon folks, it's a nice place here, sign up and start posting
Thanks for the information that you have provided me on this topic because it has really helped me a lot. My problem has been solved so very thanks to you.