The store will not work correctly in the case when cookies are disabled.
This website requires cookies to provide all of its features. For more information on what data is contained in the cookies, please see our Privacy Policy page. To accept cookies from this site, please click the Allow button below.
We use cookies to make your experience better.Learn more.
A Few Considerations When You Install Surround Speakers
A Few Considerations When You Install Surround Speakers
Surround sound is everywhere: once only available for movies and concert DVDs, it's now being broadcast nightly on our favorite TV shows. If you've been resisting switching to 5- or 7.1-channel surround sound because you didn't know how you were going to fit the speakers into your room, take heart: it's easier than ever to get the right sound right where you want it. Here's a step-by-step guide to follow when you install surround speakers in your home.
Aim for Optimal Positioning First
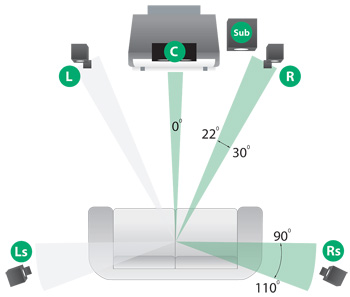
As you can see from the picture to the right, Dolby Labs recommends placing surround speakers to the left and right of the sitting area, above ear level about 2 feet or more, and somewhere between 90 and 110° from the center.
So what do you do if there are no walls in that area, or if that height isn't going to work for you? Don't worry: Axiom's unique driver arrangement means that you're going to get great surround effects even if things aren't ideally placed.
If it suits your room better, consider using stands for placement. The QSS Surround Stand, for example, is 38 inches high, placing the speakers above ear level when you are sitting on your couch.
Some rooms have different challenges: for example, your home theater might be half of an open-concept finished basement, as a lot of our customers' are. In that case, you may want to mount the speakers from the ceiling so that they are still in the main listening area, rather than on a wall far away from the center of the action.
The only place you can't place Axiom surround speakers? In a shelving unit or bookcase. Because there is a driver on the bottom of the speaker, it can't sit on a shelf the way a traditional bookshelf speaker does. We've had innovative customers come up with mini-stands to elevate the quadpolar speaker in a bookcase; if you'd like to try that route just be sure to get between 1.5 and 2 inches of clearance between the speaker and the surface beneath it.
As you can see in the video to the right, there are a lot of mounting options with Axiom's speakers. The easiest (and most innovative!) if you are wall-mounting is to use the included Power Mount bracket. Unique to Axiom, we engineered this bracket to get around the problem of banana plugs forcing the speaker to jut out from the wall.
To use the Power Mount bracket, simply carefully remove it from the speaker, attach it the wires coming from your receiver, and then mount it to the wall. TheQS8, QS4, or on-wall speaker model simply slides into the two gold-colored hooks on the back of the speaker and makes the electrical connection.
The QSS Surround Speaker Stand also includes accommodation for using the Power Mount on it.
The next option is the hex-bolt at the back of the speaker. This will accept our Full Metal Bracket or our Full Metal Ceiling Bracket, or a variety of other after-market speaker mounts. If you choose to install surround speakers in a position where you need to angle them or hang them from the ceiling, these are the best options.
Using either of the brackets is easy. Simply use the supplied Allen key to attach the speaker mount to the speaker. Next, using a stud locator (or the knock test if you prefer), screw the body of the bracket into the stud or ceiling joist. Use the provided 1 3/4" screws to ensure a secure connection. Once that is in place, reattach the pivot portion of the speaker bracket using the hex bolt and nut.
The brackets also come with a small wedge. This wedge is for making precise vertical angle adjustments once the speaker has been installed.
Making the Connection
There are a couple of options when you choose the cables for your speakers. If you are installing surround speakers on outside walls, you may have a challenge fishing the wire through the tightly-packed insulation. In that case, Flat Speaker Wire can come to your rescue. The wire is flat and spreads the wires along the surface of the wall instead of in a tube, so you can lay it flat and then paint or plaster over it. You can also run it under carpets and baseboards, since it is just 0.024-inch / .60 mm thick. Just be sure not to drive a nail through it, breaking the connection!
If you're running wire inside walls to a central location, you need to look for speaker wire that is in-wall rated. This rating means that it is properly insulated against fire risks, and it can safely be run from the back of your surround speakers through the wall to the floor or ceiling and out to the amplifier. Insurance companies prefer you use this sort of wire.
And finally, if you're using stands or you're not concerned about wires showing, the least expensive and most commonly-found wire option is regular bulk speaker wire. If you're choosing your wire from a large selection in a store, just ensure that you are getting 99.9999% oxygen-free copper wire.
if your speaker wire run is less than 25 feet, a 14-gauge wire is fine
for runs less than 15 feet, you can use 16-gauge or lower
if you're running wire 25 feet or further, you need to use 12-gauge cable for the least resistance on the line.
(For an explanation of why that matters, and why you don't need to spend more on cables than you do groceries, read our article entitled "What's in A Cable?" If you still want to buy expensive cables after reading it, you'll know you're doing it because you want to and not because some salesman told you you have to, and that's all we ask!)
There you have it: a comprehensive look at what you need to think about when you install surround speakers. Have you got any innovative installation ideas or helpful suggestions? Post them in the comments below!