The store will not work correctly in the case when cookies are disabled.
This website requires cookies to provide all of its features. For more information on what data is contained in the cookies, please see our Privacy Policy page. To accept cookies from this site, please click the Allow button below.
We use cookies to make your experience better.Learn more.
Andrew Welker: In this video we're going to discuss positioning our LFR1100 omnidirectional speakers - both placement and how to wire them up; in particular, some of the settings on the DSP unit.
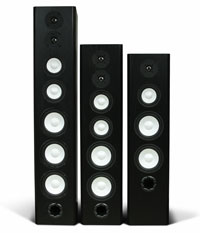
As many of you know the LFR1100 is omnidirectional, and that just means it radiates sound in 360 degrees - in all directions. To achieve that, there is a complement of drive units - two midranges and two tweeters - on the back. Because of that, the relative placement of the LFR1100 to the back wall, and the angle at which you've got it to the back wall, influences the soundstage, and the way that the sound is going to blend at the listening position.
So one of the things that we recommend - if at all possible - is to allow a couple of feet from the rear of the speaker to the back wall. In this setup here, it's about 2 feet. If however you need to get the speaker closer than that, there is a boundary compensation switch on the back of the unit.
Now, there's no hard-and fast rule of exactly when that switch needs to be used. You've just got to experiment and listen: is the sound big and full, or when you move the speakers back in position, does the soundstage collapse and sound more like a conventional loudspeaker? You want it to sound big and open and spacious.
Another thing to note: even though the back of the speaker is angled so that you don't have to angle the speaker towards the listening position much, I find that in most situations that actually toeing the speaker in towards and aiming it towards the listening position a little bit helps to get that reflected information out from behind the speaker to give you that enveloping soundstage.
If you have one of the latest LFR models, the 880 or the smaller 660, neither of those have the angled back. In that case, toe-in is extremely important, because if the speakers are just pointing straight, then the reflection from behind it won't escape and will just bounce around behind it. So make sure that you toe the speakers in towards the listening position to get a nice seamless soundstage.
Ian Colquhoun: In follow up to Andrew's discussion of the placement of the speaker in a room for an LFR1100 or 660 or 880, I thought I'd get into a bit about how the electronics work.
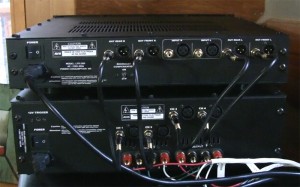
For these three models, the LFR series, the rear channel is separated from the front channel by this digital signal processor, so it requires four channels of amplification to drive one pair of loudspeakers. What I've got here is the DSP box sitting on top of an ADA 1500 amplifier. This particular DSP is the top-of-line pre-amp model of DSP (there is now going to be four models) and here you have either XLR or RCA inputs, a set of left channel front and rear output (either XLR or RCA) and the right side over here, into the four-channel ADA 1500 amplifier, and there are two sets of speaker wires going to each speaker: one for the front and one for the rear. Here is where you would see your input from your pre-amplifier.
ADA 1500 Amplifier and DSP Unit
For other models of this digital signal processor, there are no XLR connectors, but you now have a choice between an either an RCA input or a high-level input. So if you're using a processor that does not have pre-amplifier outputs, you're still able to run any of the processors in the LFR series. You would simply take your speaker wires from the receiver for the front right and left and go into the high level (or if you do have pre-outs go in to the RCA and then out of the RCAs into the amplifier - either an ADA 1250 or ADA 1500). And then the four channels come out to the two speakers.
Then there's another model which combines our ADA 1000 amplifier with the DSP. So in that particular case, you would come in from your into the receiver either using line-level pre-outs or the speaker outputs for right and left channel, directly into the one unit. It has the amplifier in it and four channels of amplification coming out. So it's a convenient all-in-one unit.
In the fourth model, it works similarly except that it also contains a preamp. So now there are three selectable input sources and four channels of amplification out. And there's a volume, balance control, and input selector on the front. So now all you need to do is hook any source to the DSP/Amp combination, go right to the speakers, and you're done.
So I hope that helps explain how this works: it seems a little complicated at first but it's simply taking two channels in and separating it into four channels so that we have a front-rear, front-rear for each speaker.
Lastly I think I should just mention the Boundary switch. Andrew mentioned it in his discussion. It's located here and it's on four models. It's Boundary Compensation "on" and "off" and if you are getting close to the wall in your set up you should turn it on. But there's nothing wrong with experimenting no matter where your speakers are located, don't forget - try it on and off to see what works best in your room set up.

 ADA 1500 Amplifier and DSP Unit